RV Sewer Smell After Driving? Common Causes & Fixes
Last updated: February 2026
If your RV smells like sewer after driving, you’re dealing with odor pathways that opened up during travel—not just a dirty tank. This guide walks you through every common cause of RV sewer smell after driving and shows you exactly how to diagnose and fix it.
Quick Answer / Quick Start
The fast path to fixing post-drive RV sewer smell:
- Check your P-traps first. Driving sloshes water out of sink, shower, and floor drain traps. Refill every trap the moment you park.
- Inspect the toilet bowl seal. If there’s no standing water in the bowl, odor has a direct path into the cabin.
- Look under sinks for a failed air admittance valve (AAV). A stuck or worn AAV lets sewer gas burst through on pressure changes.
- Confirm roof vent airflow. A blocked or poorly capped vent traps gas inside the system instead of releasing it above the roofline.
- Rule out pressure-driven backflow. Driving creates negative cabin pressure that can pull odors past weak seals and into living spaces.
- Check for unsealed roof penetrations near your AC return. This is an overlooked pathway that pulls attic-space odors into the HVAC system.
- Decision rule: If the smell appears only after towing or driving and fades after you’ve been parked a while, prioritize pathway and pressure checks before changing your tank treatment.
⚠️ Safety first: If the odor resembles propane, exhaust fumes, or has a sharp chemical character, treat it as urgent. Do not continue driving until you’ve ruled out a gas leak, exhaust intrusion, or electrical issue.
What Kind of Smell Are You Dealing With?
Before you start pulling apart plumbing, take a moment to identify what you’re actually smelling. Different odors point to completely different systems, and applying the wrong fix wastes time.
Quick-match odor table (sewer vs sulfur vs musty vs exhaust vs chemical)
| Odor Type | What It Smells Like | Most Likely System | First Action |
|---|---|---|---|
| Sewer gas | Rotten, sewage-like | Black/gray tanks, plumbing traps, vent system | Check P-traps and toilet seal → “Fixes by Cause” |
| Sulfur / rotten egg | Sharp, eggy | Tank biology, anode rod (water heater), or propane leak | Rule out propane first → then check tank treatment → “Safety First” |
| Musty / mold | Damp, earthy, stale | Moisture trapped in walls, HVAC ducts, soft furnishings | Check for moisture sources → “Ongoing Maintenance” |
| Exhaust | Fuel, engine-like | Engine/generator exhaust intrusion (motorhomes) | Stop driving, ventilate, inspect exhaust path → “Safety First” |
| Chemical / off-gassing | Plastic, glue, “new RV” | New materials, adhesives, sealants | Ventilate thoroughly; usually fades over time |
Each odor category routes to a different section of this guide. Sewer gas and sulfur smells are the most common post-drive complaints, so the bulk of what follows focuses there—but don’t skip the safety triage section if anything smells like propane or exhaust.
Why Driving Makes RV Odors Worse (The Physics)
Your RV can sit at camp for days smelling perfectly fine, then reek within an hour of highway driving. That’s not a coincidence. Motion, speed, and vibration change the physics inside your rig in ways that create new odor entry points.
P-trap water loss (sloshing/evaporation)
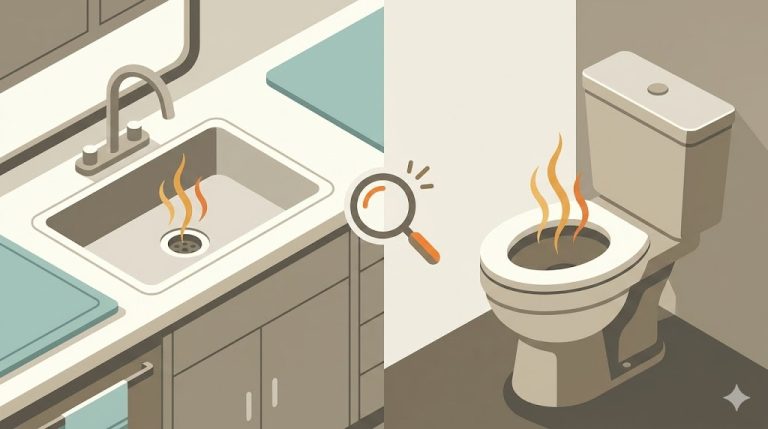
Every sink, shower, and floor drain in your RV has a P-trap—a U-shaped bend in the pipe that holds a small amount of water. That water acts as a vapor barrier, blocking sewer gas from rising through the drain and into your living space.
The problem is that driving sloshes that water around. Acceleration, braking, cornering, and road vibration can gradually reduce the water level in those traps. In some cases, the trap empties entirely, and you’ve now got an open channel from the tank straight to your nose. Evaporation during storage or hot weather compounds the issue.
Venturi effect + negative cabin pressure
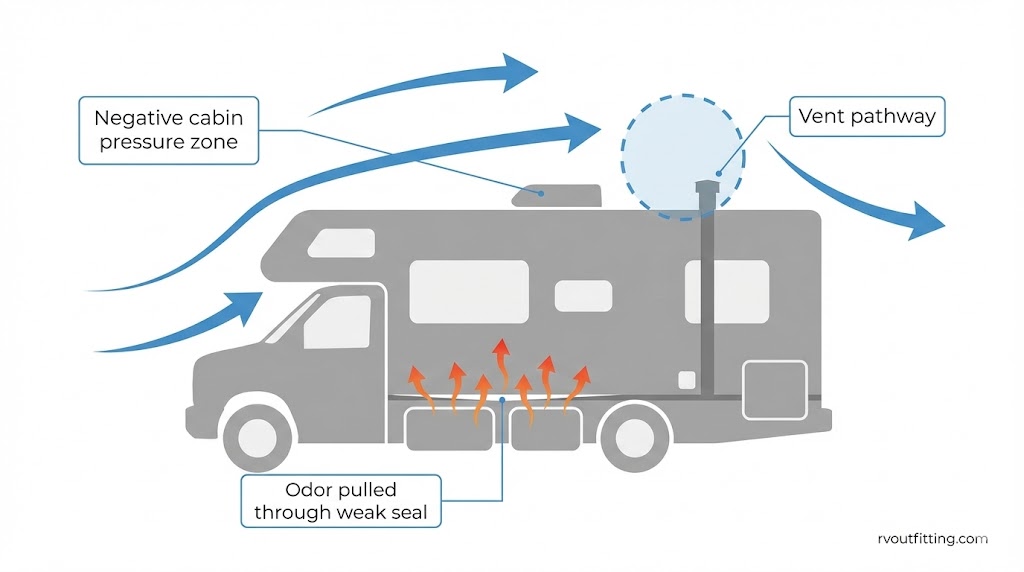
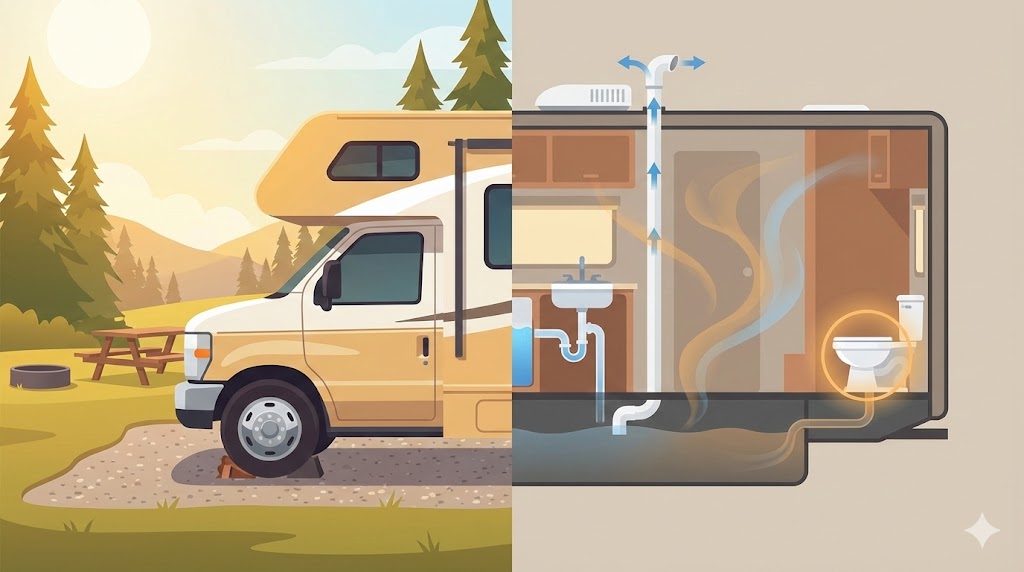
When your RV moves at highway speed, air flowing over and around the vehicle creates pressure differences. The Venturi effect describes how faster-moving air creates lower pressure—and that low-pressure zone can form right around your roof vents, plumbing exits, or any exterior opening.
At the same time, the cabin can develop negative pressure relative to the areas beneath the rig (where tanks and plumbing live). The result: odors get pulled upward and inward through any weak seal, valve, or gap. Think of it as the RV literally sucking sewer gas into the living space through the path of least resistance.
Vibration loosening seals and mounts
Miles of road vibration can work fasteners loose, compress gaskets, and shift mounts just enough to create gaps. The toilet floor seal is one of the most commonly reported failure points—vibration can break the wax or foam seal between the toilet base and the flange, giving sewer gas a direct route into the bathroom.
Other joints, fittings, and under-sink connections can suffer the same fate. These gaps might be tiny, but sewer gas doesn’t need much space.
Tank warming + “odor rebound” from residue films
Even after you dump your tanks, a thin film of residue often remains on the tank walls. When the RV sits in the sun or drives on a hot day, the tank warms up. That warmth accelerates bacterial activity in the residue film, producing a burst of odor gas—even though the tank reads “empty.”
This “odor rebound” catches a lot of people off guard. You dumped, you flushed, and it still smells. The residue film is the reason, and it’s why a simple dump-and-go routine doesn’t always solve persistent odor problems.
HVAC/AC return pathway (attic/roof penetrations)
This one is often missed. Many RVs have unsealed or poorly sealed roof penetrations—around the AC unit, antenna mounts, vent pipes, or other hardware. The space between the roof and the ceiling (sometimes called the “attic” area) can collect odors from the vent system or tank gases that escape near the roofline.
When the AC runs, the return air pathway can pull those odors from the attic space directly into your living area through the ceiling vents. You’ll notice it as a smell coming from the AC or ceiling rather than from any drain or toilet—and that throws off the diagnosis because it doesn’t seem like a plumbing problem.
The Driving Odor Diagnosis Checklist (Sniff Test Workflow)
Guessing leads to wasted money on products that don’t fix the actual problem. A systematic sniff test takes only a few minutes and routes you to the right fix.
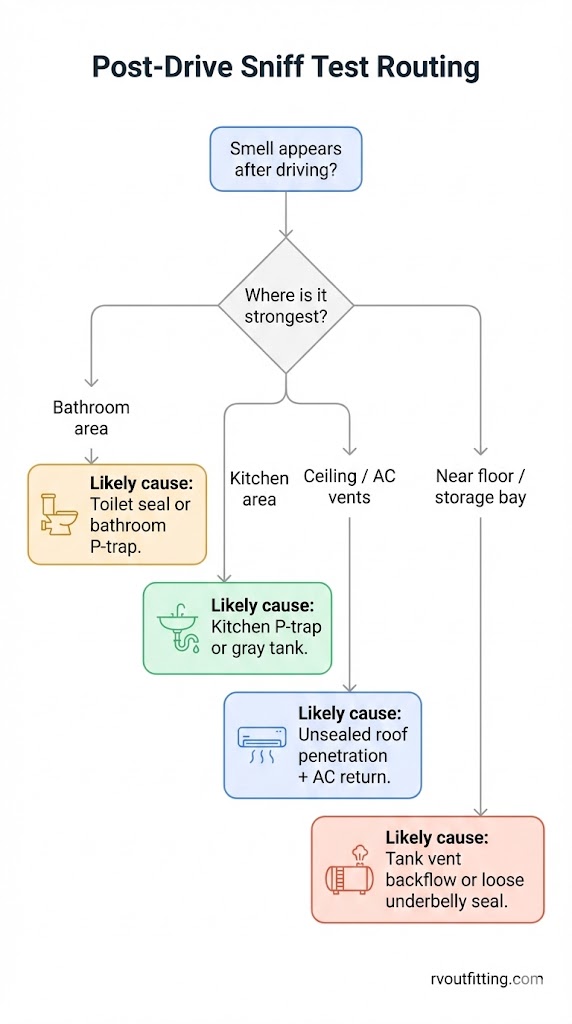
Start conditions (when to test)
Run this test immediately after arriving at your destination—within the first few minutes of parking. Odors from driving-related causes (especially dried P-traps and pressure-driven backflow) tend to be strongest right after travel and can fade as things re-equalize.
Walk through the RV and note where the smell is strongest. Is it concentrated in the bathroom? The kitchen? Coming from ceiling vents or the AC? Near the floor or a storage bay? Location is your most important diagnostic clue.
Fast routing steps (do this in order)
Work through these checks in sequence:
- Toilet bowl water + seal: Look in the bowl. Is there standing water? Press down on the toilet base and check for any rocking or movement. If the bowl is dry or the base moves, you’ve likely found your problem.
- Sink and shower drains: Run a small amount of water into every sink and the shower. If the smell noticeably decreases near a particular drain after running water, that trap was dry.
- Under-sink AAV/ASTVD area: Open the cabinet under each sink and sniff directly near the air admittance valve (a small plastic device on the drain pipe). Strong odor bursts here point to a failed valve.
- Roof vent function: From inside, check whether the roof vent opens freely and whether you notice any odor change when you open or close it. Blockages or stuck caps change how the system vents.
- AC return / ceiling area: Turn off the AC and sniff near the ceiling return. If the smell is concentrated there rather than at any fixture, you’re dealing with an attic/roof penetration pathway.
Record what changed
Before you start fixing, note the pattern:
- Does the smell appear only while moving, or does it persist when parked?
- Does hot weather make it worse?
- Did the smell appear after the RV sat in storage?
“Only while moving” patterns point strongly to pressure and vibration causes. “Hot day makes it worse” patterns suggest tank residue and biology. “Post-storage smell” routes you toward moisture, mold, and evaporated traps.
Immediate Fixes When You Arrive at Camp
You’ve just pulled in and the smell is there. Here’s what to do right now to get relief before diving into deeper diagnosis.
Re-establish vapor barriers
The single fastest thing you can do is restore the water seals that driving may have disrupted:
- Run water into every sink drain, the shower drain, and any floor drains for about 15–30 seconds each. This refills the P-traps.
- Flush the toilet and confirm water stays in the bowl after the valve closes. If water drains away on its own, the toilet seal needs attention.
- If your RV has been in storage, fill traps in fixtures you haven’t used recently—those are almost certainly dry.
Reduce pressure-driven backflow
If you’ve been driving with every window sealed and the AC or furnace running, the cabin pressure dynamics may be working against you:
- Open a window or roof vent on the opposite end of the RV from where the smell is strongest. This helps equalize cabin pressure and can reduce the “pulling” effect on sewer gas.
- If your roof vent fan has a reversible direction, experiment with which setting reduces the odor.
Quick seal checks
Do a fast visual and touch inspection:
- Check around the toilet base for any visible gap, rocking, or dampness.
- Look under sinks for loose fittings, disconnected pipes, or a displaced AAV.
- Feel around plumbing access panels for warm air or odor drafts that would indicate a broken seal.
These quick checks often reveal the cause without any tools or disassembly.
Fixes by Cause (Symptom → Likely Cause → First Fix)
Now that you’ve narrowed down the source, here’s how to address each specific cause. But first—understanding whether you’re dealing with a tank problem or a pathway problem changes your entire approach.
| Tank Residue Odor | Vent/Pathway Odor | |
|---|---|---|
| When it shows up | After warming (sun, driving), persists after dump | During or immediately after driving, fades when parked |
| What it smells like | Strong sewage, biological | Sewer gas bursts, may be intermittent |
| Where it’s strongest | Near tank area, bathroom broadly | Specific fixture, under sink, or ceiling vent |
| Best first fix | Deep tank flush + enzyme treatment | Seal repair, trap refill, or vent upgrade |
Dried/sloshed P-traps
What confirms it: The odor is strongest near a specific drain (sink, shower, or floor). Running water into that drain for 15–30 seconds noticeably reduces or eliminates the smell.
Failed AAV/ASTVD under sinks
What confirms it: The smell is concentrated inside the cabinet under a sink, particularly near the air admittance valve (AAV) or auto-siphon trap vent device (ASTVD). You may notice odor “bursts” when opening the cabinet.
First fix: AAVs are designed to let air in but not let gas out. When they fail, they do both—or neither. Inspect the valve for visible damage, sticking, or debris. Replacement AAVs are inexpensive and straightforward to swap. After replacing, monitor for a few days to confirm the odor is gone. If the problem returns, verify the valve is correctly rated for your plumbing configuration.
 image seo file name: rv-p-trap-aav-odor-pathway-diagram.png Image ALT: Diagram showing how a P-trap and air admittance valve block sewer gas in RV plumbing Caption: Your odor barrier is a system: trap + valve + seals. Canva prompt: Simple labeled line diagram of a sink drain with a P-trap and an AAV under the sink. Use arrows showing “air in” vs “gas blocked” and a separate callout showing what happens when the trap loses water. Flat vector style.
Toilet seal gap / vibration-related failure
What confirms it: The odor is concentrated in the bathroom, strongest near the toilet base. The toilet may rock slightly, or you can see or feel a gap between the base and the floor. The bowl may not hold water properly.
First fix: Tighten the mounting hardware first—sometimes vibration has simply loosened the bolts. If tightening doesn’t resolve it, remove the toilet and inspect the flange seal. Replace the seal (wax ring, foam gasket, or manufacturer-specific seal depending on your toilet type) and re-mount securely. If the toilet base itself is cracked or warped, replacement is more likely than adjustment.
Clogged/ineffective roof vent or cap
What confirms it: Odor behavior changes noticeably with airflow conditions—worse when driving (wind over the vent), better when parked in still air, or the smell intensifies when you open/close the roof vent. You may also notice slow tank drainage.
First fix: Inspect the roof vent pipe from above for visible blockages (nests, debris, ice in cold weather). Check the vent cap condition—cracked, missing, or poorly designed caps can allow rain intrusion while failing to create the airflow dynamics needed to pull gases up and out. Clear any obstruction and evaluate whether the cap style is appropriate. Siphon-style or rotating caps are designed to use wind to actively pull air through the vent stack.
Unsealed roof penetrations + AC return pulling odors
What confirms it: The smell comes from ceiling vents or the AC return area rather than from any fixture or drain. It may be worse when the AC is running. Turning the AC off and opening windows may reduce it.
First fix: Inspect the roof around the AC unit, antenna mounts, and vent pipe boots for gaps, cracked sealant, or missing weatherstripping. The goal is to seal the space between the roof skin and the interior ceiling so that the AC return cannot draw air from that cavity. Use a sealant appropriate for RV roofing material (the type depends on whether your roof is rubber, fiberglass, or aluminum—check your manufacturer’s recommendations). Pay special attention to where the AC unit meets the roof opening.
Gray tank odor (yes, it can be strong)
What confirms it: The smell is strongest near the kitchen sink or other gray water sources. It may have a sour, grease, or soap-scum character rather than the sharper sewage smell associated with the black tank.
First fix: Gray tanks accumulate food particles, grease, soap residue, and biofilm that can produce surprisingly strong odors. Flush the gray tank thoroughly and adopt habits that reduce buildup: use drain screens to catch food particles, avoid dumping grease down the sink, and periodically treat the gray tank the same way you’d treat the black tank. Avoid products that claim to “deodorize” but actually just mask the smell without addressing the biological source.
“Smells bad even after dumping” (odor rebound / residue)
What confirms it: You dump and flush, the smell goes away briefly, then returns—especially on warm days or after driving. The tank level sensor may read empty.
First fix: This is the residue film problem. A standard dump doesn’t remove the biofilm clinging to tank walls. Consider a thorough tank rinse using your built-in tank flush system (if equipped) or an external flush wand. Run multiple fill-and-dump cycles. If the problem persists after aggressive rinsing, a “total tank reset”—a deep soak with an appropriate enzyme-based treatment followed by thorough flushing—may be warranted. Going forward, consistent use of a bacteria-based tank treatment helps prevent the film from rebuilding.
Best Products to Eliminate RV Odors After Driving
Choosing the right product depends on whether your problem is the source (what’s in the tank) or the pathway (how gas reaches you). Using the wrong category of product means you’re either masking a plumbing problem or treating a tank that isn’t the issue.
Tank treatments (aerobic vs anaerobic logic)
Tank treatments fall into two broad categories based on how they work biologically. Aerobic treatments use bacteria that thrive in oxygenated environments to break down waste and reduce odor-producing gases. Anaerobic approaches work in low-oxygen conditions.
The key principle: treatments that introduce beneficial bacteria to break down waste are generally more effective and sustainable than chemical deodorizers that simply overpower the smell. Many experienced RVers have moved toward enzyme and bacteria-based treatments for this reason.
⚠️ Avoid counterproductive products. Some harsh cleaning chemicals, bleach-based treatments, and formaldehyde-containing deodorizers can actually kill the beneficial bacteria that control odor in your tanks. This creates a cycle where you need more product to cover the smell that the product itself is making worse.
Vent/pathway upgrades
If your diagnosis points to pressure-driven odor entry rather than a tank problem, pathway upgrades address the actual cause:
- Siphon-style vent caps replace the standard mushroom cap on your roof vent pipe. They use wind passing over the cap to create suction that actively pulls gases up and out of the tank vent. This directly counteracts the Venturi effect and negative pressure issues that worsen during driving.
- Powered vent fans mount in the vent stack and continuously or intermittently pull air through the system. Some solar-powered options avoid the need for wiring.
Waterless P-trap / valve upgrades for motion environments
Standard water-filled P-traps have an inherent weakness in a moving vehicle: the water moves too. Waterless trap devices and one-way valve inserts are specifically designed for this problem. They create a vapor barrier that doesn’t rely on a water seal, so driving, sloshing, and evaporation can’t defeat them.
These are particularly worth considering for drains that repeatedly lose their water seal despite refilling—shower drains and seldom-used floor drains are common candidates.
Odor eliminators (professional-grade category)
Spray and gel odor eliminators have a role, but it’s a limited one. They’re useful for neutralizing residual odor in fabrics, carpets, and enclosed spaces after you’ve fixed the actual source. They are not a substitute for fixing the pathway or treating the tank.
Rule of thumb: If you’re using an odor eliminator more than once and the smell keeps coming back, you haven’t fixed the source. Go back to the diagnosis checklist.
Permanent Upgrades That Prevent Driving Odors
If you’re tired of chasing the same smells after every trip, these upgrades address the root driving-related mechanisms.
Stop pressure-driven vent backflow
Replacing a standard vent cap with a siphon-style or 360-degree rotating cap is one of the most impactful single upgrades for post-drive odor. These caps use the same wind that causes the Venturi problem to instead create positive venting action. When the RV moves, air flowing across the cap pulls gas up and out rather than pushing it back down.
Stop slosh-related trap failure
For drains that consistently lose their water seal during travel, installing a waterless trap device or a one-way drain valve eliminates the problem permanently. The shower drain and any low-use floor drain are the highest-priority locations. These devices require minimal modification and pay for themselves in avoided frustration.
Add venting assistance without wiring complexity
Solar-powered vent fans are an emerging category that adds active venting to your tank system without running new wiring. They mount at the roof vent location and use a small solar panel to run a fan that continuously pulls air through the vent stack. This keeps positive airflow moving through the system during both driving and camping.
Seal the “attic/roof penetration” pathway
If your diagnosis confirmed that odors are entering through the AC return or ceiling area, a permanent fix means sealing every penetration between the roof surface and the interior ceiling cavity. Focus on the perimeter of the AC unit, any antenna or satellite mounts, vent pipe boots, and anywhere sealant has cracked or pulled away. This is a one-time job that eliminates an entire odor pathway.
Pre-Trip Odor Prevention Checklist
Run through this before every trip to minimize the chance of arriving at camp with a sewer smell problem.
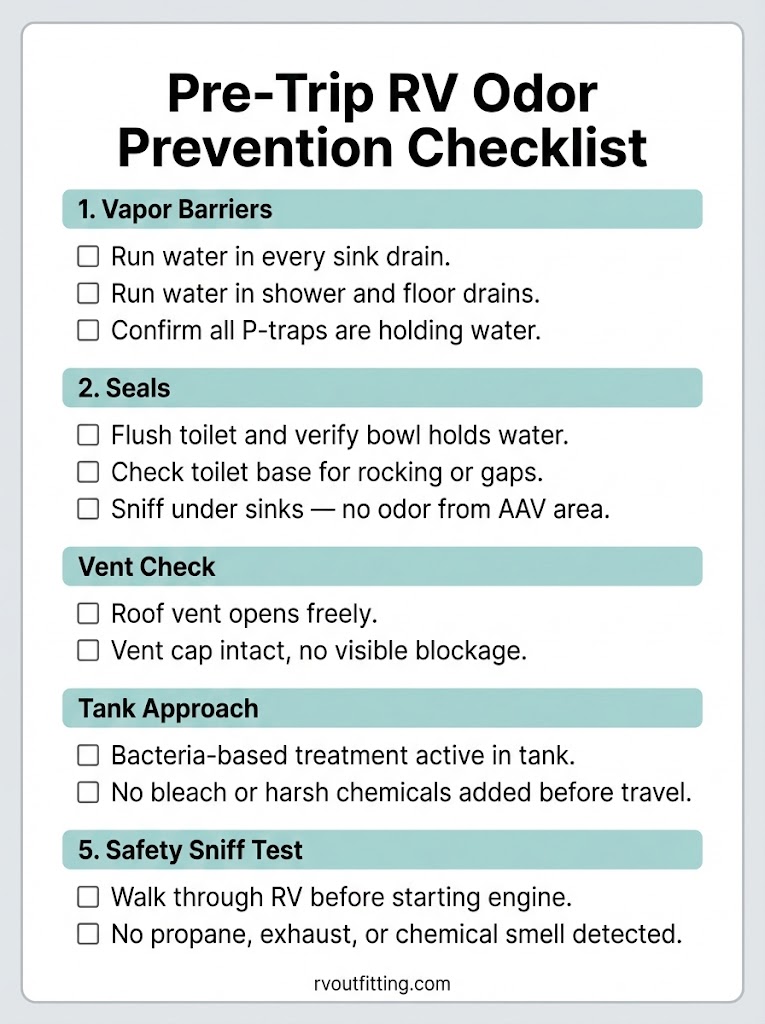
Before you roll
Pre-trip odor prevention checklist:
- ☐ P-traps filled: Run water in every sink, shower, and floor drain to ensure traps are full and holding.
- ☐ Toilet seal confirmed: Flush and verify water stays in the bowl. Check for base movement.
- ☐ Roof vent clear: Confirm the vent opens freely and the cap is intact with no visible blockage.
- ☐ Tank treatment aligned: If you use a bacteria-based treatment, confirm it’s active in the tank. Avoid dumping bleach or harsh chemicals that would kill beneficial bacteria right before travel.
- ☐ AAV check: Quick sniff under sinks—no odor should be present.
- ☐ Safety sniff: Before starting the engine, do a quick walk-through. Any propane, exhaust, or chemical smell should be investigated before you drive.
Driving habits that reduce negative pressure issues
There’s genuine debate among RVers about the best window and vent configuration while driving. Some prefer cracking a window to equalize pressure; others keep everything sealed for climate control. The underlying principle is pressure management—you want to avoid creating strong negative pressure inside the cabin relative to the plumbing spaces below.
If you consistently notice smells worsen during driving with everything sealed, experiment with cracking a roof vent or window slightly. This is one area where there isn’t a universal answer, because every RV’s aerodynamics and seal condition are different. Pay attention to what works for your specific rig.
Ongoing Maintenance to Stay Odor-Free
Prevention beats diagnosis every time. These routines keep odors from building up between trips.
Tank care routines
Regular tank maintenance prevents the residue film buildup that causes odor rebound:
- Flush tanks thoroughly at every dump, not just a quick pull-and-go. If your RV has a built-in tank rinse, use it until the water runs clear.
- Maintain a bacteria-based tank treatment consistently. These treatments work best when they have time to colonize and break down waste between trips.
- Avoid harsh chemicals, bleach, and antibacterial cleaners in your drains. What kills germs in your sink also kills the beneficial bacteria in your tank.
When it comes to keeping your RV freshwater system clean, regular sanitization on the fresh side prevents cross-contamination smells as well.
Moisture control to prevent musty/mold smells
Musty smells after driving often have nothing to do with the sewer system—they’re moisture-related. RVs are prone to condensation, especially when temperature swings are common.
- Use a dehumidifier or desiccant products in the RV, especially during storage or in humid climates.
- Keep air moving: crack vents or use fans when the RV is closed up.
- Address any water intrusion promptly. A small leak around a window or roof seam can create mold behind walls that’s difficult to find and unpleasant to smell.
Maintaining good year-round climate control habits goes a long way toward preventing moisture-driven odors.
Seasonal/usage scenarios
Hot weather: Heat amplifies every odor source. Tanks warm faster, residue films produce more gas, and any seal weakness becomes more noticeable. In summer, be more aggressive with tank treatments, flush more often, and run through the pre-trip checklist with extra attention.
Post-storage: If your RV has been sitting for weeks or months, expect dry P-traps, possible mold or mildew in enclosed spaces, and stale air throughout. Fill every trap, run the water system, open all vents, and do a full walkthrough before your first drive of the season.
What NOT to Do
🚫 Mistakes that keep RV sewer odors coming back:
- Don’t just mask it. Spraying air freshener or pouring deodorizer without diagnosing the pathway means the smell will return as soon as the product wears off.
- Don’t use bleach or harsh chemicals in your tanks. These kill the beneficial bacteria that actually control odor. You end up needing more product to cover the smell that you created.
- Don’t leave the black tank valve open on hookups. This creates the “poop pyramid” problem—dried solids, persistent odor, and a tank that’s much harder to clean.
- Don’t ignore the gray tank. It can smell just as bad as the black tank and is often the overlooked source.
- Don’t assume the tank is the problem. If the smell appeared after driving, the pathway (seals, traps, vents, pressure) is often more important than what’s in the tank.
- Don’t skip the safety check. Propane and exhaust smells can mimic sewer gas. Treating a propane leak as a plumbing problem is dangerous.
Safety First: When the Smell Isn’t Sewer
Not every bad smell in an RV is sewer gas, and some of the alternatives are genuinely dangerous. Take these seriously.
Propane vs sulfur confusion
Propane is odorized with mercaptan, which gives it a sulfur or rotten-egg smell. This can be confused with the sulfur smell from tank biology (hydrogen sulfide gas). The critical difference: if there’s any chance the smell is propane, treat it as a propane leak until proven otherwise.
🚨 If you suspect propane:
- Do not operate any switches, appliances, or ignition sources.
- Turn off the propane supply at the tank if you can do so safely.
- Open doors and windows to ventilate.
- Move away from the RV.
- Contact a qualified technician. Do not attempt to find the leak yourself.
Understanding RV electrical safety fundamentals helps you recognize when a smell may indicate an electrical issue rather than a plumbing one.
Exhaust smell inside (motorhome-specific path)
If you smell engine exhaust inside your motorhome while driving, this is a separate and serious issue. Exhaust contains carbon monoxide, which is odorless at dangerous concentrations—by the time you smell exhaust, the CO levels may already be elevated.
Pull over, ventilate the cabin, and have the exhaust system inspected before driving again. Exhaust intrusion is a mechanical/structural problem (cracked manifold, loose exhaust pipe, damaged seals around the engine compartment), not a plumbing problem.
Having the right fire and safety gear on board, including a working carbon monoxide detector, is non-negotiable for motorhome owners.
Recall awareness and why it matters
Multiple sewer-gas-related recalls have been issued in recent months, making this a pattern worth paying attention to:
- Forest River Recall 24V-619 (August 2024): sewer-gas-related issue.
- Forest River Recall 24V-775 (October 2024): sewer-gas-related issue.
- Forest River sewer-gas-related recall (April 2025).
- REV/Fleetwood Recall 25V121 (April 2025).
That’s three or more sewer-gas-related recalls within a 12-month span, plus a separate exhaust-tip detachment recall that also poses cabin air quality risk. If you own a unit from these manufacturers—or any manufacturer—check your VIN through the official NHTSA recall database (nhtsa.gov/recalls). Recall repairs are free and can address issues you might otherwise spend months troubleshooting on your own.
Mini FAQ (PAA-focused, short answers)
Why does my RV smell like sewage after driving?
Driving creates conditions that open odor pathways: P-traps lose water from sloshing, cabin pressure changes pull gas through weak seals, and vibration can loosen toilet mounts and pipe fittings. The smell is usually sewer gas finding a new way in—not necessarily a tank that needs treatment.
How do I stop sewer smell in my RV while traveling?
Fill all P-traps before departure, confirm your toilet seal is intact, verify roof vent function, and consider waterless trap devices for drains that repeatedly lose their water seal. Managing cabin pressure by cracking a vent can also help.
Why does my camper smell like rotten eggs?
The rotten egg smell is usually hydrogen sulfide from tank bacteria or, less commonly, a failing anode rod in the water heater. However, always rule out a propane leak first, as propane odorant smells similar. If the smell is only near drains or after driving, it’s most likely tank-related.
Can gray water tanks smell as bad as black tanks?
Yes. Gray tanks accumulate grease, food particles, soap scum, and biofilm that can produce strong sour or rotten odors. Many RVers are surprised to discover the gray tank is their primary odor source, especially in the kitchen area.
How do I keep P-traps from drying out in my RV?
Run water in every drain before travel and upon arrival. For drains that dry out frequently—especially during storage—consider adding a small amount of non-toxic RV antifreeze or installing a waterless trap device that doesn’t rely on a water seal.
What is the best RV black tank treatment for odor control?
Look for enzyme-based or bacteria-based treatments that break down waste biologically rather than chemical deodorizers that mask odor. The key factors are compatibility with your usage pattern (how often you dump, whether you’re on hookups or boondocking off-grid), and ensuring you don’t use harsh chemicals that kill the beneficial bacteria the treatment introduces.
Why does my RV smell worse in hot weather?
Heat accelerates bacterial activity in tank residue, increases gas production from waste, and causes more evaporation from P-traps. Everything that produces or transmits sewer gas works faster when it’s warm.
How do you get rid of musty smell in an RV after storage?
Open all windows and vents for thorough airing. Fill every P-trap (they’ve almost certainly dried out). Check for moisture intrusion or mold in hidden areas—behind cushions, under mattresses, inside cabinets. Use a dehumidifier and clean soft surfaces that may have absorbed moisture.
What causes exhaust smell inside a motorhome while driving?
Exhaust intrusion is caused by a structural or mechanical failure in the exhaust system—cracked components, loose connections, or deteriorated seals between the engine compartment and the cabin. This is dangerous due to carbon monoxide risk and should be inspected by a qualified technician immediately.
Do siphon-style vent caps really work?
Siphon-style caps use the Bernoulli principle: wind passing over the cap creates suction that pulls air up through the vent stack. This actively removes gas from the tank system rather than relying on passive venting. They are particularly effective during driving, when wind flow is constant—which is exactly when pressure-driven odor problems are worst.
Why does my RV smell bad even after dumping?
A standard dump removes the liquid contents but not the biofilm residue coating the tank walls. That residue continues to produce odor, especially when warmed by sun or driving. Multiple flush-and-dump cycles, a tank rinse system, or an enzyme soak can address the film that a simple dump leaves behind.
Should I leave my black tank valve open at full hookups?
No. Leaving the valve open allows liquids to drain while solids accumulate and dry into a mound that’s difficult to remove—and produces significant odor. Keep the valve closed, let the tank fill to a reasonable level, then dump. This ensures enough liquid volume to carry solids out during the dump.
What is an air admittance valve and when should I replace it?
An air admittance valve (AAV) is a one-way valve on your drain plumbing that lets air into the system (to prevent siphoning of P-traps) while blocking sewer gas from escaping. Replace it when you detect odor bursts under the sink, if it’s visibly damaged, or if it’s stuck in the open position. They’re inexpensive and easy to swap.
How do I check if my RV roof vent is clogged?
From the roof, visually inspect the vent pipe opening for debris, nests, or damage. From inside, open the vent and note whether airflow feels restricted. You can also run water down the vent pipe from the roof—if it drains slowly, there’s a partial blockage. Check the cap for damage or improper seating as well.