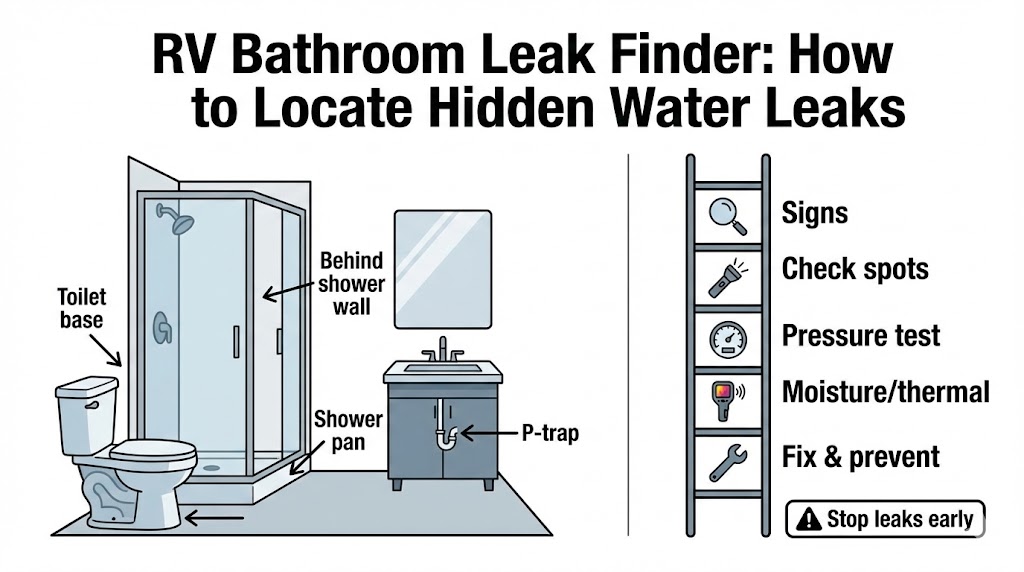
RV Bathroom Leak Finder: Locate Hidden Water Leaks Fast
Last updated: February 2026
Finding hidden water leaks in your RV bathroom before they cause serious damage is one of the smartest maintenance moves you can make — this guide walks you through a proven detection ladder, from quick visual checks to advanced tools, so you can pinpoint the source and stop it fast.
Quick Answer / Quick Start
5-Minute Leak Triage Checklist
- Confirm the symptom type: wet floor, musty smell, stains or bubbling panels, soft/spongy spots, or a water pump that cycles on and off by itself.
- Run the fastest “prove it” checks: try the pump cycling test (turn off all faucets, listen for the pump kicking on); wrap paper towels around fittings; inspect toilet base and shower edges.
- Decide: plumbing leak or rain/exterior leak? Use the decision table further in this guide to compare symptom patterns (pump cycling, timing after rain vs. water use, location clues).
- If the source is still unclear, escalate your tools: moisture meter → thermal imaging → endoscope/borescope → professional pressurization test.
- Don’t ignore it. Water damage can cascade into delamination, electrical problems, and mold growth. If you see signs of widespread damage or can’t safely access the area, consider calling in a professional.
⚠️ Safety Note: Hidden water damage is not just a cosmetic problem. Left unchecked, moisture behind walls and under floors can compromise structural integrity, short out wiring, and create mold hazards. If anything looks extensive or you’re uncomfortable with the scope of the problem, a professional inspection is the right call.
Warning Signs of Hidden RV Bathroom Water Leaks
Before you start tearing things apart, learn the clues that tell you something is wrong. These high-signal symptoms justify deeper testing and help you zero in on where to look.
Visual cues (what you can see)
Soft or “spongy” spots in the bathroom floor are one of the most telling signs. Walk slowly across the space and press down — any give underfoot means moisture has likely been sitting there for a while.
Look for stains, discoloration, or bubbling on wall panels and ceiling surfaces. These are delamination-risk signals, meaning the layers of your RV’s construction are separating because of trapped water.
Water pooling near the toilet base or along the shower threshold is an obvious red flag, but it’s easy to overlook if it only happens intermittently — check after using the shower or flushing, and again the next morning.
Smell-based cues
A musty or moldy odor concentrated near the bathroom zone is one of the earliest warnings. Even if you can’t see water, that damp smell means moisture is hiding somewhere — behind a wall, under a floor, or in an enclosed cabinet space.
Behavior/system cues
If your freshwater pump cycles on and off without anyone running water, that’s a strong leak indicator. The pump is trying to maintain pressure in a system that’s losing water somewhere.
Unexplained water loss — noticing your freshwater tank dropping faster than expected without a clear reason — is another system-level clue. While it’s harder to quantify precisely, tracking your usage patterns over a few days can reveal the discrepancy.
Most Common RV Bathroom Leak Locations
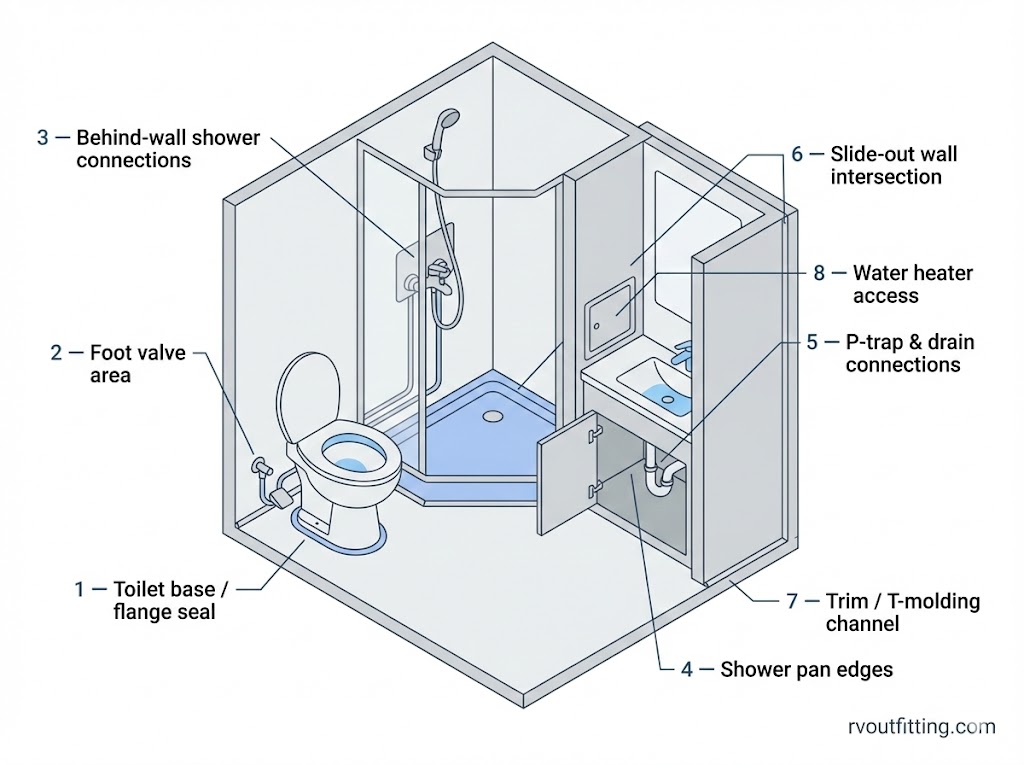
Rather than guessing randomly, work through the most likely culprits first. This prioritized search map covers bathroom-specific hotspots, from the most common offenders down to the sneaky ones people miss.
Toilet zone (high-frequency suspect)
The toilet is the single most common source of RV bathroom leaks. Start with the base and flange area — the seal between the toilet and the floor fitting degrades over time, especially with road vibration.
Foot valve failures are another frequent culprit on many RV toilet models. These valves control water flow into the bowl, and when they wear out, slow drips can go unnoticed for weeks.
DIY Tip: The food coloring test works well here. Add a few drops of food coloring to the toilet bowl, wait without flushing, and check below and around the base for colored water. If you see it, you’ve confirmed the leak path.
Shower zone (hidden-behind-wall + pan)
Shower leaks are tricky because the source is often behind the wall where you can’t see it. The faucet connections and supply lines run through a wall cavity, and a loose fitting back there can drip for months before symptoms show up on the visible side.
Shower pan cracks are another common issue. The pan sits underneath the shower floor, and cracks — from flexing, impacts, or age — let water escape beneath the visible surface. Behind-wall connections where supply lines meet the faucet body deserve extra scrutiny.
Sink + drain zone
The P-trap and drain connections under your bathroom sink are exposed to constant vibration on the road. Check drain nuts and fittings at the component level — sometimes a connection just needs to be hand-tightened, other times the fitting itself has cracked.
Don’t overlook the supply line connections feeding the faucet. Give each one a visual inspection and a gentle tug to check for play.
Nearby water system access points that “show up in the bathroom”
Depending on your RV’s layout, the water heater inlet and outlet lines may run near or through the bathroom wall cavity. A leak at the water heater can travel along channels and appear as a bathroom problem.
PEX manifolds and distribution points are sometimes routed near the bath area. If your leak doesn’t match any bathroom fixture, trace the supply lines back to see if the source is actually upstream. For a deeper look at how your RV water system connects together, understanding the overall plumbing layout helps narrow down suspects.
Overlooked bathroom-adjacent entry points (often missed)
The intersection where bathroom walls meet a slide-out seal is a commonly missed entry point. Road movement creates gaps over time, and rainwater can work its way in through these seams.
Trim pieces and T-molding paths can act as hidden channels, allowing water to travel from one area and appear in another. A leak that shows up at the bathroom floor might actually originate at a trim joint several feet away.
Step-by-Step Leak Detection Methods (Easy → Advanced)
Work through these steps in order. The whole point of this ladder is to avoid unnecessary teardown — escalate only when the prior step fails to confirm the source.
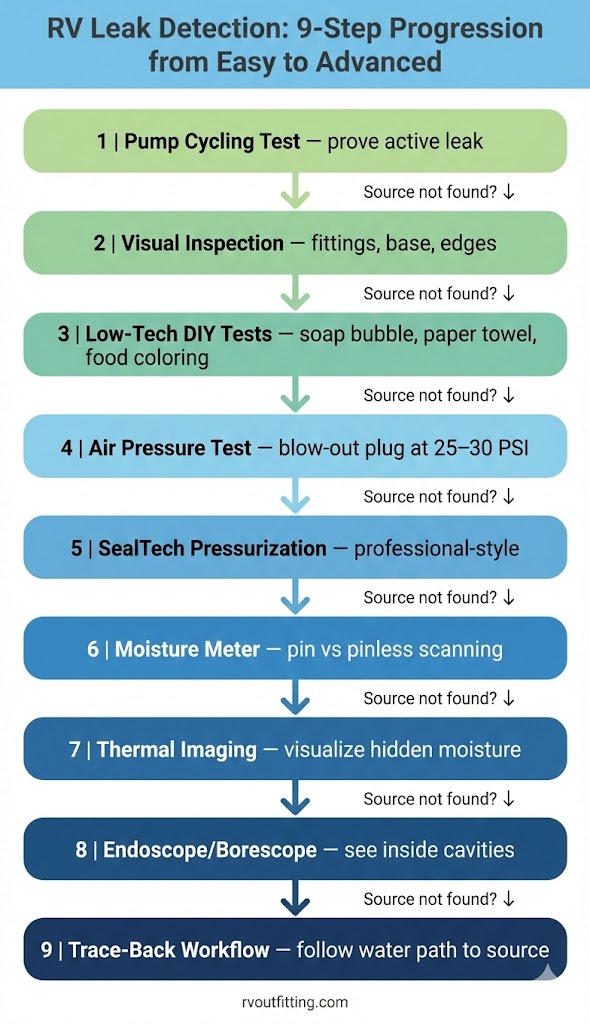
Step 1 — Prove there’s an active plumbing leak (pump cycling test)
Turn off every faucet and water-using appliance in the RV. Then turn the water pump on and listen. If the pump kicks on periodically — cycling on and off to maintain pressure — something in the system is losing water. That cycling is your confirmation that there’s an active plumbing leak somewhere.
If you’re connected to city water rather than running the pump, you’ll need to isolate variables differently. Disconnecting from city water and switching to the pump makes the cycling test possible.
Step 2 — Visual inspection routine (fast, repeatable)
With the leak confirmed, do a focused visual sweep of the bathroom. Check the toilet base, shower edges, and under-sink P-trap area. Examine every visible fitting you can access.
Look specifically for mineral or calcium buildup around fittings and connections. That white, crusty residue is a telltale sign that water has been slowly weeping from a joint — even if it’s not actively dripping when you look.
Step 3 — Low-tech DIY diagnostic tests (Coach Specialists toolkit)
These simple tests cost almost nothing and can pinpoint a leak source quickly.
Soap bubble method: With the plumbing system pressurized, spray or brush soapy water onto suspect fittings. Bubbles forming at a joint mean air or water is escaping there.
Paper towel test: Wrap dry paper towels around suspect joints and fittings. Walk away for an hour. Come back and check — any dampness on the towel points directly to the leaking connection.
Food coloring test: For toilet leak suspicions, add food coloring to the bowl water. If colored water appears around the base or underneath, you’ve confirmed the path.
Step 4 — Air pressure test via blow-out plug (intermediate)
Connect an air compressor to the system using a blow-out plug and bring pressure to 25–30 PSI. With the system pressurized with air instead of water, watch the gauge for pressure loss — a dropping reading means air is escaping through a leak.
Combine this with the soap bubble method at suspect points for a powerful one-two approach. Pressurized air escaping through a bad fitting will blow visible bubbles through soapy water.
⚠️ Safety: Do not exceed the 25–30 PSI range. Over-pressurizing can damage RV plumbing components and fittings, creating new problems instead of finding existing ones.
Step 5 — Professional-style pressurization (SealTech method)
The SealTech approach uses a dedicated pressurization system combined with a soapy solution for systematic pinpointing. It’s the method many RV service shops use because it’s thorough and repeatable.
If you can’t isolate the leak with the previous steps, this is the professional escalation point. SealTech-style testing pressurizes the entire system uniformly, making even small leaks visible through the soap solution.
Step 6 — Moisture meter pinpointing (hidden moisture)
When the leak is confirmed but you can’t see where the water is going, a moisture meter lets you map wet zones without cutting into walls.
Pin vs. pinless — when each is useful: Pin-type meters use probes you press into the material for a precise reading at a specific point. Pinless (scanning) meters detect moisture through surfaces without penetration, making them better for sweeping larger areas quickly.
For a structured scan, work methodically: start at the suspected source and move outward in a grid pattern along bathroom walls and floor edges. Mark any readings that spike above surrounding areas — these are your target zones for closer investigation.
Step 7 — Thermal imaging (advanced visualization)
A thermal imaging camera detects temperature differences on surfaces. Wet areas behind walls are typically cooler than dry surroundings, creating visible patterns on the thermal display.
For best results, adjust the thermal span to a narrow range (around 10–20°C) so subtle temperature differences become more visible. Wider spans wash out the small variations that reveal hidden moisture.
Step 8 — Endoscope/borescope to reduce cutting (gap method)
Before making access holes in your RV walls, use a borescope or endoscope to look inside cavities through existing gaps, vents, or small drilled peek holes.
Where to peek first: The cavity behind the shower wall is a high-priority target. Also check under the shower pan lip, behind the toilet base where access panels or gaps exist, and into any wall cavity near a suspect fitting. This step can save you from unnecessary demolition by confirming or ruling out a location before you cut.
Step 9 — When the symptom shows far from the source (trace-back workflow)
Water inside an RV rarely stays where it starts. It travels along wiring channels, trim paths, and underbelly surfaces, pooling at low points that may be nowhere near the actual leak.
When your symptoms show up far from any obvious source, use a structured tracing approach: start at the highest point near the symptom and work upward/upstream. Follow trim lines, wiring paths, and any channel water could travel along. Check underbelly low points where water may collect. The goal is to trace the moisture path backward to find the origin.
Best Tools & Tech for RV Leak Detection (What to Buy + Why)
Here’s a buyer-oriented shortlist organized by use case, with specific models referenced for bathroom leak detection.
Moisture meters (pin vs pinless)
| Tool | Type | Key Detail |
|---|---|---|
| Klein Tools ET140 | Pinless | Detection depth noted at 3/4″ |
| Protimeter Mini BLD2001 | Pin-type | Moisture range 6%–30% |
| Protimeter BLD5365 Surveymaster | Dual (pin + pad) | Combines both methods in one unit |
The Klein moisture meter has been specifically recommended as a go-to for hidden RV moisture detection. If you’re only buying one, a pinless model is the most versatile starting point for bathroom leak hunting since you can scan quickly without damaging surfaces.
Thermal imaging cameras (from budget to pro)
| Tool | Positioning |
|---|---|
| FLIR ONE Pro LT | Budget smartphone attachment — good entry point |
| FLIR MR160 | Combined moisture + thermal tool |
| FLIR E96 | Pro-grade; resolution 640×480 |
For most RV owners, the FLIR ONE Pro provides enough resolution to spot moisture patterns behind bathroom walls without a massive investment. Higher-end models are better suited for professionals or RVers who do frequent inspections.
Smart leak sensors (24/7 monitoring)
Smart sensors provide always-on monitoring so a slow leak doesn’t go unnoticed between your manual checks.
| Sensor | Notable Feature |
|---|---|
| YoLink Water Leak Sensor | LoRa-based connectivity (noted for long range) |
| GoveeLife Water Leak Detector | IP66/IP67 rated; noted 5-year battery life |
| First Alert L1 Wi-Fi Water Leak and Freeze Detector | Noted as Editors’ Choice by PCMag (Nov 2025 update) |
| Flo by Moen Smart Water Monitor and Shutoff | Whole-home inline with automatic shutoff |
| Flume 2 Smart Home Water Monitor | Clamp-on design, no pipe cutting required |
| RV Whisper WTR1 | RV-specific; supports up to 10 sensors per station |
| Waggle RV Smart Sensor | RV-specific monitoring |
For RV-specific use, the RV Whisper and Waggle are purpose-built for the mobile environment. For broader smart-home-style monitoring, the YoLink and GoveeLife options offer solid connectivity and long battery life.
Some RVers are now pairing smart sensors with IFTTT automations and automatic shutoff valves for hands-free leak response — a setup worth considering if you store your RV or travel frequently.
Pro equipment (if you want the “industry style” method)
The SealTech 430AL RV Leak Tester is the professional-grade option. It’s a dedicated pressurization and soapy solution system designed specifically for RV leak testing. This is the tool RV service shops use for systematic, repeatable results.
Rain Leak vs. Plumbing Leak — How to Tell the Difference
Overlapping symptoms can send you down the wrong diagnostic path. Use this framework to separate the two.
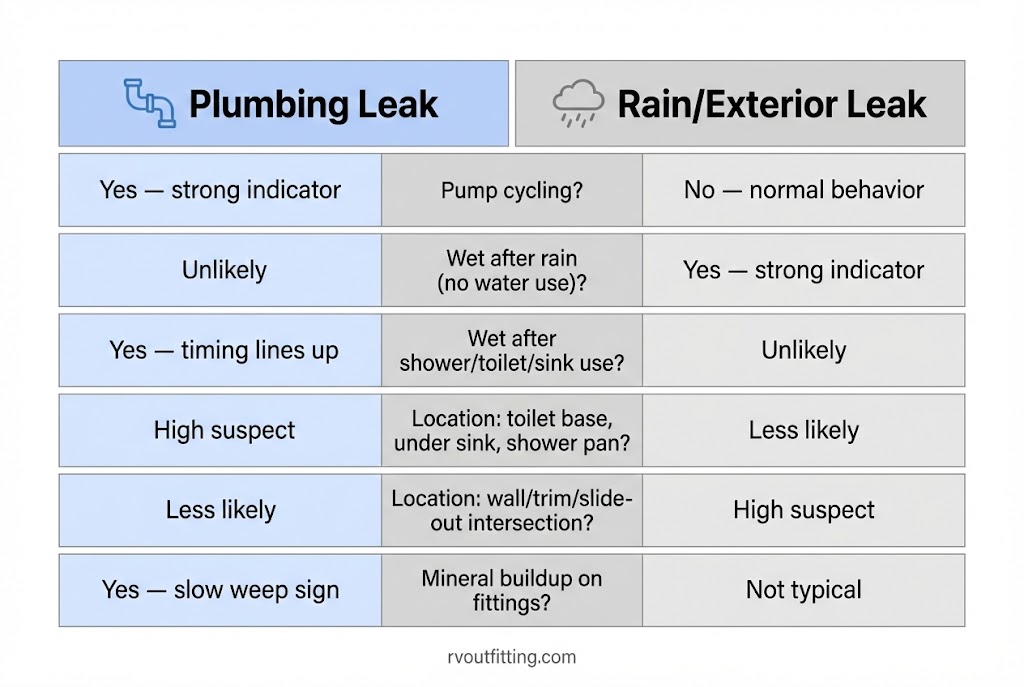
Decision table (symptom pattern → most likely leak type)
| Clue | Points to Plumbing Leak | Points to Rain/Exterior Leak |
|---|---|---|
| Pump cycling without water use? | Yes — strong indicator | No — pump behavior is normal |
| Wet after rain (even with no water use)? | Unlikely the cause | Yes — strong indicator |
| Wet after using shower/toilet/sink? | Yes — timing lines up | Unlikely the cause |
| Location: toilet base, under sink, shower pan | Plumbing-side suspect | Less likely |
| Location: wall/trim/slide-out intersection | Less likely | Exterior entry suspect |
| Mineral buildup on fittings? | Yes — slow plumbing weep | Not typical |
When patterns overlap: Some symptoms genuinely point both directions — for example, moisture at a wall intersection near a shower could be either type. Mark that uncertainty and run both test paths before concluding.
The “two-path test” to reduce false conclusions
Path 1 — Plumbing-focused: Run the pump cycling test. If it cycles, move through the pressure and fitting checks in the detection ladder above. This isolates whether the plumbing system is losing water.
Path 2 — Exterior/rain-focused: Inspect all seal and trim intersections around the bathroom perimeter, especially where walls meet the slide-out or exterior shell. Weather impact and seal degradation are the primary culprits here. If your symptoms only appear after rain or washing the exterior, this path is your priority.
Running both paths — rather than assuming one — prevents the false conclusion that sends you chasing the wrong fix.
Smart Leak Sensor Placement Strategy (Bathroom-Specific)
Buying sensors is only half the equation. Where you place them determines whether you catch a leak early or find out about it after the damage is done.
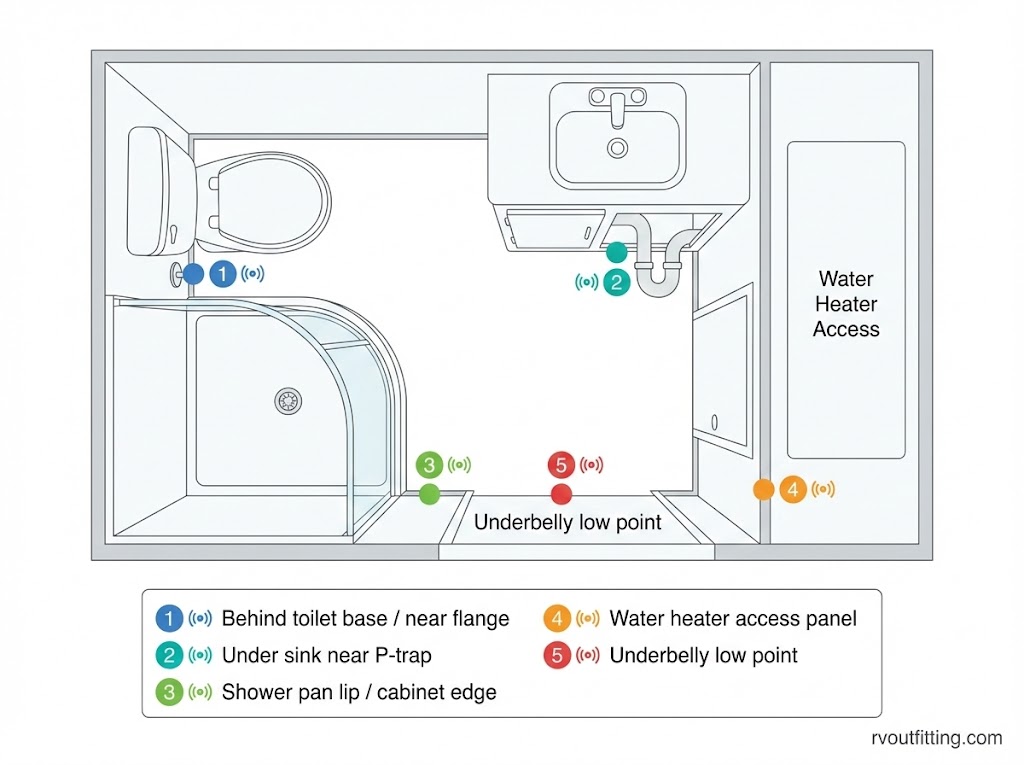
Placement map (high-value locations)
These five locations give you maximum early-warning coverage without overbuying.
- Behind the toilet base / near flange access area — the highest-frequency leak zone in an RV bathroom.
- Under the sink near P-trap and drain connections — catches both supply-side and drain-side leaks.
- Near the shower pan lip / adjacent cabinet edges — where shower pan cracks and behind-wall leaks first show up.
- Near the water heater access panel (if bathroom-adjacent) — catches leaks that travel from the heater into bathroom spaces.
- Underbelly low point where water may pool — the gravity catch-all for any leak that travels downward through the floor structure.
Alerts + workflow
When a sensor triggers an alert, follow this sequence: confirm → isolate → escalate tools.
First, confirm the alert is real (not a condensation false alarm or a spill). Then isolate the water source — shut off the pump or city water connection to stop flow. Finally, escalate through the detection methods above to pinpoint the exact source.
Some RVers are integrating IFTTT automations with smart shutoff valves so the system can cut water flow automatically when a leak is detected, even when they’re away from the RV.
Quick Fixes & Repair Options (After You Find the Source)
Once you’ve pinpointed the leak, here’s how to approach the repair — from sealant selection to knowing when it’s time to call a pro.
Sealants and when each makes sense (freshness-sensitive)
The most important distinction is self-leveling vs. non-leveling sealant. Self-leveling products flow into gaps and settle flat, making them ideal for horizontal surfaces like roof seams. Non-leveling sealants stay where you put them, which is what you need for vertical joints and edges.
Named sealant options include Dicor, EternaBond, Flex Seal, Forever Lap Sealant, Alphathane, and SikaFlex. Each has different application characteristics, and matching the right type to the surface and orientation matters more than brand loyalty.
A note on sealant rankings: Late-2025 sealant comparison testing exists, but methodology and detailed results vary across sources. Treat blanket “best sealant” claims with skepticism and focus on matching the product type to your specific repair scenario.
Plumbing component fixes (bathroom-adjacent)
For leaks at PEX fittings, valves, or shower faucet connections, component replacement is often straightforward. Push-fit and PEX fitting ecosystems are widely available, and many bathroom plumbing repairs can be completed with basic tools.
If the leak originates at a fitting, replacing the fitting is almost always more reliable than attempting to re-seal it. The connection either seals properly or it doesn’t — sealant isn’t a long-term fix for a failed plumbing joint. If you need help with your water pump system specifically, that’s a separate but related repair path.
Shower pan crack scenario
A cracked shower pan requires a decision: seal it, replace it, or get a professional assessment. Minor surface cracks may respond to appropriate sealant, but structural cracks — especially those that flex when you stand on them — typically need replacement or professional repair.
Not confirmed in the provided outline for exact repair methods, so treat this as a source-location problem first. Confirm the pan is actually the leak source (not a behind-wall fitting) before committing to a pan repair or replacement.
DIY vs professional help (clear thresholds)
Call a professional when:
- The leak source remains ambiguous after working through the full escalation ladder.
- Damage indicators suggest delamination or electrical risk — these problems compound quickly and carry safety implications.
- You want a professional pressurization test (SealTech-style) for definitive, systematic results.
For straightforward fitting replacements and sealant applications where the source is confirmed and access is good, most handy RV owners can handle the repair. The line is drawn at uncertainty and structural risk.
Prevention & Seasonal Maintenance Schedule (Stop Repeat Leaks)
The best leak is the one that never happens. A prevention routine tied to real failure modes keeps you ahead of problems instead of reacting to them.
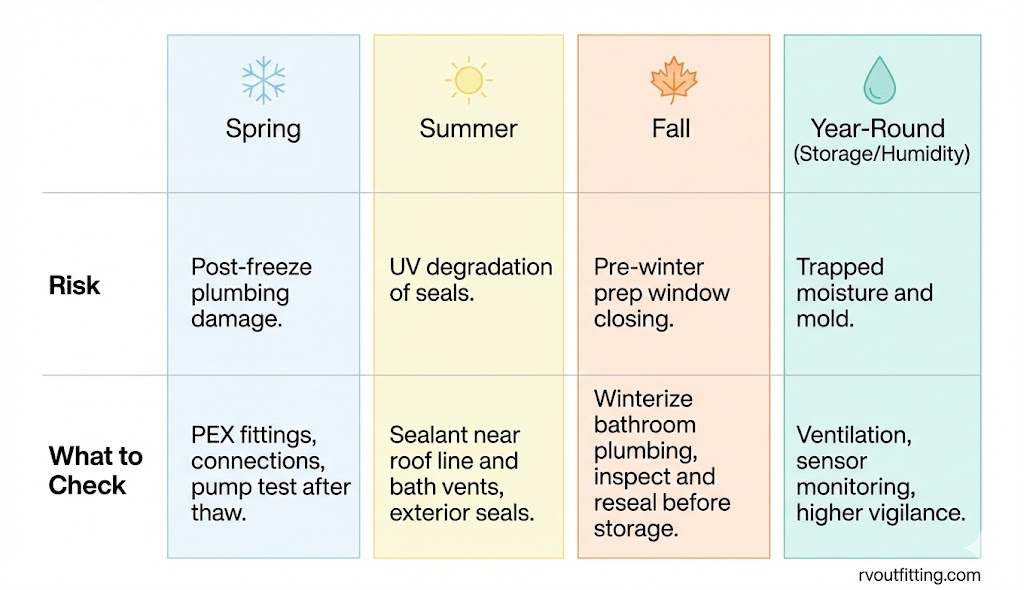
Annual reseal routine + inspection points
An annual reseal and inspection routine is one of the most effective prevention measures you can adopt. Check all sealant joints, trim intersections, and around bathroom penetrations (vents, plumbing passes). Reapply sealant where it’s cracked, pulled away, or no longer pliable.
Winterization + freeze-risk checks
Spring thaw is a critical checkpoint. Freeze-cracked PEX fittings and connections may not leak until water pressure returns, so run a careful pressurization check after winter storage before assuming everything is fine.
Proper winterization of bathroom plumbing before cold storage prevents the cracks in the first place. If you’re in a freeze-risk area, this step is non-negotiable. Maintaining your RV freshwater system throughout the seasons helps avoid surprise failures.
Seasonal risk matrix (gap)
| Season | Primary Risk | What to Check |
|---|---|---|
| Spring | Post-freeze plumbing damage | PEX fittings, connections, pump test after thaw |
| Summer | UV degradation | Sealant near roof line and bath vents, exterior seals |
| Fall | Pre-winter prep window | Winterize bathroom plumbing, inspect and reseal before storage |
| Year-round (storage/humidity) | Trapped moisture, mold | Higher leak-risk vigilance, ventilation, sensor monitoring |
Does RV Insurance Cover Bathroom Water Damage?
Disclaimer: The information in this section is general in nature and is not insurance, legal, or financial advice. Policies vary widely by provider and plan. Always consult your specific policy and insurance representative for coverage questions.
Coverage varies + documentation matters (no legal advice)
Many comprehensive RV insurance policies may not automatically include water damage coverage. Whether a bathroom leak claim is covered often depends on whether the damage resulted from a sudden event versus gradual maintenance neglect — a distinction that varies by policy.
Consistent maintenance documentation can support your position if you ever need to file a claim. Showing that you performed regular inspections and upkeep demonstrates responsible ownership.
What to document (practical, non-legal)
If you discover a bathroom leak or water damage, document the situation immediately.
- Photos of the affected area from multiple angles, showing the extent of damage.
- Photos of the suspected source zone to establish the origin.
- Written notes of inspections and maintenance actions you’ve performed, with dates.
This documentation won’t guarantee a claim outcome, but it puts you in a much stronger position than having nothing.
Mini FAQ (PAA + Gap Questions) — Short Answer Format
How do I know if my RV bathroom has a hidden water leak?
Look for soft floors, stains or delamination signs, musty odor, and pump cycling without active water use. If any of these are present, follow the escalation ladder starting with the pump cycling test and visual inspection, then work up to moisture meters and thermal imaging as needed.
What causes water to pool around the base of an RV toilet?
Common suspects include deteriorated toilet base seals, flange issues, or toilet foot valve leaks. Confirm with a visual inspection of the base area and, if needed, the food coloring test to trace the water path.
Can I use a moisture meter to find leaks in my RV walls?
Yes — moisture meters are a key tool for narrowing down wet zones without opening walls. Use a pinless meter for broad scanning, then switch to a pin-type for precise readings before cutting into anything.
How do you find a water leak behind an RV shower wall?
Start by confirming symptoms (pump cycling, visible moisture at shower edges). Escalate to moisture meter and thermal imaging scans of the wall surface. If those indicate moisture, use a borescope through an existing gap or small peek hole to see inside the cavity before making larger access holes.
What is the best smart water leak detector for an RV?
Multiple strong options exist, including the YoLink Water Leak Sensor (long-range LoRa connectivity), GoveeLife detector (rated IP66/IP67 with long battery life), First Alert L1 (noted as PCMag Editors’ Choice), and RV-specific systems like RV Whisper and Waggle. “Best” depends on your connectivity needs, placement strategy, and whether you want RV-specific features or broader smart-home integration.
How do I pressure test my RV plumbing system for leaks?
Connect an air compressor to the system via a blow-out plug and bring pressure to 25–30 PSI. Monitor the gauge for pressure loss, and apply soapy water to suspect fittings to visually identify where air escapes. Do not exceed the cited PSI range to avoid damaging components.
Why does my RV water pump keep cycling on and off?
Pump cycling without any water running is a strong indicator of a leak somewhere in the plumbing system. The pump detects a pressure drop and kicks on to compensate, then shuts off, and the cycle repeats. Follow the step-by-step detection process starting with visual inspection of fittings and connections to isolate the source. For help diagnosing low water pressure issues, that’s a related but separate troubleshooting path.
Can a thermal imaging camera detect water leaks in an RV?
Yes. Thermal imaging cameras detect temperature differences on surfaces, and wet areas behind walls are typically cooler than dry surroundings. Narrowing the thermal span to around 10–20°C makes subtle moisture patterns more visible. This method works best as a complement to moisture meters, not a standalone solution.
How much does it cost to repair RV water damage from a leak?
Not confirmed in the provided outline. Costs vary widely depending on damage extent, accessibility, whether structural elements are affected, and whether you DIY or hire a professional. Minor fitting replacements are inexpensive; extensive delamination repair can be significant.
Does RV insurance cover water damage from leaks?
Coverage varies widely by policy and provider. Many comprehensive policies may not automatically cover water damage, and the distinction between sudden events and gradual neglect matters. Maintenance documentation can support your position. This is general information, not legal or insurance advice — check your specific policy.
What sealant should I use to stop an RV roof leak?
Match the sealant type to the surface and application. Self-leveling sealants work for horizontal surfaces; non-leveling for vertical joints. Options include Dicor, EternaBond, Flex Seal, Forever Lap Sealant, Alphathane, and SikaFlex. Avoid relying on outdated “best of” rankings — sealant performance comparisons have seen some volatility in recent testing.
How often should I reseal my RV to prevent leaks?
An annual reseal routine is widely recommended as a prevention measure. Beyond that universal reference, the exact schedule depends on your climate, usage, and the condition of existing sealant — inspect regularly and reseal when you see cracking, separation, or loss of flexibility.
What are the signs of water damage in an RV?
Beyond the immediate leak symptoms (wet spots, musty smell), downstream effects include delamination (wall/floor layers separating), electrical short circuits from moisture reaching wiring, and mold growth in enclosed spaces. These consequences are why early detection matters so much.
How do I fix a cracked RV shower pan?
Not confirmed in the provided outline for exact repair method. Treat it as a source-location problem first — confirm the pan is actually the leak source, not a behind-wall fitting. Then decide: minor surface cracks may respond to sealant, while structural cracks usually require replacement or professional assessment.
What is a SealTech leak test and how much does it cost?
SealTech is a pressurization and soapy solution system used for systematic RV leak detection. The system pressurizes the RV and applies solution to surfaces, making leaks visible as bubbles. It’s the method many service shops use. Cost for the test is not confirmed in the provided outline and varies by service provider and location.
What NOT to Do (Common Mistakes)
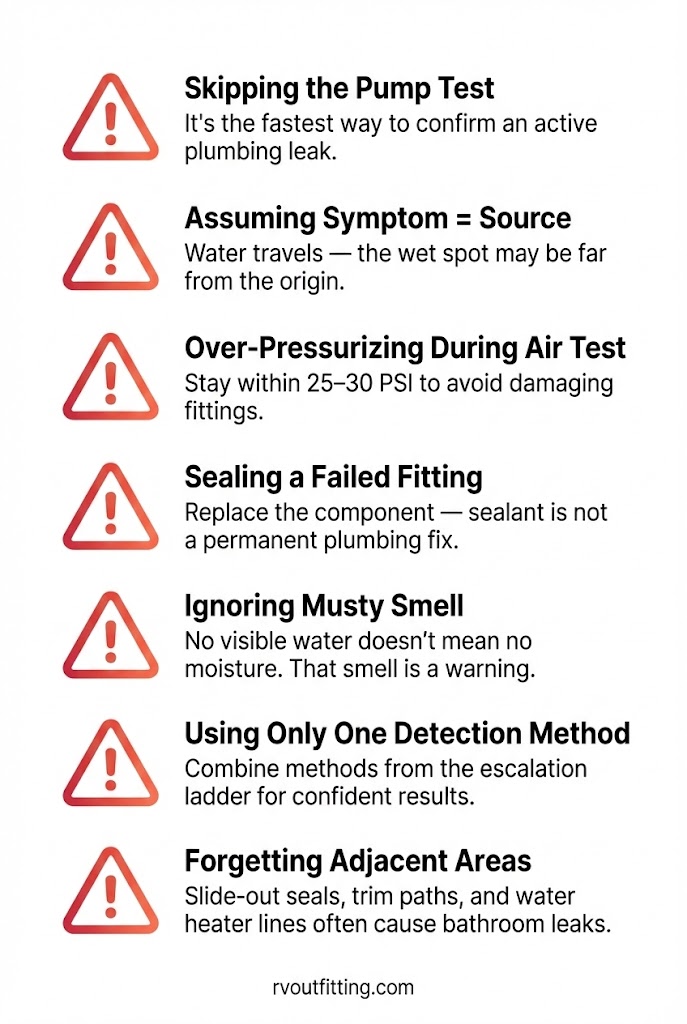
Avoid these common missteps:
- Don’t skip the pump cycling test. It’s the fastest way to confirm an active plumbing leak, and jumping straight to tearing out walls without it wastes time.
- Don’t assume the symptom location is the source location. Water travels along channels, trim, and wiring paths. The wet spot on your bathroom floor might originate several feet away.
- Don’t over-pressurize during air testing. Exceeding the 25–30 PSI range can damage fittings and create new leaks.
- Don’t use sealant as a permanent fix for failed plumbing fittings. If a PEX connection or valve is leaking, replace the component. Sealant buys time at best.
- Don’t ignore a musty smell because you can’t see water. That smell means moisture is present somewhere, and waiting only lets damage spread.
- Don’t rely on a single detection method. The escalation ladder exists for a reason — combine methods for confident identification.
- Don’t forget to check bathroom-adjacent areas. Slide-out seals, trim paths, and nearby water heater connections are frequently overlooked sources that present as bathroom leaks.
| Symptom | Likely Cause | First Fix |
|---|---|---|
| Soft/spongy bathroom floor | Prolonged moisture under flooring | Moisture meter scan → locate source → repair fitting or reseal |
| Water pooling at toilet base | Flange seal or foot valve failure | Food coloring test → replace seal or valve |
| Musty smell near bathroom | Hidden moisture behind wall/floor | Moisture meter + thermal scan → open and dry affected area |
| Pump cycling without water use | Active plumbing leak somewhere | Visual fitting inspection → pressure test → isolate source |
| Stains/bubbling on wall panels | Water intrusion causing delamination | Determine rain vs plumbing (decision table) → appropriate repair path |
| Water at shower threshold | Shower pan crack or behind-wall fitting | Check pan integrity → borescope behind wall → repair or replace |
| Moisture at slide-out wall joint | Seal gap allowing exterior water entry | Inspect and reseal slide-out intersection → monitor |
Keeping your RV bathroom dry isn’t about luck — it’s about having a system. Work the detection ladder, place your sensors in the right spots, maintain your seals annually, and you’ll catch problems long before they become expensive. For broader guidance on staying safe and comfortable on the road, the RV safety gear essentials category is worth bookmarking.