How to Choose an RV Cell Phone Booster: Data-Backed Buying Guide
Last updated: January 2026
Affiliate Disclosure: This guide contains affiliate links. If you click through and make a purchase, we may earn a small commission at no extra cost to you. This helps support our deep-dive research.
Editor’s Note: This guide is based on a deep-dive analysis of real owner feedback, forum discussions, and long-term usage reports across multiple RV cell phone booster brands. We cut through the marketing specs to tell you what actually matters.
🎯 Already know what you need? Jump straight to our tested recommendations in the 10 Best RV Cell Phone Boosters list.
The Real RV Signal Problem Isn’t “No Bars”—It’s No Usable Connection
If you’ve ever pulled into a gorgeous campsite and watched your phone flip between one bar, “SOS,” and “No Service,” you already know the real pain isn’t losing social media. It’s maps that won’t load, weather alerts that never arrive, two-factor login codes stuck in limbo, and work calls that dissolve into robot-voice soup.
Here’s the frustration most RVers face when shopping for a cell booster:
- Marketing specs don’t match reality. Every booster claims to work with “all major carriers” and cover “up to 5,000 sq ft”—but owners frequently report wildly different outcomes.
- The “bars” lie. You can gain bars and still have an unusable connection, or gain stability without the bars ever changing.
- Installation matters more than the brand name. Across hundreds of owner discussions, a recurring theme emerged: the same booster that gets a 5-star “lifesaver” review also gets a 1-star “paperweight” review—and the difference almost always traces back to setup.
- Your RV is working against you. Metal roofs, aluminum frames, and tinted windows turn your rig into a rolling signal sponge.
The big takeaway: Success with an RV cell phone booster isn’t about buying the most expensive unit. It’s about matching the right booster to your signal environment, your carrier’s bands, and your willingness to treat installation like the real project it is.
Quick Summary: The 30-Second Verdict
The Golden Rule: A booster amplifies weak signal—it cannot create signal where none exists. If you have some usable service outside your RV (even just a faint bar), a booster can often turn that into reliable calls, texts, and workable data inside your rig. If you’re truly in a dead zone, no booster will help.
5 Questions to Ask Before Buying
- Do I actually have usable signal outside my RV at my typical campsites? Walk outside with your phone before you buy anything.
- What carrier do I use, and what bands does this booster support in my travel regions? Band mismatch is a leading cause of “it did nothing” outcomes.
- Can I physically separate the outdoor and indoor antennas by 15–50 feet in my rig? Oscillation (feedback) kills performance if they’re too close.
- Am I willing to spend 30–60 minutes on installation and placement testing? Owners who treat this like a quick gadget are the most disappointed.
- What’s my primary goal—reliable calls/texts, or high-speed data? Calls and texts improve more consistently than data speeds.
The “Don’t Do This” Warning
Never buy a cell booster expecting it to turn a dead zone into full service. Across the owner feedback I analyzed, a recurring theme is this exact disappointment: someone buys a booster hoping for internet in a spot where there’s essentially no usable carrier service. After setup, they see little to no change and conclude it’s a scam. In most of these stories, the missing step was confirming whether any signal existed outside to amplify.
1. Pick Your Lane (Risk vs. Convenience)
There is no “one best RV cell phone booster” for everyone. The right choice depends on how you travel, how much setup work you’re willing to do, and what your actual signal environment looks like.
| Lane | Who It’s For | What You Give Up |
|---|---|---|
| Budget / DIY Value | RVers with some outside signal who want a cost-effective upgrade and are comfortable with placement testing | Less forgiveness in fringe areas; may need more trial-and-error; support/documentation can be inconsistent |
| Premium / Support-Focused | Remote workers, full-timers who need reliability and responsive troubleshooting help | Higher cost; still requires proper installation—premium doesn’t mean plug-and-play |
| Stationary / Directional | Seasonal campers, long-stay RVers, or those who camp in the same weak-signal areas repeatedly | Must aim the antenna at each new site; not designed for in-motion boosting while driving |
The honest truth: Budget boosters can deliver results nearly identical to premium ones when installed correctly. Premium kits often offer better documentation, clearer diagnostics, and more responsive support—which matters most when things go wrong.
2. Fit, Compatibility & Sizing (The “Boring” Stuff That Matters)
The Pre-Purchase Checklist
Before you click “Buy,” verify these often-overlooked factors:
Physical & Technical Constraints
- [ ] Antenna separation distance: Can you place outdoor and indoor antennas 15–50+ feet apart? (Shorter rigs struggle here)
- [ ] Mounting options: Does your RV have a ladder mount, roof rail, or existing pole for the outdoor antenna?
- [ ] Cable routing: Is there an existing path (unused satellite cable route, refrigerator vent, cable hatch) to run coax without drilling?
- [ ] Power source: Do you have a reliable 12V or 120V outlet where the booster unit will live?
- [ ] Carrier band support: Does this booster amplify the specific bands your carrier uses in your travel areas? (Critical for T-Mobile users especially)
Common Regret: The “It Doesn’t Fit My Rig” Story
Owners commonly report buying a booster, excitedly unpacking it, and then discovering their travel trailer or camper van simply can’t provide enough antenna separation. In short rigs (under 20 feet), the outdoor and indoor antennas may “hear” each other through thin walls, causing oscillation that throttles performance or triggers shutdowns.
The fix: Before permanent installation, do a “soft install” with temporary antenna positions. Test performance. Only then commit to drilling or sealing.
For a broader view of how cellular boosting fits into your RV tech stack, check out our complete guide: RV Tech and Connectivity: A Complete Guide to Wi-Fi, GPS, and Backup Cameras.
3. Real-World Performance: What Actually Happens?
Marketing Claims vs. Owner Reality
| What Marketing Says | What Owners Actually Experience |
|---|---|
| “Works with all major carriers” | Results vary significantly by carrier. AT&T and Verizon see the most consistent wins; some T-Mobile users report band compatibility issues (bands 66, 71 mentioned specifically) |
| “Up to 5,000 sq ft coverage” | Indoor coverage is often a “bubble” around the inside antenna—strongest within a few feet, fading as you move away |
| “Easy plug-and-play setup” | Installation is straightforward for some; others describe an all-day project with cable routing and mounting work |
| “Boosts 5G” | Most boosters help with “nationwide 5G” that runs on LTE bands; don’t expect ultra-wideband/mmWave performance in remote areas |
| “Improved signal strength” | The bigger win is often stability—fewer dropped calls, texts that actually send—not necessarily more bars |
The “80% Performance” Truth
Owners who are happiest tend to describe improvements like:
- Fewer dropped calls
- Clearer voice quality (less “robot voice”)
- Texts that actually send
- Data that becomes stable enough for email, maps, light streaming, and hotspot use
Owners who are angriest tend to describe situations like:
- “I had basically no signal and still have basically no signal” (this is expected behavior)
- “I expected the whole RV to have full bars” (not how inside antennas work)
- “My mounting location was compromised” (low placement, blocked by the rig, poor cable routing)
The Indoor Antenna “Bubble” Is Real
One pattern that comes up repeatedly is that performance drops with distance from the indoor antenna. Practical implications:
- If you expect the bedroom, cab, and dinette to all get the same boost, you may be disappointed.
- If you’re willing to “live near the antenna” (or place it near your workspace/hotspot device), many owners report excellent results.
- Pro move: Design your indoor antenna placement around your actual routine—dinette for remote work, bedroom for nighttime device charging, or near your dedicated hotspot device.
Calls/Texts vs. Data: Different Outcomes
Owners commonly report that voice and texting reliability is the first obvious win—especially when inside-RV signal was basically unusable. Data performance is more nuanced: some owners see meaningful speed improvements; others say data is hit or miss even when calls/texts become reliable.
This isn’t unusual: carrier congestion, band selection, and tower backhaul can make “bars” look better without producing the data performance you hoped for.
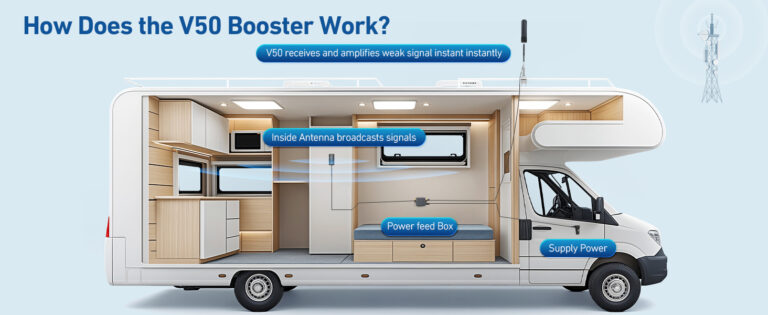
4. The Setup: Where Most Failures Happen
Installation and positioning came up constantly across owner feedback. In fact, “install/installation/antenna” language appears in a huge share of reviews—because placement is the product.
Step-by-Step: The “Test Before You Commit” Method
Step 1: Do a baseline signal check first Walk outside your RV and identify where your phone gets the best signal (even if it’s weak). A booster can amplify what’s there; it can’t invent what isn’t.
Step 2: Temporarily mount the outdoor antenna Don’t permanently drill on day one. Use a temporary mount (ladder clamp, pole, or test position on the roof). This prevents the classic “I drilled holes and the signal got worse” moment.
Step 3: Aim/position toward the best direction Many owners use phone apps or field test mode to find tower direction and compare signal strength while repositioning. Small directional tweaks can change everything in hilly terrain.
Step 4: Place the indoor antenna far from the outdoor antenna A recurring fix for “red light” or feedback issues was increasing separation—distance and/or putting more structure between them. In many RVs, “far” means opposite ends of the rig.
Step 5: Power up and test the right way Don’t rely on bars alone. If you can, check actual signal strength (dBm) on your phone. Test calls, texts, and data before finalizing anything.
Step 6: Only after it works, lock in the final routing Once you see reliable improvement, then make it clean: cable routing, mount tightening, strain relief.
The “Wake-Up” Call: Oscillation
When the outdoor antenna “hears” the indoor antenna (they’re too close or have line-of-sight through windows), the system can create feedback. Modern consumer boosters detect and mitigate this by reducing power or displaying warnings—which often looks like reduced gain or unstable performance.
How owners fix it:
- Increase vertical separation (roof antenna higher, inside antenna lower)
- Increase horizontal separation (opposite ends of the rig)
- Avoid placing the inside antenna next to a window facing the outside antenna
If you’re building out your power protection and electrical safety setup while adding tech, these guides help you do it without risking your gear:
- RV Surge Protectors 101: Safeguarding Your RV’s Electrical System
- RV Electrical Safety Tips: Avoiding Fires, Shocks & Power Damage
5. Reliability & Support: The Hidden Cost
The Support Experience (What Owners Actually Report)
Support and returns were mentioned more than you’d expect across the owner feedback. About 10–15% of reviews mention customer service or returns/exchanges. That tells us two things:
- People do run into setup/compatibility confusion
- When buyers reached out, many felt the company tried to help (though experiences varied)
Brand-specific patterns:
- HiBoost: Multiple owners describe proactive, hands-on support—follow-up calls, live troubleshooting, and replacement parts shipped quickly. This was a recurring positive theme.
- weBoost: Generally solid reputation, though some owners report long holds or mixed outcomes when troubleshooting.
- Budget brands: Support experiences vary widely; some owners describe helpful guidance, others report difficulty getting help.
Buyer Protection Plan: What to Do Immediately Upon Arrival
Arrival Checklist
- [ ] Inspect all components for shipping damage
- [ ] Verify you received all cables, antennas, and mounting hardware
- [ ] Do a “soft install” test within your return window (typically 30 days)
- [ ] Test actual performance at a known weak-signal location before permanent mounting
- [ ] Keep the original packaging until you’re certain it’s working
- [ ] Document any issues with photos/video for support claims
- [ ] Note the purchase date—don’t let the return window slip while “hoping it starts working later”
DOA and Early Failure Patterns
A minority of owners report units that arrived dead or stopped working within weeks. The practical response:
- Test immediately
- Contact support quickly if something seems wrong
- Many manufacturers will send replacement parts or entire units
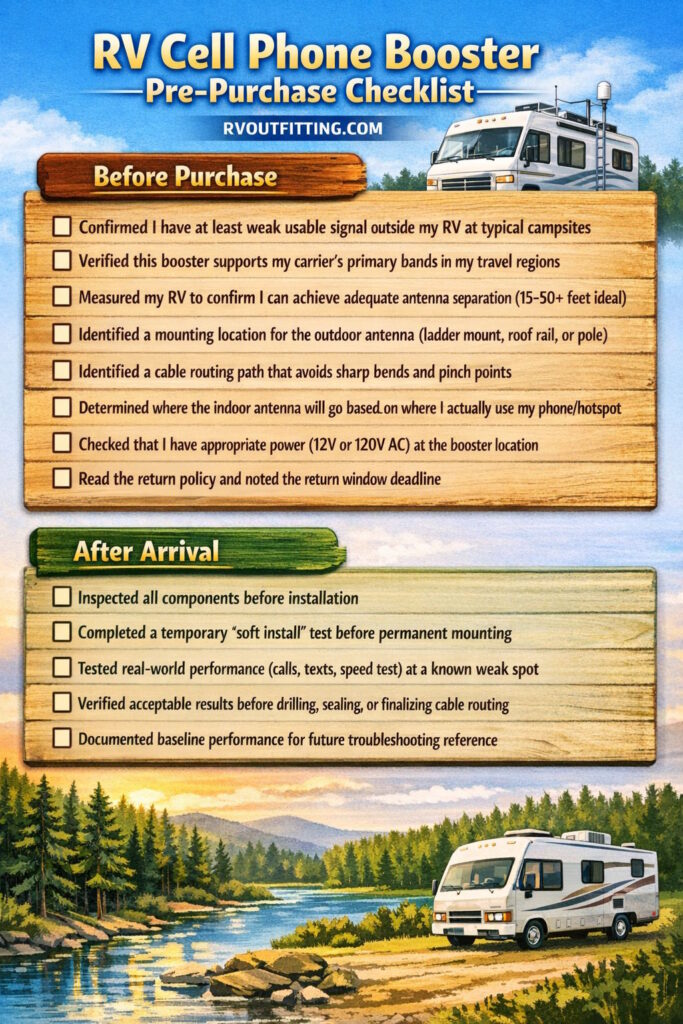
6. Pre-Purchase Checklist (Save This)
Use this checklist before you buy and after your booster arrives:
Before Purchase
- [ ] Confirmed I have at least weak usable signal outside my RV at typical campsites
- [ ] Verified this booster supports my carrier’s primary bands in my travel regions
- [ ] Measured my RV to confirm I can achieve adequate antenna separation (15–50+ feet ideal)
- [ ] Identified a mounting location for the outdoor antenna (ladder mount, roof rail, or pole)
- [ ] Identified a cable routing path that avoids sharp bends and pinch points
- [ ] Determined where the indoor antenna will go based on where I actually use my phone/hotspot
- [ ] Checked that I have appropriate power (12V or 120V AC) at the booster location
- [ ] Read the return policy and noted the return window deadline
After Arrival
- [ ] Inspected all components before installation
- [ ] Completed a temporary “soft install” test before permanent mounting
- [ ] Tested real-world performance (calls, texts, speed test) at a known weak spot
- [ ] Verified acceptable results before drilling, sealing, or finalizing cable routing
- [ ] Documented baseline performance for future troubleshooting reference
7. Who Should Buy What? (Buyer Personas)
The Weekender
What you need:
- A straightforward kit that works for occasional weekend trips
- Budget-friendly option (you’re not living full-time in fringe coverage)
- Simple mounting that can be easily adjusted or removed
What to avoid:
- Over-engineering your setup for trips where campground Wi-Fi might be good enough
- Spending premium prices for features you won’t fully utilize
Best approach: Start with a budget-to-mid-tier kit. Test it on a few trips. Upgrade only if you consistently camp in areas where the basic kit struggles.
The Full-Timer / Remote Worker
What you need:
- Reliable performance for daily calls, video meetings, and hotspot use
- A brand with responsive support (because downtime costs you money)
- Willingness to invest time in optimal installation
- Possibly a multi-source connectivity strategy (booster + router + backup options)
What to avoid:
- Cheap kits with questionable support when your income depends on connectivity
- Expecting any single booster to solve all your connectivity needs
Best approach: Invest in a mid-to-premium kit known for support responsiveness. Pair it with a quality router setup to distribute the boosted signal. Consider satellite backup for true dead zones.
For building a complete connectivity stack, see:
- Best RV Wi-Fi Boosters & Routers (Top Picks and Setup Tips)
- Peplink Router for RV Internet
- Starlink Roam for RV (for dead zone situations)
The Budget Hunter
What you need:
- Lowest reasonable cost that still delivers meaningful improvement
- Patience for potentially more trial-and-error during setup
- Realistic expectations about support quality
What to avoid:
- The cheapest possible option if it doesn’t support your carrier’s bands
- Assuming “budget” means “plug-and-play with no effort”
Best approach: Budget boosters can deliver results nearly identical to premium ones when installed correctly. Focus on getting placement right. Accept that you may need to troubleshoot more independently.
Comparison Table: Budget vs. Mid-Tier vs. Premium
| Factor | Budget Tier | Mid-Tier | Premium |
|---|---|---|---|
| Typical Price Range | $150–$250 | $300–$450 | $500–$700+ |
| Best For | Occasional campers, testing the waters, known-good signal areas | Full-timers who want balance of value and support | Remote workers with income depending on connectivity |
| Installation Forgiveness | Less forgiving; placement/band match matters more | Better diagnostics often available | Often best documentation and troubleshooting guidance |
| Support Experience | Varies widely | Generally more responsive | Typically most responsive (brand reputation matters) |
| Build Quality | Usually acceptable; occasional durability complaints | Solid; fewer mount/cable issues reported | Premium feel; fewer hardware complaints |
| Fringe Zone Performance | May struggle at coverage edges | Competitive with premium in most scenarios | Best chance in truly marginal areas |
FAQ (Data-Backed Answers)
Will a cell booster work if I have zero bars outside my RV?
Usually no. Owners commonly report that if there’s no usable signal outside—nothing intermittent to “grab”—a booster has nothing to amplify. In that scenario, many RVers end up exploring satellite-based options like Starlink Roam instead.
How much improvement should I realistically expect?
In real-world use, many users find it’s most often a 1–2 bar improvement—and the bigger “win” is usability (calls hold, texts go through, hotspot stops collapsing), not just the icon on your screen. Focus on whether your connection works, not whether bars look better.
Why do some people get no improvement even after installing correctly?
Three common causes show up repeatedly:
- The outdoor antenna isn’t aimed at a helpful tower
- Antennas are too close (performance throttles due to oscillation)
- The outside signal is too weak/too inconsistent to amplify meaningfully
A fourth cause: carrier/band mismatch. Some buyers discovered their booster didn’t support a key band in their area—exchanging for a different model or band configuration sometimes solved it.
Does the booster need to be close to my phone?
Yes, proximity to the indoor antenna matters. Many owners describe best results within a few feet of the indoor antenna. Plan your setup around creating a “signal zone” where you actually use your devices—dinette for work, bedroom for overnight charging, or near your hotspot/router.
Can a cell booster help while driving?
Several owners use boosters designed for in-motion use across long travel routes. The biggest difference tends to be fewer dropped calls and more consistent service in fringe areas—again, assuming there’s at least some signal to boost. Stationary/directional boosters (with antennas you aim at camp) are not designed for this use case.
Do I need to register a cell booster?
In the U.S., FCC rules require consumer signal boosters to include provider consent and registration requirements with your wireless carrier. Check your carrier’s specific registration process before installation.
Why is T-Mobile performance sometimes worse than other carriers?
A small but important thread in the owner feedback: some T-Mobile users report no improvement and specifically mention band compatibility concerns (bands 66 and 71 are mentioned). If you’re primarily a T-Mobile user, treat band support as a “verify before you buy” item—a booster that helps Verizon/AT&T well but misses your key bands will feel like a total loss.
Final Verdict
The “Lane” Strategy Works: Choosing an RV cell phone booster isn’t about finding the “best” one—it’s about matching your signal environment, carrier, rig layout, and effort tolerance to the right tier of product.
- If you have weak-but-present signal outside and you’re willing to treat installation like a real project, you’ll likely join the large group of owners who describe boosters as “finally, I can work/call/live inside my RV.”
- If you’re regularly in true dead zones, no booster will help—and you should look at satellite options instead.
- If you want plug-and-play magic with zero effort, this entire product category will probably frustrate you.
The owners who succeed follow the same fundamentals: they test before committing, mount the outdoor antenna high and clear, maximize separation, place the indoor antenna where they actually use their devices, and fine-tune until it works.
Ready to choose a specific model? We’ve ranked the top performers based on these exact criteria—real owner feedback, installation reality, and honest performance patterns.
Related Reading
Building a complete RV connectivity system? These guides help you put all the pieces together:
- RV Tech and Connectivity: A Complete Guide
- Best RV Wi-Fi Boosters & Routers
- Peplink Router for RV Internet
- Starlink Roam for RV
- RV Surge Protectors 101
- RV Electrical Safety Tips
- RV Camping for Beginners