RV Bathroom Mold & Mildew: Removal & Prevention Guide
Last updated: February 2026
If you’ve ever opened your RV bathroom door to a musty smell and suspicious dark spots, you’re not alone—this guide covers everything you need to know about RV bathroom mold and mildew, from fast prevention routines to safe removal steps and the best products to keep your space clean.
Quick Answer / Quick Start
The safest, fastest path to a mold-free RV bathroom:
- Keep humidity between 30–50% RH inside your RV bathroom at all times—use a hygrometer to monitor it.
- Run your exhaust fan during and after every shower, and crack a window when possible.
- Adopt a 2-minute post-shower wipe-down with a squeegee and microfiber towel to eliminate standing moisture.
- Never mix bleach with ammonia or vinegar—this creates toxic fumes in a tiny RV space.
- If the affected area is under approximately 10 square feet, the EPA considers that a reasonable DIY threshold; larger or recurring problems may need professional help.
- Vinegar kills roughly 82% of mold species, making it a solid first-line DIY cleaner for most RV bathroom surfaces.
- Storage is a major mold trigger—always include a bathroom-specific mold prevention plan before putting your RV away for the season.
Safety & Health Disclaimer: This guide is informational only and is not medical advice. If you or anyone in your household has asthma, allergies, or a compromised immune system, consult a healthcare professional before tackling mold cleanup. Always wear appropriate PPE (mask, gloves, goggles) when cleaning mold.
Start here — mini decision rule:
- Small, visible mold + you can dry the area → DIY cleanup using the steps in this guide, then lock in a prevention routine.
- Hidden or recurring mold + strong musty odor → Inspect the bathroom hotspots listed below and consider environmental testing (ERMI is noted as a research tool, not a diagnostic standard).
- Large affected area or structural damage (warped walls, swelling, bulging) → Professional remediation is likely needed; evaluate a replace-vs-repair decision.
Why Your RV Bathroom Is a Mold Magnet
Your RV bathroom packs a full wet room into a space smaller than most closets. That combination of constant moisture, limited airflow, and tightly sealed construction creates near-perfect conditions for mold and mildew to thrive.
The moisture stack in a tiny space
Every shower, hand wash, and toilet flush dumps water vapor into a space with almost nowhere for it to go. An average person contributes roughly one liter of water vapor per day just through normal breathing and activity. Scale that to a family of four and you’re looking at somewhere between five and ten liters of moisture daily being released inside a sealed box.
Now layer on the specifics of an RV bathroom: trapped steam from hot showers, condensation forming on cool walls and windows, poor natural airflow behind closed doors, wet towels hanging in place, and closed cabinets trapping damp air. Each of these moisture sources stacks on top of the others. In a stick-built home, that moisture disperses across thousands of square feet. In your RV bathroom, it has nowhere to go.
Storage makes it worse (the “closed RV” problem)
Mold doesn’t take a break when you park your RV for the season—in fact, storage is one of the biggest mold triggers. When you seal up a rig with any residual moisture inside, the bathroom becomes a prime hotspot. Closed doors, stagnant air, and even small amounts of dampness left in cabinets or around the toilet base can fuel mold growth over weeks or months of sitting idle.
Many RVers open their rigs after winter storage to find the bathroom covered in mildew. The “closed RV” environment traps humidity with no ventilation and no one around to catch it early.
A/C nuance (condensation traps)
Running your air conditioner seems like it should help—and it does reduce humidity in general. But cranking the A/C to very cold settings in a small RV bathroom can actually create condensation zones on walls, fixtures, and surfaces where warm moist air meets cold surfaces. Those condensation traps become feeding grounds for mold, especially on surfaces behind or below the A/C unit’s airflow path.
The takeaway: moderate, consistent cooling beats aggressive cold blasts when it comes to mold prevention in tight spaces.
How to Spot Mold in Your RV Bathroom Fast
Catching mold early is the difference between a quick wipe-down and a full remediation project. Here’s how to find it before it spreads.
Visual signs checklist
Look for these red flags during a quick bathroom scan:
- Discoloration — dark spots, green or black patches on walls, ceilings, caulk lines, or grout
- Peeling or bubbling paint — moisture trapped behind the surface pushing paint away
- Bulging or soft drywall/wall panels — a sign that moisture has penetrated the substrate
- Fuzzy or slimy texture on caulk, grout, or silicone seals
- Staining around fixtures that doesn’t wipe away easily
Smell-based detection
Sometimes your nose finds mold before your eyes do. A persistent musty or earthy odor in your RV bathroom—especially one that returns after cleaning—is a strong indicator of hidden mold growth. If you detect that smell, the next step is to open and inspect likely cavities: behind access panels, under the sink, and inside closed cabinets.
Don’t dismiss a faint musty smell as “just an old RV.” That odor is volatile organic compounds released by active mold colonies, and it means growth is happening somewhere nearby.
Hidden hotspots map (bathroom-specific)
Mold loves the places you don’t look. These are the top hidden hotspots in an RV bathroom:
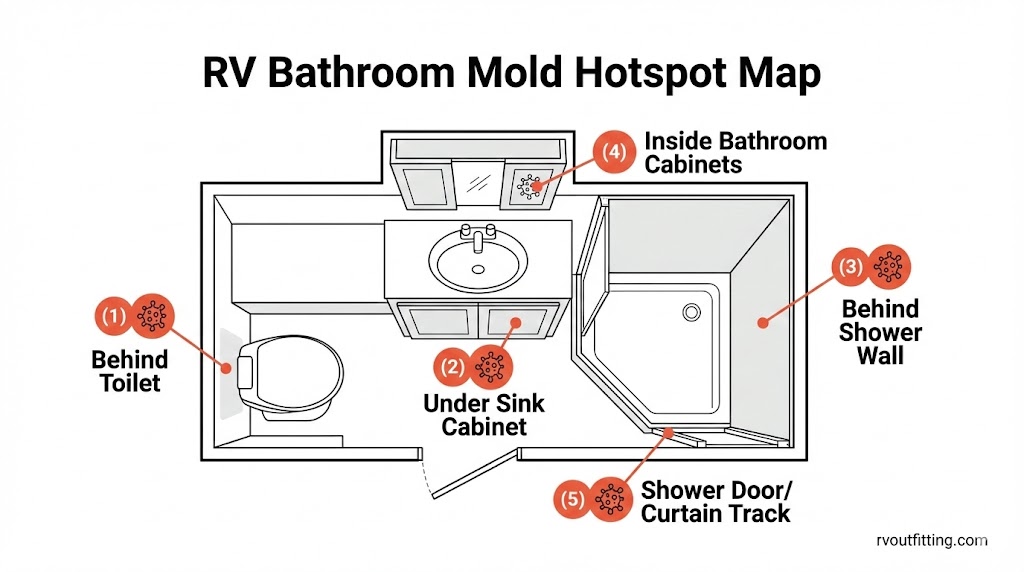
- Behind the toilet — splashes and condensation collect against the wall where you can’t see them.
- Under the sink — slow drips and pipe condensation create a constantly damp environment inside the cabinet.
- Inside bathroom cabinets — closed doors with zero airflow and stored damp items.
- Behind shower walls — water can wick through caulk failures or panel seams into the wall cavity.
- Around the shower door or curtain track — water pools in tracks and seals that rarely get dried.
Make a habit of checking these spots periodically. Catching a small patch early saves you from dealing with a large-scale problem later.
Mold vs. Mildew (Quick Definition Block)
Getting the terminology right matters because it changes how you respond.
Definitions
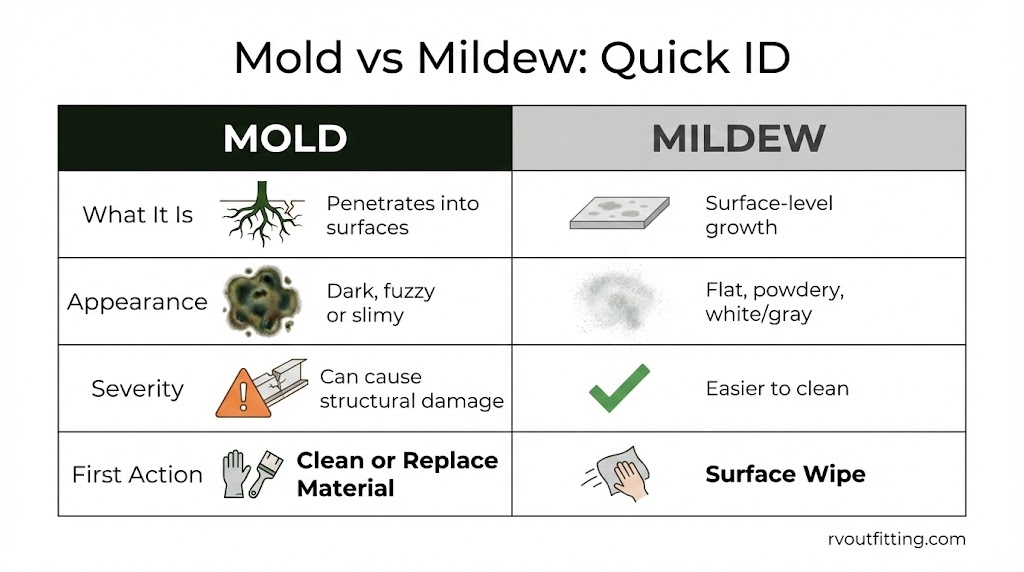
| Mold | Mildew | |
|---|---|---|
| What it is | A fungal growth that can penetrate into surfaces | A surface-level fungal growth |
| Appearance | Often darker (black, green, brown); can be fuzzy or slimy | Usually flat, powdery, white or gray |
| Where it grows | On and into porous materials (wood, drywall, caulk) | On surface of tiles, grout, shower walls |
| Severity | Can cause structural damage if left unchecked | Generally easier to clean; less likely to cause lasting damage |
Practical implications
If you’re dealing with mildew—flat, surface-level discoloration on tile or a shower wall—a surface wipe with vinegar or a bathroom cleaner is usually enough. Mildew hasn’t penetrated the material, so cleaning the surface solves the problem.
Mold is different. Because it can grow roots (hyphae) into porous materials like wood paneling, drywall, and silicone caulk, a surface wipe may remove what you see but leave the colony alive underneath. When mold has penetrated the material, replacement of that material becomes more realistic than repeated cleaning.
The practical rule: if it comes off easily with a surface wipe and doesn’t return within a couple of weeks, you’re likely dealing with mildew. If it keeps coming back or the material feels soft or damaged underneath, assume mold and treat accordingly.
Types of Mold Found in RV Bathrooms
Not all mold is the same, and knowing the common species helps you understand the risk level—without trying to diagnose it yourself.
Common species list (dossier)
These are the types of mold most frequently found in RV bathroom environments:
- Stachybotrys chartarum — commonly called “black mold”; often found on water-damaged drywall and wood
- Aspergillus — very common; can grow on a wide range of surfaces including dust and damp walls
- Penicillium — often found on water-damaged materials; recognizable by blue-green color
- Chaetomium — associated with heavily water-damaged materials; produces a strong musty odor
- Fusarium — can grow at cooler temperatures; sometimes found around leaking fixtures
- Alternaria — common in damp areas like showers and under sinks
“Black mold” clarity block
Stachybotrys chartarum is the species most people mean when they say “black mold.” It is described as highly toxic and is associated with serious health concerns, particularly in enclosed or poorly ventilated spaces like an RV bathroom.
Important: Don’t diagnose mold by color alone. Many mold species can appear dark or black. Aspergillus and Chaetomium, for example, can both look black. Color is not a reliable way to identify species or toxicity. If you’re concerned about the type of mold in your RV, professional testing is the only way to confirm species.
Health Risks of RV Bathroom Mold Exposure (People + Pets)
Understanding the health risks helps you prioritize cleanup—but remember, this is general information, not medical advice.
Common symptom categories (non-medical)
Mold exposure in an enclosed RV bathroom can affect people in several ways, broadly grouped into these categories:
- Respiratory symptoms — coughing, wheezing, nasal congestion, throat irritation, difficulty breathing
- Allergic reactions — sneezing, runny nose, itchy or watery eyes, skin rashes
- Skin symptoms — irritation, redness, or rashes from direct contact with moldy surfaces
People with asthma, allergies, or compromised immune systems are at higher risk and may experience more severe reactions. If symptoms persist or worsen, consult a healthcare professional.
Pets & mold toxicity (gap coverage)
Your pets are also at risk in a moldy RV. Dogs and cats can show symptoms of mold exposure that are easy to miss or misattribute to other causes. Watch for unusual scratching, nosebleeds, lethargy, and respiratory distress. Pets spend time close to the floor and in corners where mold concentration can be highest—and they can’t tell you something smells wrong.
If your pet shows these symptoms and your RV has a mold issue, mention the mold exposure to your veterinarian.
Mycotoxins definition (AI-friendly)
Mycotoxins are toxic substances produced by certain mold species. Not all molds produce mycotoxins, but those that do—such as Stachybotrys chartarum—can release these compounds into the air, particularly when the mold is disturbed during cleaning. This is one of the key reasons PPE (especially an N95 mask) is critical during mold removal.
Mold Prevention in Your RV Bathroom (The Bathroom-First Playbook)
Prevention beats cleanup every time. This section gives you a repeatable system to keep mold from gaining a foothold in your RV bathroom.
Ventilation best practices
Airflow is your single most effective weapon against bathroom mold. Here’s how to maximize it:
- Run the exhaust fan during every shower and for at least 10–15 minutes after. If your RV bathroom has a vent fan, this is non-negotiable.
- Crack a window or roof vent when showering to create cross-ventilation and give moisture an escape route.
- Upgrade your vent fan if the stock unit is weak. Products like the MaxxAir or Maxxfan series are popular among RVers for significantly improving bathroom and RV-wide airflow.
- Leave the bathroom door open after showers to let moist air disperse throughout the RV rather than staying trapped in one small room.
Control humidity (tools + target)
The target zone for indoor humidity is 30–50% RH. Staying in this range makes it very difficult for mold to establish itself. Here’s how to hit and maintain that target:
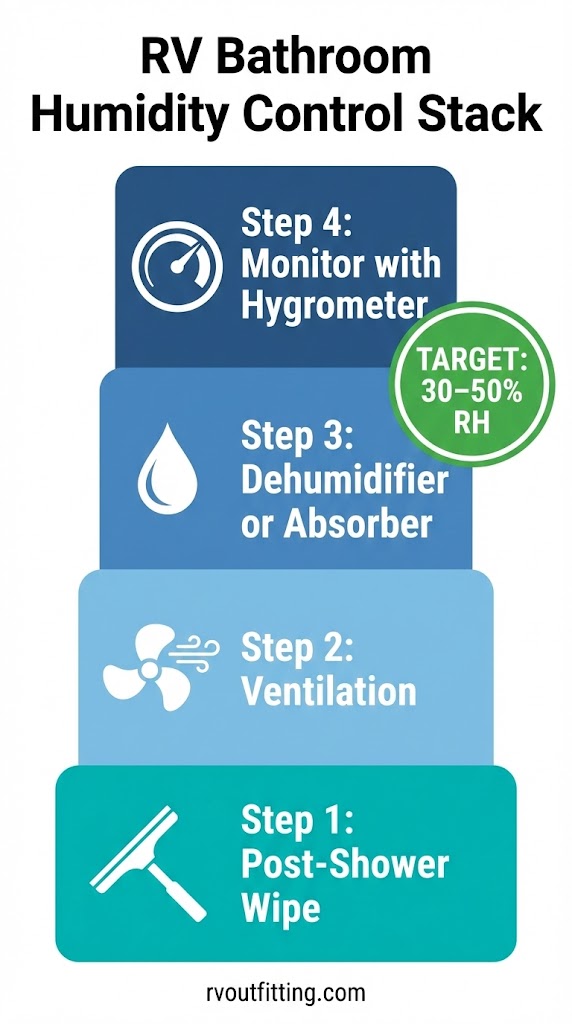
- Use a hygrometer — a small, inexpensive digital hygrometer placed in your bathroom tells you exactly where you stand. You can’t manage what you don’t measure.
- Moisture absorbers — products like DampRid tubs or hanging bags work well in small RV spaces, especially in cabinets and closets.
- Mini dehumidifiers — for persistent humidity issues, a compact electric dehumidifier designed for small spaces can pull meaningful moisture from the air.
- Combine tools — the most effective approach layers ventilation + absorbers or a dehumidifier + monitoring with a hygrometer.
Post-shower routine (2-minute habit)
This is the single highest-impact daily habit for preventing mold in your RV bathroom:
- Squeegee shower walls and the door or curtain immediately after turning off the water.
- Wipe down any remaining wet surfaces—sink, countertop, toilet exterior—with a microfiber towel.
- Hang textiles to dry — spread towels and bath mats so air can circulate around them; don’t bunch them up.
Two minutes. Every shower. This alone eliminates the majority of standing moisture that feeds mold growth.
Mold-resistant materials & micro-upgrades
Small material swaps can make a big difference in a mold-prone RV bathroom:
- Vinyl shower walls instead of fabric curtains — vinyl doesn’t absorb water and is easy to wipe dry.
- Silicone-based sealants — use high-quality RV-friendly silicone caulk around the shower, toilet base, and sink. Silicone resists mold better than standard latex caulk.
- Quick-dry bath mats — swap out cotton mats for quick-dry or microfiber options that don’t hold moisture for hours.
Plumbing maintenance & leak prevention
Slow leaks are silent mold factories. Make a habit of routinely checking:
- Under the sink — look for drips at pipe connections, dampness on the cabinet floor, or water stains.
- Around the toilet base — feel for moisture around the seal. Even a tiny wax ring leak can feed mold behind the toilet for weeks.
- Shower fixtures — check for dripping faucets or showerheads and repair them promptly.
Fix leaks immediately. A small drip in an enclosed RV cabinet can create a mold colony in days. If you’re dealing with low water pressure or plumbing issues, addressing those problems early can also prevent the kind of fixture failures that lead to hidden leaks.
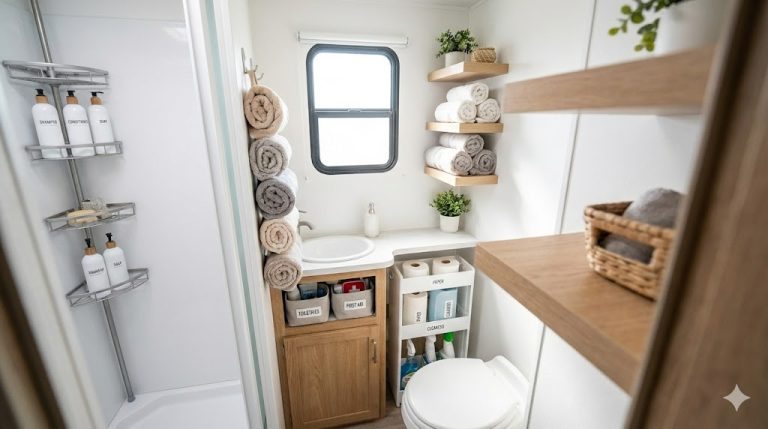
Storage of towels & bath items
How you store bathroom textiles matters more than you’d think:
- Never store damp towels in a closed bin or cabinet. Wet fabric in a sealed space is a mold incubator.
- Use hooks or bars that allow full airflow around hanging towels.
- Rotate towels frequently and wash them before they develop a musty smell.
- Store toiletries and bath items on open shelves or racks rather than in sealed containers where condensation can build.
Inspection routine (hotspot sweep)
Build a quick inspection sweep into your routine—especially before and after trips:
- Pull out items from under the sink and look at the cabinet floor and walls.
- Check behind the toilet (use a flashlight and mirror if access is tight).
- Open all bathroom cabinets and feel for dampness.
- Run your hand along caulk lines in the shower for soft spots or discoloration.
Catching mold at the “small spot” stage is infinitely easier and cheaper than dealing with it once it’s spread behind walls.
A/C condensation guardrails
As mentioned earlier, aggressive A/C use can create cold-surface condensation traps in a small bathroom. To avoid this:
- Don’t set the A/C extremely low in hot, humid conditions. Moderate settings with good airflow are more effective at controlling moisture.
- Check for condensation on bathroom walls and fixtures after running the A/C, especially surfaces near or below vent openings.
- Use a fan to keep air circulating rather than relying on the A/C alone to manage humidity.
For a deeper dive into managing your RV’s climate control setup for year-round comfort, make sure your system is optimized for moisture management, not just temperature.
How to Remove Mold & Mildew From an RV Bathroom (Step-by-Step)
When prevention isn’t enough and you’re facing active mold, here’s how to safely and effectively remove it.
What you’ll need (PPE + tools checklist)
PPE (Personal Protective Equipment):
- N95 or fine-particulate respirator mask
- Rubber gloves (not cloth)
- Safety goggles (sealed, not open-frame glasses)
Tools & Supplies:
- Spray bottles (one per cleaning solution)
- Soft-bristle brush (for scrubbing grout and caulk)
- Microfiber towels (for wiping and drying)
- Squeegee
- Trash bags (for disposing of contaminated materials)
- Plastic sheeting (optional, to contain the work area)
DIY cleaning solutions (with cautions)
You have several effective DIY options. Each has strengths and limitations:
| Solution | Mix Ratio | Best For | Key Caution |
|---|---|---|---|
| White vinegar | Undiluted | Most surfaces; first-line cleaner | Mild acid; safe for most RV materials |
| Tea tree oil | 2 tsp per 2 cups water | Natural antifungal boost | Strong scent; allow dwell time |
| Hydrogen peroxide | As sold (typically 3%) | Porous and nonporous surfaces | Test on colored surfaces first (may lighten) |
| Baking soda | Paste or dissolved in water | Gentle scrubbing; deodorizing | Mild; best combined with vinegar |
| Borax | Dissolved in water | Hard surfaces | Don’t rinse; residue continues to inhibit mold |
| Rubbing alcohol | 50/50 with water | Quick surface disinfection | Evaporates fast; ventilate area |
| Ammonia | 50/50 with water | Nonporous hard surfaces | NEVER mix with bleach |
| Bleach | Diluted per label | Nonporous surfaces only | NEVER mix with ammonia or vinegar; doesn’t penetrate porous materials |
⚠️ Chemical Safety Rules:
- Bleach is for nonporous surfaces only. It does not penetrate porous materials like wood or drywall, so it may appear to clean the surface while leaving mold alive underneath.
- NEVER mix bleach with ammonia or vinegar. This creates toxic chlorine or chloramine gas—extremely dangerous in a small, enclosed RV bathroom.
- Ventilate thoroughly when using any cleaning solution. Open windows, run the vent fan, and take breaks.
Vinegar vs bleach (snippet-ready decision note)
This is one of the most common questions in RV mold cleanup, so here’s the straightforward answer:
Vinegar kills roughly 82% of mold species and works on both porous and nonporous surfaces. It penetrates into materials where mold roots can hide. Bleach, while effective at surface-level sanitation on nonporous surfaces, does not penetrate porous materials. On surfaces like wood, grout, or caulk, bleach may remove visible mold while leaving the colony alive beneath the surface.
For most RV bathroom surfaces, vinegar is the better first choice. Use bleach only on truly nonporous surfaces like porcelain or plastic, and only when vinegar hasn’t been effective.
Surface-specific removal guides (bathroom)
Caulk/silicone (shower and toilet areas): Spray undiluted vinegar directly onto the affected caulk. Let it sit for at least an hour, then scrub with a soft-bristle brush. If the mold is embedded into the silicone and doesn’t come clean, replacement is the better call (see the caulk replacement section below).
Tile and grout: Apply your chosen cleaning solution and scrub grout lines with a soft-bristle brush. Work in small sections, rinse, and dry thoroughly. The key after cleaning tile and grout is keeping moisture low—this is where your post-shower wipe-down routine pays off.
Wood panels and drywall: If you see swelling, bulging, or soft spots in wood or drywall behind your shower or around the toilet, that’s an escalation signal. Surface cleaning won’t solve the problem. These materials will likely need to be replaced, especially if the structural integrity is compromised.
Shower curtains vs. walls: If you’re using a fabric shower curtain that keeps growing mildew, consider upgrading to vinyl shower walls or a mold-resistant liner. The material swap eliminates a recurring moisture trap.
Moldy silicone caulk replacement (gap module)
When cleaning caulk fails and mold keeps coming back, replacement is the answer. Here’s the workflow:
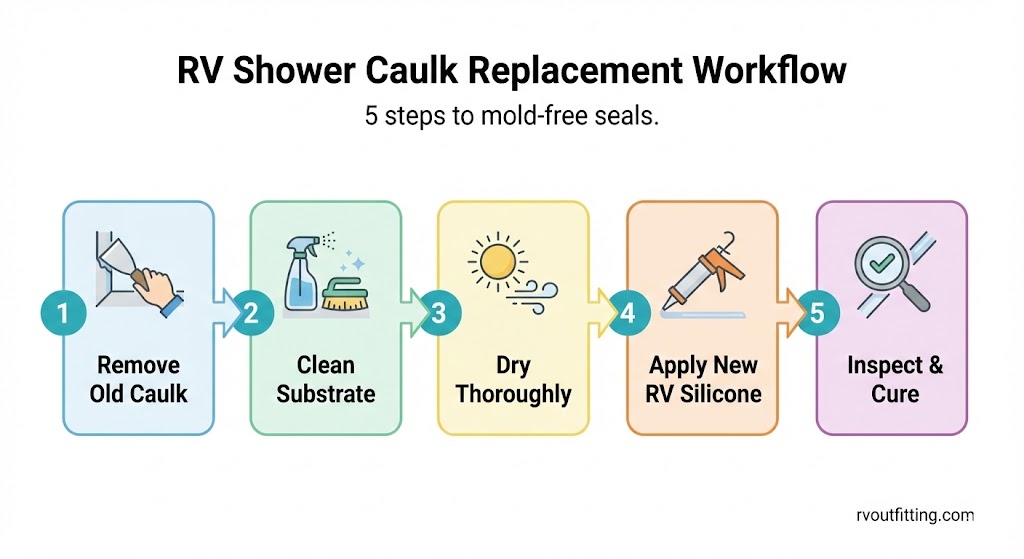
- Remove old caulk — use a caulk removal tool or razor scraper to fully strip the old silicone. Get all of it out; leaving remnants underneath defeats the purpose.
- Clean the substrate — scrub the exposed surface with vinegar or rubbing alcohol to kill any remaining mold and remove residue.
- Dry thoroughly — this step is critical. Let the area dry completely before applying new caulk. Any trapped moisture underneath new silicone will restart the mold cycle.
- Apply new RV-friendly silicone caulk — use a mold-resistant, RV-rated silicone sealant. Apply a smooth, continuous bead and tool it for a clean finish.
- Allow full cure — follow the manufacturer’s instructions for cure time before exposing the new caulk to water. (Specific cure times vary by product—check the label.)
Commercial RV mold removers (round-up structure)
When evaluating commercial cleaners, compare them based on surface compatibility, whether they focus on stain removal vs. actually killing mold, and ventilation requirements for indoor use.
Products referenced for RV mold and mildew removal include: Dicor, Spray Nine, Lippert, Walex, MiracleMist, Shurhold Moldaway, and OxiClean. Each is formulated differently—some target rubber and vinyl, others are designed for fabric or hard surfaces. Always check the product label for surface compatibility before use, and ensure adequate ventilation in your RV bathroom when using any chemical cleaner.
Replace vs clean (triage rules)
Not every mold situation is a cleanup job. Here’s how to triage:
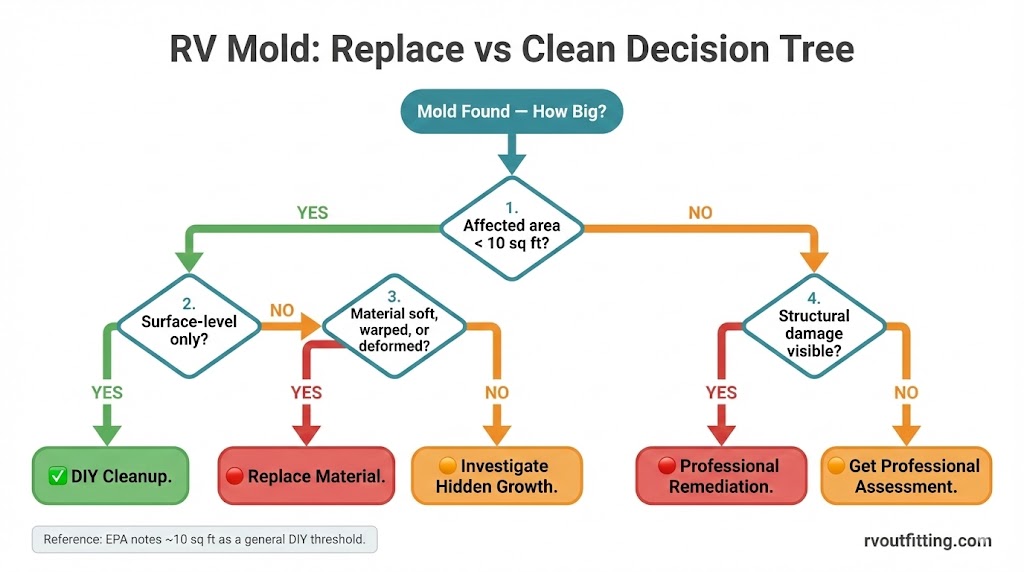
- Affected area under approximately 10 sq ft + surface-level growth → DIY cleanup is reasonable (this aligns with the EPA’s referenced DIY threshold).
- Persistent musty odor even after surface cleaning → likely hidden growth behind walls or under fixtures; investigate further before deciding.
- Soft, swollen, or deformed materials → the substrate is damaged. Cleaning the surface won’t fix structural compromise. Replacement is more realistic.
- Recurring mold in the same spot after multiple cleanings → there’s an underlying moisture source you haven’t found, or the material is colonized beyond surface-level cleaning.
Troubleshooting Matrix (Symptom → Likely Cause → First Fix)
Use this matrix for fast answers when you spot a problem and need a starting point.
| Symptom | Likely Cause | First Fix |
|---|---|---|
| Musty odor that won’t go away | Hidden mold behind wall/fixture; humidity above target | Inspect behind toilet and under sink; place hygrometer to check RH |
| Recurring dark spots on caulk | Mold colonized inside the silicone; moisture not controlled | Replace caulk entirely; improve post-shower drying routine |
| Condensation on walls after shower | Ventilation deficit; no exhaust fan use | Run vent fan during and after showers; crack a window |
| Damp cabinets under sink | Slow leak at pipe connections | Check all fittings for drips; dry cabinet and add a moisture absorber |
| Mold discovered after storage | Residual moisture sealed in; no airflow during storage | Deep clean, dry out completely, implement pre-storage checklist |
| Damp smell in bathroom cabinets | Stored wet textiles; no airflow in closed space | Remove damp items; leave cabinet doors open; add absorber |
| Mold near A/C vent in bathroom | Cold surface condensation trap from aggressive A/C | Raise A/C temp slightly; improve air circulation in bathroom |
| Soft or bulging wall behind shower | Water intrusion through failed caulk or seam | Stop using shower; inspect for water damage; likely needs material replacement |
Best Products for RV Bathroom Mold & Mildew (Comparison Section)
Here’s a breakdown of products that help with RV bathroom mold, organized by category so you can compare at a glance.
Cleaner comparison table (dossier products)
| Product | Surface Compatibility | Positioning | PPE/Ventilation Notes |
|---|---|---|---|
| Dicor | Rubber roofs, exterior surfaces | Mold/mildew stain removal | Use outdoors or with ventilation |
| Spray Nine | Multi-surface (hard, nonporous) | Heavy-duty cleaner/disinfectant | Strong formula; ventilate well |
| Lippert | RV-specific surfaces | Mold/mildew cleaning | Follow label for surface compatibility |
| Walex | Bathroom surfaces, holding tanks | Odor + mold control | Check label for bathroom-specific use |
| MiracleMist | Vinyl, fiberglass, tile, grout | Mold/mildew stain removal | Indoor-rated but ventilate |
| Shurhold Moldaway | Marine/RV vinyl, plastic, fabric | Mold/mildew stain removal | Use in well-ventilated area |
| OxiClean | Fabric, grout, hard surfaces | Oxygen-based stain remover | Gentler than bleach; good for textiles |
Note: Always check the product label for your specific surface (vinyl, plastic, fabric, rubber) before use. “Kills mold” and “removes mold stains” are different claims—stain removal doesn’t always mean the mold is dead.
Moisture absorber comparison (dossier products)
| Product | Format | Best Placement | Maintenance |
|---|---|---|---|
| DampRid Tub | Open tub | Cabinets, under sink | Replace when crystals dissolve; rated up to 6 months (availability may vary) |
| DampRid Hanging Bag | Hanging pouch | Closets, small cabinets | Discard when full |
| DampRid RV & Boat | RV-specific format | General RV bathroom use | Purpose-built for small spaces |
| DampRid Charcoal Tub | Open tub with charcoal | Odor-heavy areas | Dual action: moisture + odor |
| Camco Bucket | Bucket absorber | Larger RV spaces, storage | Refill as needed |
| Star Brite No Damp | Bucket/container | RV and marine use | Established marine product |
| Eva-Dry E-333 | Renewable mini dehumidifier | Small cabinets, enclosed spaces | Recharge when indicator changes; no refills needed |
Mini dehumidifier shortlist (dossier models)
For RVers dealing with persistent humidity that absorbers alone can’t handle, a mini electric dehumidifier can make a meaningful difference.
| Model | Key Feature |
|---|---|
| SEAVON 27oz | Compact; suitable for small RV spaces |
| ProBreeze Mini | Popular in the RV community; small footprint |
| Crane Compact | Brand-name reliability in a small form factor |
| Afloia Q10 | Quiet operation noted |
| TABYIK DH CS01 | Budget-friendly small-space option |
Model rotation note: Small dehumidifier models are updated frequently by manufacturers. Specific model numbers may change every 6–12 months. Always verify current availability and compare specs at the time of purchase.
Air purifier “when it helps” note (not a mold remover)
Air purifiers do not remove mold—they filter airborne particles, including mold spores, from the air. They can be a useful supplementary tool if someone in your RV is sensitive to mold spores, but they should never be your primary mold control strategy. Fix the moisture source first.
Products noted in this category include the Coleman-Mach i-Wave-M and the Austin Air HealthMate Jr. Plus.
RV Storage & Winterization Mold Prevention (Bathroom Edition)
The “open your RV after storage and find a mold disaster” scenario is preventable. Here’s the bathroom-specific checklist.
Pre-storage deep clean
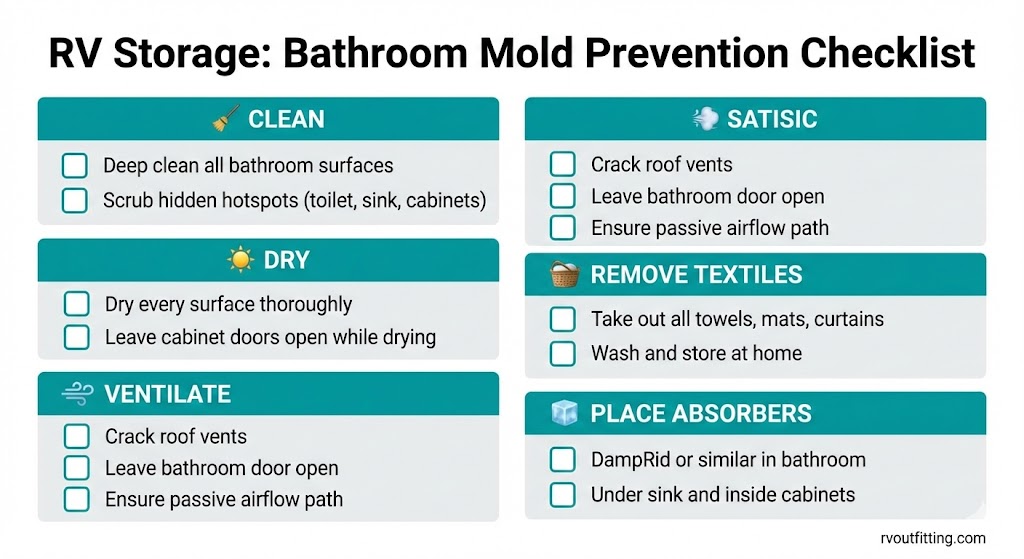
Before putting your RV away, give the bathroom a thorough cleaning and dry-out:
- Clean all surfaces with a mold-inhibiting solution (vinegar works well).
- Pay special attention to hidden hotspots: behind the toilet, under the sink, inside all cabinets.
- Remove any visible mold or mildew completely before sealing the rig.
- Dry every surface thoroughly—leave cabinet doors open for airflow while drying.
Drain/winterize pipes (high level)
Drain your freshwater lines and winterize your plumbing system to prevent standing water from becoming a moisture source during storage. Any water left sitting in pipes, the toilet bowl, or traps can evaporate into the sealed space and raise humidity. For detailed winterization steps, consult your RV manufacturer’s guide or a dedicated winterization walkthrough. If you use your RV freshwater system for off-grid camping, draining completely before storage is especially important.
Ventilation & moisture absorbers during storage
Airflow doesn’t stop being important just because you’re not using the RV:
- Leave roof vents cracked (with covers if weather is a concern) to allow passive air circulation.
- Place moisture absorbers in the bathroom, under the sink, and inside cabinets. DampRid tubs or similar products are popular choices for storage.
- Consider DampRid detection strips as a newer tool for monitoring moisture levels during storage without opening the RV.
- Do not seal the bathroom door shut. Leave it open so air can circulate between the bathroom and the rest of the RV.
Remove soft furnishings & linens
Before storage, remove all bathroom textiles from the RV:
- Towels, washcloths, and bath mats should be taken out, washed, and stored dry in your home.
- Remove any fabric shower curtains.
- Take out sponges, loofahs, or any item that holds moisture.
Leaving damp or even slightly moist textiles in a sealed RV bathroom is one of the fastest ways to guarantee a mold problem when you reopen.
Advanced: Testing, “New Camper Syndrome,” and When Mold Isn’t the Only Issue
Sometimes the problem is more complex than visible mold. This section covers testing options and a commonly overlooked air quality issue.
ERMI testing (what it is; what it isn’t)
ERMI (Environmental Relative Moldiness Index) is a DNA-based mold analysis that uses a method called qPCR (quantitative polymerase chain reaction) to identify and quantify mold species from a dust sample. It produces a score on a scale from −10 to +20, with higher scores indicating greater mold burden relative to a reference dataset.
Important caveat: The EPA considers ERMI a research tool, not a standardized diagnostic method for consumer use. It can provide useful data, but results should be interpreted carefully and ideally with professional guidance. This is an evolving area—monitor for updates to EPA guidance.
ERMI testing can be useful context if you suspect hidden mold but can’t find it, or if you want a baseline measurement before and after remediation. It should not be used as a sole basis for major remediation decisions.
VOCs + formaldehyde off-gassing (“New Camper Syndrome”)
Not every air quality problem in an RV is mold. “New Camper Syndrome” refers to the off-gassing of volatile organic compounds (VOCs) and formaldehyde from building materials, adhesives, cabinetry, and flooring in new or recently manufactured RVs.
The symptoms can overlap with mold exposure: headaches, respiratory irritation, eye irritation, and general discomfort. If you’re experiencing these symptoms in a newer RV but can’t find visible mold, VOC off-gassing may be the real culprit.
Don’t assume mold when the RV is new and showing no moisture or mold indicators. Ventilation helps with both issues, but the root cause and long-term solutions are different.
When to Call a Professional (and When It May Be “Too Bad to Fix”)
DIY has limits. Here’s when to escalate.
Signs it’s beyond DIY
Consider professional remediation if you’re seeing any of these:
- Widespread mold growth covering large areas of the bathroom or extending into adjacent spaces
- Structural material deformation — walls, floors, or ceiling panels that are warped, swollen, soft, or separating
- Recurring hidden mold — you’ve cleaned multiple times but the mold keeps returning, suggesting growth behind surfaces you can’t access
- Strong, persistent musty odor that remains even after thorough surface cleaning and prevention efforts
Replace vs remediate decision framework
The core decision comes down to scope and damage:
- Under approximately 10 sq ft of surface-level mold on accessible surfaces → DIY remediation is a reasonable approach (aligned with the EPA’s referenced DIY threshold).
- Mold has penetrated into structural materials → replacement of the affected material is typically more effective than repeated surface cleaning.
- Mold covers a large area or is in inaccessible wall/floor cavities → professional remediation is the safer path.
Cost ranges for professional RV mold remediation are not confirmed and vary widely depending on the scope, location, and extent of damage. Get multiple quotes and ask about their process before committing.
Insurance reality check (only what dossier states)
Don’t assume your RV insurance will cover mold damage. Notably, Progressive RV insurance does not cover mold or fungus, and many other policies have similar exclusions. Check your specific policy before relying on a claim, and factor this into your decision about how aggressively to invest in prevention.
FAQ
What causes mold and mildew in RV bathrooms?
The combination of high moisture (from showers, sinks, and humidity), minimal airflow, tightly sealed construction, and small enclosed spaces makes RV bathrooms ideal for mold growth. Storage without ventilation is another major trigger.
How do you get rid of mold in an RV shower?
Spray undiluted white vinegar on affected surfaces, let it sit, then scrub with a soft-bristle brush. For stubborn mold in caulk or grout, hydrogen peroxide or baking soda paste can help. If the mold is embedded in silicone caulk, replacing the caulk is often more effective than repeated cleaning.
Is vinegar or bleach better for killing mold in an RV?
Vinegar is generally the better choice for RV bathrooms. It kills roughly 82% of mold species and penetrates porous surfaces where mold roots hide. Bleach works on nonporous surfaces but doesn’t penetrate porous materials—it may remove visible mold while leaving the colony alive underneath. Never mix bleach with vinegar or ammonia.
What is the best product to remove mold from an RV bathroom?
There’s no single “best” product—it depends on the surface. Products like MiracleMist, Spray Nine, and Shurhold Moldaway are formulated for different materials. Check the cleaner comparison table above and match the product to your specific surface (vinyl, tile, fabric, etc.).
How do you prevent mold in an RV during storage?
Deep clean and dry the bathroom before storage, remove all textiles, drain and winterize plumbing, leave interior doors and cabinets open, crack roof vents for airflow, and place moisture absorbers throughout the bathroom. See the full storage prevention checklist above.
Can mold in an RV make you sick?
Mold exposure can cause respiratory symptoms (coughing, wheezing, congestion), allergic reactions (sneezing, itchy eyes, rashes), and skin irritation. People with asthma, allergies, or compromised immune systems are at higher risk. This is general information—consult a healthcare professional if you’re experiencing symptoms.
What does black mold look like in an RV?
“Black mold” typically refers to Stachybotrys chartarum, which appears dark black or greenish-black and may look slimy. However, many mold species can appear dark or black, including Aspergillus and Chaetomium. Color alone is not a reliable identifier—professional testing is needed to confirm species.
How do you keep an RV bathroom dry after a shower?
Use a squeegee on shower walls immediately after showering, wipe remaining surfaces with a microfiber towel, run the exhaust fan during and after the shower, crack a window for cross-ventilation, and leave the bathroom door open to let moist air disperse.
What humidity level should an RV be kept at?
Aim for 30–50% relative humidity (RH). Use a digital hygrometer to monitor levels, and deploy moisture absorbers or a mini dehumidifier if you’re consistently above 50% RH.
Is RV mold covered by insurance?
Often not. Notably, Progressive RV insurance does not cover mold or fungus damage. Many other RV insurance policies have similar exclusions. Check your specific policy for mold-related coverage details before assuming you’re protected.
What is the best dehumidifier for an RV bathroom?
Compact models like the SEAVON 27oz, ProBreeze Mini, Crane Compact, Afloia Q10, and TABYIK DH CS01 are options designed for small spaces. Model availability changes frequently—verify current models before purchasing, as manufacturers update lineups every 6–12 months.
How do you remove mold from RV caulking and silicone?
Try cleaning first with undiluted vinegar and a brush. If the mold is embedded and keeps returning, fully remove the old caulk with a scraper, clean and dry the surface, then apply new mold-resistant RV-rated silicone caulk and let it cure completely before water exposure.
When is RV mold too bad to fix?
Consider it beyond DIY if the affected area is large, structural materials are warped or deformed, mold keeps recurring after multiple cleanings, or there’s hidden growth in wall cavities. The EPA references approximately 10 sq ft as a general DIY threshold—above that, or when structural integrity is compromised, professional remediation or material replacement is the safer path.
What types of mold are commonly found in RVs?
The most common species include Stachybotrys chartarum (“black mold”), Aspergillus, Penicillium, Chaetomium, Fusarium, and Alternaria. Each has different characteristics and preferred growing conditions, but all thrive in the damp, enclosed environment of an RV bathroom.
Should you ERMI-test your RV if you suspect hidden mold?
ERMI testing can provide useful data about mold species and relative burden, but the EPA considers it a research tool rather than a standardized consumer diagnostic. It may be worth pursuing if you have persistent symptoms, can’t find visible mold, or want a baseline before and after remediation—but interpret results with professional guidance and monitor for updates to EPA recommendations.