RV Bathroom Freeze Damage: Repair & Prevention Guide
Last updated: February 2026
If you’ve woken up to a frozen RV toilet or lifeless shower faucet, you’re not alone—and you’re in the right place. This guide covers everything you need to diagnose, thaw, repair, and prevent freeze damage in your RV bathroom, from emergency first moves to long-term winterization strategies.
Quick Answer / Quick Start
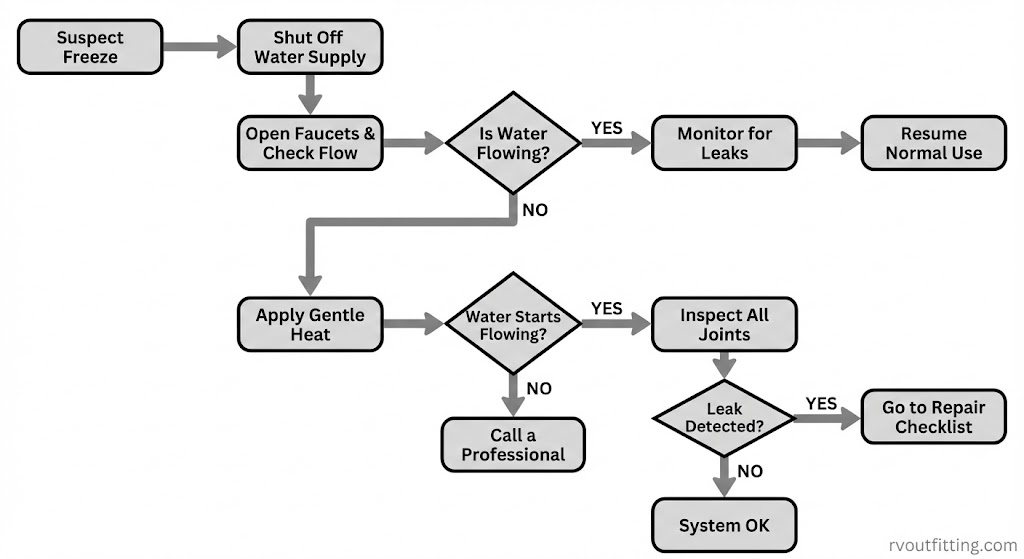
Suspect a freeze in your RV bathroom? Here’s the safest, fastest path:
- Shut off the water supply immediately (city water hookup or water pump) to prevent flooding if a pipe has already cracked.
- Open bathroom faucets and the toilet valve so expanding ice has somewhere to go and you can monitor flow return.
- Apply gentle, indirect heat near suspected freeze points—never use a torch or direct flame.
- Inspect for bulging pipes or visible cracks before restoring full water pressure.
- Check behind access panels for hidden leaks once water starts flowing again.
- If you see cracking, splitting, or water spraying, stop the thaw, shut everything off, and move to the repair section below.
- Know the line: winterization means fully draining and protecting a stored RV; active-use freeze protection means keeping the system functional while camping in cold weather. They require different approaches.
Why RV Bathrooms Freeze Before Other Areas
Your RV bathroom is often the first casualty in a freeze event, and understanding why helps you target prevention where it matters most.
Freeze mechanics that matter in RVs
Water expands roughly 9% when it freezes. That expansion creates enormous pressure inside rigid plumbing components—enough to crack valves, split pipe fittings, and rupture tank walls. Unlike a residential home with insulated walls and a heated basement, an RV’s plumbing runs through areas with minimal insulation and significant exposure to outside air.
The underbelly of most RVs is particularly vulnerable. Even rigs with enclosed underbellies lose heat rapidly through thin belly material, and any gap or tear in that barrier lets frigid air reach pipes directly. Cold air pooling under the coach creates a heat-loss cycle that can freeze exposed lines faster than most owners expect.
Bathroom-specific weak spots
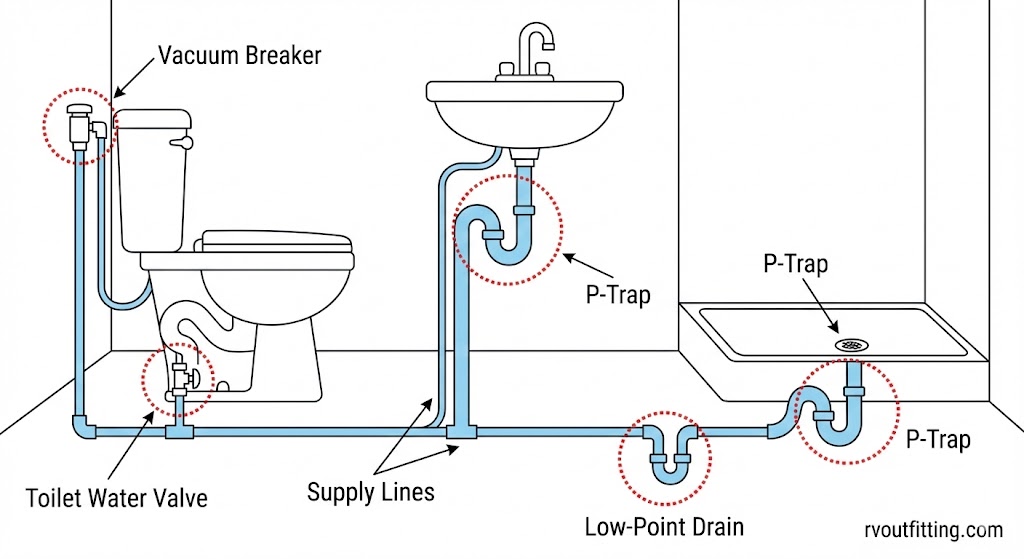
The bathroom concentrates several of the most freeze-prone components in one small area:
- Toilet feed line and water valve assembly — often routed through or near the floor with minimal insulation.
- Vacuum breaker — a small anti-siphon device on or near the toilet that contains water and is easily overlooked during winterization.
- P-traps (under the sink and shower) — these hold standing water by design, which makes them prime targets for freezing.
- Shower supply lines — frequently routed along exterior walls or through the underbelly.
- Low-point drains — located at the lowest points in the plumbing system, often directly exposed beneath the rig.
Each of these components sits at or near the lowest, least insulated portions of the RV, making the bathroom a freeze-damage hotspot.
Signs Your RV Bathroom Plumbing Is Frozen
Before you start thawing anything, take a few minutes to diagnose what’s actually going on. Rushing past this step can turn a small freeze into a big repair bill.
Bathroom freeze symptom checklist
- No flow or drastically reduced flow at the bathroom sink, shower, or toilet — the most obvious sign. If you turn on a faucet and get nothing (or just a trickle), a freeze is the likely culprit.
- Toilet won’t fill or flush — the fill valve won’t cycle, the bowl doesn’t refill, or you hear nothing when you press the foot pedal. This is one of the most common freeze indicators, and yes, a frozen RV toilet can crack—more on that in the FAQ below.
- Bulging or visibly distorted pipes — this is a high-signal indicator. If a pipe or fitting looks swollen, bowed, or out of shape, ice has already expanded inside it. Treat bulging as a serious warning that a burst may follow once things thaw.
- Frost or ice visible on exposed plumbing or fittings behind access panels or under the rig.
- Unusual sounds — creaking, popping, or ticking from behind walls or under the floor as ice expands or shifts.
Quick isolation steps (to narrow the frozen zone)
Before applying any heat, figure out whether you’re dealing with a bathroom-only problem or something system-wide.
Is it just the bathroom? Try running the kitchen faucet and any other fixtures outside the bathroom. If those work fine, the freeze is localized to bathroom-area plumbing.
Line freeze vs. fixture freeze? If the sink runs but the toilet doesn’t fill, the freeze is likely in the toilet feed line or valve assembly rather than a main supply line. If nothing in the bathroom works, the freeze may be in a shared supply line feeding the bathroom zone.
Narrowing the frozen zone saves you from applying heat in the wrong places and helps you plan a targeted thaw.
How to Safely Thaw Frozen RV Bathroom Pipes
Thawing is where most DIY damage happens. The goal is controlled, gradual warming—not speed.
Thawing rules before methods
Patience is key—thawing too quickly can cause pipes to burst.
That single rule should guide every decision in this section. Ice creates a pressurized plug inside your plumbing. If you heat one section rapidly while ice still blocks another section downstream, the expanding water has nowhere to go and can blow out a fitting, valve, or pipe wall.
What you’re trying to achieve: restore water flow gradually while watching every joint, valve, and connection for leaks the moment water begins moving again.
Gentle heat thaw methods (ranked)
1. Interior heat + open cabinets + open faucets. Turn up the RV furnace or place a portable space heater (kept away from combustibles) in the bathroom. Open all vanity and cabinet doors so warm air can reach the pipes behind them. Open the bathroom faucets to a slow drip so you’ll know the instant water begins flowing. This is the lowest-risk approach and often the best first move.
2. Hair dryer or heat gun on low setting. Direct warm air at the suspected freeze point, moving the heat source back and forth so you don’t concentrate it in one spot. Start from the faucet side and work toward the frozen section so melting water can escape through the open tap.
3. Heat tape or heating pads. Wrap self-regulating heat tape or heating pads around the frozen pipe or valve area. Look for products that are self-regulating (they adjust output based on temperature) and carry an ETL or UL safety listing. These are especially useful for areas you can’t easily reach with a hair dryer.
For more on keeping your RV’s water system performing well after a freeze, check out our guide on troubleshooting low water pressure in your RV.
Toilet-specific thawing (highest-risk component)
The toilet is often the component most at risk during a freeze because its water valve assembly, feed line, and vacuum breaker all sit low and close to the floor—right where cold air settles.
Focus your gentle heat on the toilet water module and valve zone first. If your RV toilet has an accessible vacuum breaker (the small device that prevents backflow), warm that area too—it holds a small amount of water that freezes easily.
Stop signs during thaw: If you see any cracking, splitting, deformation, or water leaking from the toilet base, valve, or surrounding fittings, stop the thaw immediately. Shut off the water supply and move to the repair section below. Continuing to push water through a compromised component will only make the damage worse.
Common thawing mistakes to avoid

What NOT to do when thawing frozen RV bathroom pipes:
- Do not use a propane torch, open flame, or boiling water on RV plumbing. The rapid temperature shock dramatically increases burst risk and can melt plastic fittings or damage the RV structure.
- Do not crank the heat on one isolated spot while ignoring the rest of the line—this creates a pressure pocket between ice plugs.
- Do not restore full water pressure before inspecting for leaks. Turn water back on slowly and check every joint before walking away.
- Do not ignore “it’s just a slow drip” leaks. A small leak after a thaw often signals a crack that will widen under pressure.
Repairing Freeze Damage in Your RV Bathroom
Once you’ve thawed the system and water is flowing again—or you’ve identified where it’s leaking—it’s time to assess the damage and figure out what needs to be fixed or replaced.
Post-thaw inspection checklist (bathroom-only)
Work through each of these systematically before deciding on repairs:
- Toilet water valve/module — look for cracks, weeping, or failure to shut off completely.
- Flush mechanism and seals — check the flush ball seal for distortion or leaking into the bowl.
- Vacuum breaker — inspect for cracks or water dripping from the breaker itself.
- P-traps (sink and shower) — look for hairline cracks, split joints, or slow drips.
- Shower and sink supply connections — check fittings, crimp rings, and any exposed line for signs of failure.
- Behind access panels and under fixtures — this is where hidden damage lives. Water from a cracked fitting behind a wall can soak subfloor material for days before it becomes visible. Pull panels and look.
Repair approach by component (what typically fails)
Toilet water module / valve kit: If the toilet’s water valve is cracked or no longer seals properly, a replacement water valve module or kit is the standard repair. These are specific to your toilet brand and model (Thetford and Dometic are the most common). Sourcing the correct kit is essential—bring your toilet model number when shopping.
Flush ball seal / gasket: If the flush ball seal is torn, deformed, or leaking after a freeze, it’s typically an inexpensive replacement part. Check the seal first before assuming the entire toilet needs replacing—this is one of the most common and affordable fixes.
Vacuum breaker: The vacuum breaker is a small but critical anti-siphon device. It contains water, freezes easily, and often cracks without being noticed. If it’s cracked, it needs to be replaced. If you’re not sure what it looks like or where it is on your toilet model, consult your owner’s manual. This is a component many RVers don’t discover until it’s too late.
P-trap cracks (sink and shower): P-traps in RVs are typically ABS or PVC plastic. A freeze crack in a P-trap usually requires replacing the trap entirely rather than attempting a patch—glued repairs on cracked plastic traps tend to fail under vibration and use. Match the material and size of the original when replacing.
Repair approach by pipe material (decision notes)
How freeze damage shows up—and how you repair it—varies depending on what your plumbing is made of:
- PEX (cross-linked polyethylene): PEX is somewhat flexible and can absorb minor ice expansion without cracking in many cases. When it does fail, it typically splits along the length. PEX repairs use crimp or push-fit fittings and are generally DIY-friendly.
- CPVC (chlorinated polyvinyl chloride): CPVC is rigid and more brittle, especially in cold conditions. Freeze failures tend to be clean cracks at joints or fittings. Repairs require solvent-welding with the correct CPVC cement.
- ABS (acrylonitrile butadiene styrene): Common in drain lines and P-traps. ABS cracks tend to be obvious and often occur at joints. Repair with ABS cement or replace the section.
The upgrade question: If your RV uses rigid CPVC supply lines and you’re dealing with repeated freeze issues, switching to PEX is worth considering for its greater flexibility and freeze tolerance. This isn’t a universal recommendation—it depends on your rig, your skill level, and how much of the plumbing you’d need to convert. Think of it as a decision framework: if CPVC keeps cracking in the same area, PEX may be the longer-term solution.
Dealing with Water Damage & Mold After a Freeze
The freeze itself is only part of the problem. The water that escapes from cracked plumbing can cause secondary damage that shows up days or weeks later.
Immediate water-damage triage
As soon as you’ve stopped the leak, focus on drying out the affected areas:
- Bathroom floor — mop up standing water and pull up any loose flooring material to let the subfloor dry.
- Under the vanity — remove everything stored here and check for pooling water or saturated wood.
- Around the shower pan edges — water can seep under the shower pan and sit undetected on the subfloor beneath it.
Use fans to circulate air and keep interior heat running to accelerate drying. The goal is to get moisture levels down as quickly as possible to prevent mold from gaining a foothold.
Delayed damage timeline checks
Not all freeze damage is visible right away. Plan to re-check these areas 30–60 days after the event:
- Mold growth — look for discoloration, musty smells, or fuzzy growth on walls, under cabinets, and around the shower area.
- Subfloor soft spots — press firmly on the bathroom floor, especially near the toilet base and shower. Spongy or soft areas indicate water-soaked subfloor that may need repair or replacement.
- Seal degradation — caulk and sealant around the toilet base, shower pan, and sink can break down after prolonged water exposure.
A moisture meter is a valuable inspection tool here. Even a basic pin-type meter can help you identify elevated moisture levels behind walls and under flooring that you’d otherwise miss until visible damage appears.
How Much Does RV Freeze Damage Repair Cost?
Prevention is almost always cheaper than repair. Here’s what you’re looking at if freeze damage has already occurred.
Quick cost snapshot (dated)
Key cost figures (as of 2025–2026):
- Average freeze damage repair bill: $3,000+
- RV shop hourly labor rate (2025): $145–$195/hr
- Toilet replacement: $200–$900
- Black tank replacement (including labor): $1,100–$3,000
- Professional winterization: $85–$150 (average ~$110)
- DIY winterization: $20–$50
Those labor rates add up fast when a tech is tracing hidden leaks behind walls and under floors. This is why many experienced RVers consider winterization an investment with one of the strongest returns in RV ownership.
Bathroom component cost breakdown (table-driven section)
| Component / Repair | Estimated Cost Range | Notes |
|---|---|---|
| RV shop labor (per hour, 2025) | $145–$195/hr | Varies by region and shop |
| Toilet replacement | $200–$900 | Depends on model and features |
| Toilet valve/module kit | Varies by brand | Thetford and Dometic kits available |
| Flush ball seal replacement | Relatively low | One of the cheapest toilet fixes |
| P-trap replacement (sink/shower) | Relatively low | Parts are inexpensive; labor depends on access |
| Black tank replacement (with labor) | $1,100–$3,000 | Significant labor component |
| Water damage remediation | Not confirmed in dossier | Depends on extent and location |
| Professional winterization | $85–$150 (avg ~$110) | Annual prevention cost |
| DIY winterization | $20–$50 | Antifreeze + basic supplies |
RV Winterization Methods Explained (Blow-Out vs Antifreeze vs Hybrid)
Winterization is how you protect your plumbing when the RV won’t be in use during freezing conditions. Choosing the right method depends on your rig, your climate, and how much risk you’re willing to accept.
Definitions (quick, AI-friendly)
Winterization vs. freeze protection: These are not the same thing. Winterization means fully preparing a stored RV’s plumbing system for freezing temperatures—draining water and protecting what remains. Freeze protection (or active-use protection) means keeping the plumbing functional while you continue to use the RV in cold weather. Different problems, different solutions.
Propylene glycol vs. ethylene glycol: RV antifreeze uses propylene glycol, which is non-toxic. Automotive antifreeze (ethylene glycol) is toxic and must never be used in your RV’s potable water system.
Blow-out method: Uses compressed air to push water out of the lines. Antifreeze method: Fills lines with non-toxic RV antifreeze to prevent any residual water from freezing. Hybrid method: Combines both—blow out lines first to remove the bulk of the water, then follow up with antifreeze in the most vulnerable areas.
Method comparison decision table
| Method | Strengths | Where It Can Fall Short |
|---|---|---|
| Blow-out (compressed air) | Fast, no chemicals to flush in spring, good for lines and fixtures | Can leave residual water in low spots, P-traps, and the toilet—exactly the bathroom areas most prone to freeze damage |
| Antifreeze | Protects P-traps, toilet systems, and low-lying areas where water pools; covers black tank | Requires more product for full coverage, adds a spring flush-out step, and some owners dislike the residual taste concern |
| Hybrid (“belt and suspenders”) | Blow out first to remove the bulk of the water, then add antifreeze to the most vulnerable zones (traps, toilet, low points) | Takes more time and materials; however, this approach is widely recommended as the most thorough protection |
The hybrid approach is particularly relevant for bathrooms because it addresses the biggest weakness of the blow-out method alone: residual water sitting in traps and the toilet system.
Step-by-Step RV Bathroom Winterization
Whether you’re doing this yourself or prepping before a shop visit, this bathroom-focused checklist gives you a repeatable process.
What you’ll need (tools/materials checklist)
For the blow-out method:
- Air compressor (capable of sustained airflow at moderate PSI)
- Blow-out adapter plug (connects to your city water inlet)
- Pressure regulator (max 50 PSI for blow-out method—higher pressures risk damaging fittings)
For the antifreeze method:
- Non-toxic RV antifreeze (pink propylene glycol type; burst protection ranges vary by product, commonly rated from -50°F to -100°F)
- A way to introduce antifreeze into the system (hand pump, winterization kit with bypass, or direct pour into fixtures)
General items:
- Basic tools for accessing low-point drains
- Knowledge of your water heater bypass valve or winterization bypass kit location
- Rags and a small bucket for draining
If you’re also working on your broader RV water system as part of a full winterization, make sure you’ve addressed city water connections and the freshwater tank as well.
Bathroom-specific step sequence
Step 1: Drain the system. Open the low-point drains to let water flow out of the lowest plumbing runs. Open all bathroom faucets (hot and cold), flush the toilet, and let water drain. Close faucets once the flow stops.
Step 2: Bypass the water heater. Engage the water heater bypass valve so you don’t fill the water heater tank with antifreeze (if using the antifreeze method) or waste compressed air pushing through it. If you don’t have a bypass valve, consider adding a winterization bypass kit—it’s a straightforward upgrade.
Step 3: Protect P-traps and the toilet system. This is where bathrooms need the most attention. Pour RV antifreeze directly into each P-trap (bathroom sink and shower drain) until you see pink liquid in the trap. For the toilet, flush to empty the bowl, then pour antifreeze into the bowl and activate the flush just long enough to pull antifreeze into the valve and feed line. Ensure the toilet bowl retains a visible level of antifreeze to protect the flush seal.
If you’re using the blow-out method, blow air through the bathroom lines, then still add antifreeze to P-traps and the toilet—this is the hybrid approach in action.
Documentation & labeling (gap-add)
This step is often skipped, but it can save you significant headaches later—and it may matter for insurance:
- Photograph valve positions (bypass valves open/closed, low-point drains, water heater bypass) so you know exactly how to reverse everything in spring.
- Create a spring de-winterization checklist tied to your specific rig. Note which drains you opened, which fittings you disconnected, and what you antifreezed.
- Label the RV as “winterized” with a visible note near the water hookup and inside the bathroom. This prevents someone from accidentally connecting water to a system full of antifreeze or with open drains.
Common winterization mistakes
- Mixing methods incorrectly — if you blow out lines and then add antifreeze, make sure the antifreeze actually reaches the vulnerable components (traps, toilet). Simply pouring a splash down a drain after a blow-out isn’t enough if the antifreeze doesn’t make it to the trap.
- Forgetting the vacuum breaker — this small component holds water and freezes easily. Make sure antifreeze reaches it, or that it’s drained thoroughly.
- Using automotive antifreeze — this cannot be stated strongly enough. Automotive antifreeze (ethylene glycol) is toxic. Use only non-toxic, propylene glycol-based RV antifreeze in your potable water system.
- Skipping the water heater bypass — without it, you’ll waste several gallons of antifreeze filling the water heater tank, and you still won’t have protected the bathroom lines effectively.
Using Your RV Bathroom in Freezing Temperatures (Active-Use Protection)
If you’re winter camping or living full-time in your RV, you need your bathroom to keep working—which means a different approach from full winterization.
The “keep it functional” priority stack
When you’re actively using the RV in freezing conditions, think of protection as a priority stack:
Priority 1: Keep vulnerable zones warm. Use heat tape on exposed pipes, heating pads on tanks, and keep cabinet doors open to let interior heat reach plumbing. Maintain interior temperatures in the bathroom area, especially overnight.
Priority 2: Monitor temperatures. Use temperature sensors in the underbelly, near tanks, and in the bathroom to catch drops before they become freezes. A remote alert system can wake you up before pipes reach critical temperatures.
Priority 3: Protect tanks. Black and gray tanks are large, slow-to-heat masses of water that can freeze from the outside in. Tank heaters and skirting are your primary defenses here.
Keeping things warm enough for your RV’s climate control system to help is a key part of this strategy—especially during overnight low-temperature periods.
Extreme cold scenario (multi-day deep freeze)
When temperatures drop well below freezing for multiple consecutive days, the risk equation changes significantly. Heat tape and open cabinet doors may not be enough on their own if ambient temperatures are extreme and sustained.
In a multi-day deep freeze, consider these decision rules: if your heating sources can’t keep underbelly and pipe temperatures above freezing, you need to either add protection (more heat tape, skirting, supplemental heat sources) or temporarily winterize vulnerable bathroom components you can live without—like shutting off the toilet water supply and using antifreeze in traps while relying on alternative facilities. There’s no universal temperature cutoff for this decision; it depends on your rig’s insulation, your heating capacity, and your power budget.
Power considerations for heating accessories
Heating pads, heat tape, and tank heaters all draw power—and it adds up. If you’re on shore power, this is manageable. If you’re off-grid or relying on a solar setup, you need to plan for the additional draw.
Some 12V tank heating pads draw between 5 and 11.8 amps, which is significant on a battery bank. Factor heating accessories into your power budget before you need them, not after your batteries are depleted at 2 AM in a snowstorm.
Best Products to Prevent RV Bathroom Freezing
These are the main product categories worth considering for freeze prevention. Specific models and availability can change, so verify current options before purchasing.
Heated hoses (selection notes)
Heated hoses replace your standard city water hose with a self-heating version that prevents the hose itself from freezing. Some commonly mentioned options include:
- PIRIT heated hose — tested to -42°F
- HEATIT heated hose — rated to -45°F
- Camco TastePure heated hose — a popular option in the RV market
Keep in mind that specific models, ratings, and availability can change between production runs. Always verify current specs and reviews before purchasing.
If you’re using a city water connection in cold weather, a heated hose paired with a quality RV water pressure regulator is a solid setup for protecting your connection point.
Skirting options (decision notes)
Skirting encloses the space under your RV, reducing heat loss from the underbelly and creating a warmer microclimate around your tanks and plumbing. Some common approaches:
- AirSkirts — inflatable panels, reported setup time of roughly 20–30 minutes
- EZ Snap — snap-on vinyl skirting system
- Custom vinyl skirting — fitted to your rig’s dimensions
- Foam board DIY — the budget option using rigid insulation panels
Skirting can raise underbelly temperatures by an estimated 10–20°F, which can be the difference between frozen and functional in marginal conditions.
Tank heaters / heating pads (what matters)
Tank heaters and heating pads attach to your holding tanks and water lines to keep them above freezing. Some products to be aware of:
- Facon 12V/120V heating pads — dual-voltage option
- UltraHeat brand pads — commonly mentioned in the RV community
Key selection considerations: look for pads with automatic temperature cycling (typically activating around 44°F and shutting off around 64°F) to prevent wasted power. Amp draw varies; 12V models in the 5–11.8 amp range are common, which matters significantly for off-grid power planning. Check for weather protection ratings appropriate to your mounting location.
Remote monitoring & alerts (comparison)
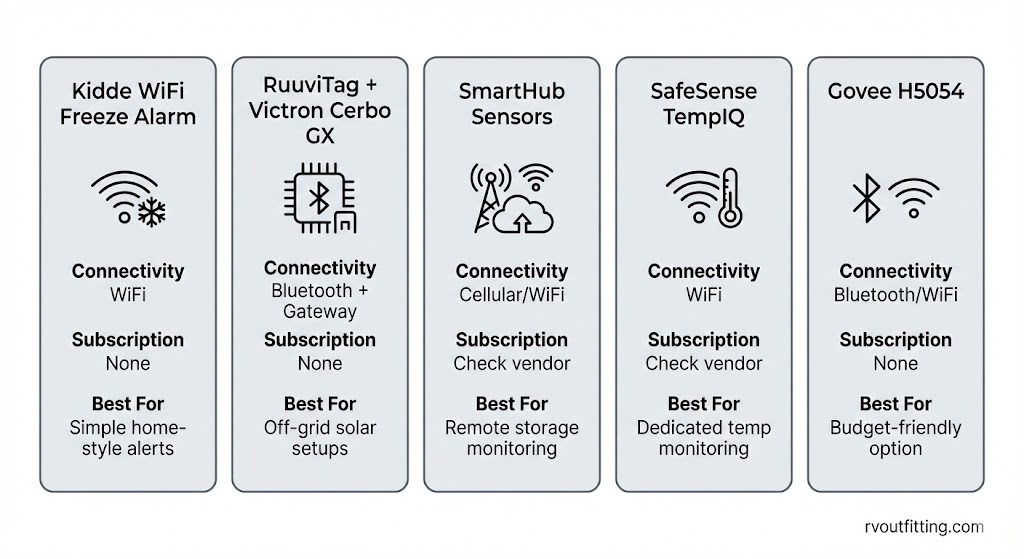
A freeze monitoring system lets you keep an eye on temperatures when you’re away from the RV—critical for storage situations. Devices mentioned in the RV market include:
- Kidde WiFi Water Leak Detector & Freeze Alarm — WiFi connected
- RuuviTag — Bluetooth sensor, can integrate with Victron Cerbo GX systems
- SmartHub Sensors — cellular/WiFi connected
- SafeSense TempIQ — temperature monitoring focused
- Govee H5054 sensors — Bluetooth/WiFi, budget-friendly
When choosing a sensor, consider: connectivity type (WiFi, Bluetooth, cellular), whether it requires a subscription for alerts, and how reliably it can reach you when the RV is in storage—Bluetooth-only devices won’t alert you remotely unless paired with a gateway.
Does RV Insurance Cover Freeze Damage?
This is one of the most-asked questions after a freeze event, and the answer is “it depends” more than most owners expect.
Coverage reality check (avoid overgeneralizing)
A few patterns worth understanding:
- Many insurers are increasingly asking for documentation that the RV was properly winterized before they’ll approve a freeze damage claim.
- Some policies contain minimum-temperature clauses or exclusions for freeze damage that occurred when winterization steps weren’t taken.
- Filing a freeze damage claim can affect your premiums or even lead to policy non-renewal, especially if damage is significant.
- Full-timer vs. recreational policies differ meaningfully in coverage. Full-time RV insurance policies sometimes offer broader coverage for weather-related events, while recreational/seasonal policies may have more exclusions around winter damage. Check your specific policy rather than assuming.
None of this is legal or insurance advice—contact your specific insurer to understand your coverage. But the takeaway is clear: documenting your winterization process isn’t just good maintenance practice, it’s a potential insurance requirement.
Claim-ready documentation checklist
If you need to file a claim, having this documentation ready strengthens your position:
- Photos of the damage — take pictures from multiple angles, including behind access panels, before you start repairs.
- Photos of your winterization setup — valve positions, antifreeze in traps, bypass valve engaged. This is where the “photograph valve positions” step from the winterization section pays off.
- Temperature logs — if you have monitoring sensors, export the data showing what temperatures your RV was exposed to.
- Receipts — for antifreeze, winterization supplies, professional winterization services, or any prevention products you’ve installed.
- Written record of winterization steps — dates and procedures you followed, especially if you did it yourself.
For a broader look at protecting your RV’s electrical and safety systems—including surge protection that can matter during freeze-related power events—see our guide to RV electrical safety.
Mini FAQ
At what temperature do RV bathroom pipes freeze?
RV bathroom pipes typically freeze at 20°F (-7°C) or below when exposed for extended periods. However, pipes in poorly insulated areas or with wind exposure can freeze at higher temperatures. Duration matters as much as the temperature itself—a few hours at 15°F is more dangerous than a brief dip to 25°F.
How do I know if my RV toilet is frozen?
The most common signs are: the toilet won’t fill when you press the foot pedal, the flush valve doesn’t cycle, or you hear no water movement at all. If the bowl water is visibly frozen or the valve area feels ice-cold to the touch, the toilet system is frozen.
Can a frozen RV toilet crack?
Yes. Water expanding inside the toilet’s valve assembly, feed line, or even the bowl itself can crack plastic and ceramic components. The valve and vacuum breaker areas are most vulnerable, but bowl cracks are also possible in severe freezes.
How do I thaw frozen pipes in my RV bathroom?
Apply gentle, indirect heat. Start with your RV’s furnace, open cabinet doors, and open faucets. Use a hair dryer on a low setting for targeted warming. Never use open flame or boiling water. Work from the faucet side toward the frozen section. Watch for leaks as soon as water starts flowing.
What is the best RV antifreeze for winterizing a toilet?
Use non-toxic, propylene glycol-based RV antifreeze (the pink stuff). Look for products with burst protection ratings appropriate for your climate—commonly rated from -50°F to -100°F. Never use automotive antifreeze (ethylene glycol), which is toxic.
How much does it cost to repair RV freeze damage?
The average freeze damage repair bill runs $3,000 or more, driven largely by RV shop labor rates of $145–$195/hr (2025). Individual component costs range from relatively affordable (toilet valve kits, seals) to significant (toilet replacement at $200–$900, black tank replacement at $1,100–$3,000).
Can I use automotive antifreeze in my RV?
No. Automotive antifreeze contains ethylene glycol, which is toxic. RV plumbing systems use non-toxic propylene glycol antifreeze. Using the wrong type contaminates your potable water system and creates a serious health hazard.
How do I winterize my RV toilet step by step?
Drain the freshwater system and open low-point drains. Bypass the water heater. Flush the toilet to empty the bowl. Pour non-toxic RV antifreeze into the toilet bowl and briefly activate the flush to pull antifreeze into the valve and feed line. Leave antifreeze visible in the bowl to protect the flush seal. Document the valve positions for spring de-winterization.
Does RV insurance cover frozen pipe damage?
Coverage varies significantly by policy. Many insurers require documentation that the RV was properly winterized. Some policies have minimum-temperature exclusions or freeze-specific clauses. Filing a claim can affect premiums. Contact your insurer to understand your specific coverage before assuming you’re protected.
How do I prevent my RV black tank from freezing?
Key strategies include: tank heating pads (12V or 120V models that cycle automatically), RV skirting to raise underbelly temperatures, keeping the tank area insulated, and dumping tanks before extended freezing periods when the RV is in storage. For winterized RVs, antifreeze in the black tank provides additional protection.
What is a vacuum breaker on an RV toilet and why does it freeze?
A vacuum breaker is a small anti-siphon device that prevents contaminated water from being siphoned back into your freshwater supply. It’s typically located on or near the toilet water connection. It freezes easily because it holds a small amount of water in a position that’s often near the floor and poorly insulated. A cracked vacuum breaker needs replacement.
How long can RV antifreeze stay in the plumbing system?
Non-toxic propylene glycol RV antifreeze can remain in your plumbing system through the winter storage season without causing damage. When you de-winterize in spring, flush the system thoroughly with fresh water before use. There’s no strict expiration timeline while it’s sitting in the system, but a full flush-out before the next use season is essential.
Should I use air compressor or antifreeze to winterize my RV?
Each method has tradeoffs. The blow-out method is faster and avoids spring flush-out, but can leave residual water in traps and low spots. Antifreeze covers those vulnerable areas but requires more product and a flush-out step. The hybrid approach—blow out first, then add antifreeze to traps, toilets, and low points—offers the most comprehensive protection and is widely recommended.
Do I need RV skirting to prevent frozen pipes?
Skirting isn’t strictly required, but it’s one of the most effective passive defenses. By enclosing the underbelly, skirting can raise temperatures underneath by an estimated 10–20°F. For winter campers and full-timers in sustained cold, skirting significantly reduces the workload on your heating accessories and lowers freeze risk.
How do I fix a cracked RV shower P-trap from freezing?
A cracked P-trap should be replaced rather than patched. Identify the material (typically ABS or PVC), match the size and type, and replace the damaged section. Patching cracked plastic traps with adhesive tends to fail under RV vibration and regular use. This is generally a straightforward DIY repair if you have access to the trap under the shower pan.