ACOPOWER Solar Panel Review – Real RV Owner Results, Output, and What to Watch For
Affiliate disclosure: This post contains affiliate links. If you buy through them, you may earn a commission at no extra cost to you.
Quick Summary
- Best takeaway: Many owners report the panel(s) can hit strong real-world wattage in good sun—sometimes surprisingly close to rated output, especially when angled well.
- Most consistent praise: Build quality and responsive customer support (including replacement parts in some cases).
- Most common frustrations: Mounting hardware not included (for some sizes), short leads, and shade sensitivity (small shadows can cause big drops).
- Big “don’t mess around” note: Several reviews make it clear you should use a charge controller (PWM or MPPT) rather than connecting a panel directly to a battery.
Quick Verdict
If you want an RV solar panel that many real owners say delivers legit output and holds up well, ACOPOWER is a strong contender—especially in the popular 175W–250W range. Just go in expecting to plan your mounting hardware, confirm your connectors/polarity, and design around shade sensitivity (which is normal for many rigid panels, but some owners found it more noticeable here).
See the ACOPOWER Solar Panel on Amazon (opens in a new tab)
What This Product Is (and why RVers buy it)
An ACOPOWER solar panel is a rigid photovoltaic (PV) panel designed to turn sunlight into DC power you can feed into a charge controller to charge your RV battery bank (typically 12V nominal systems in most travel trailers/vans, though some rigs run 24V/48V).
Why you care: campground “shore power” isn’t always available, and even when it is, you may still want solar to:
- keep batteries topped off between trips
- reduce generator runtime
- run 12V loads (fans, lights, water pump) more comfortably off-grid
- keep a portable power station (EcoFlow/Bluetti-style) charging during the day
Regional note (USA/Canada/Australia): Your RV’s shore power differs by region (common 120V AC in the US/Canada and 230V AC in Australia), but your solar charging side is DC and mostly about matching the panel(s) to the charge controller and battery setup.
Key Features That Matter to RV Owners (based on what buyers actually talk about)
Instead of listing every spec, here’s what owners repeatedly highlight as “decision drivers”:
- Real-world power delivery: Multiple reviewers report output close to expectations when sun and setup are good (including summer midday performance and angled mounting tests).
- Series/parallel flexibility: Owners commonly wire panels in series for higher voltage to a power station or controller, especially when adding panels later.
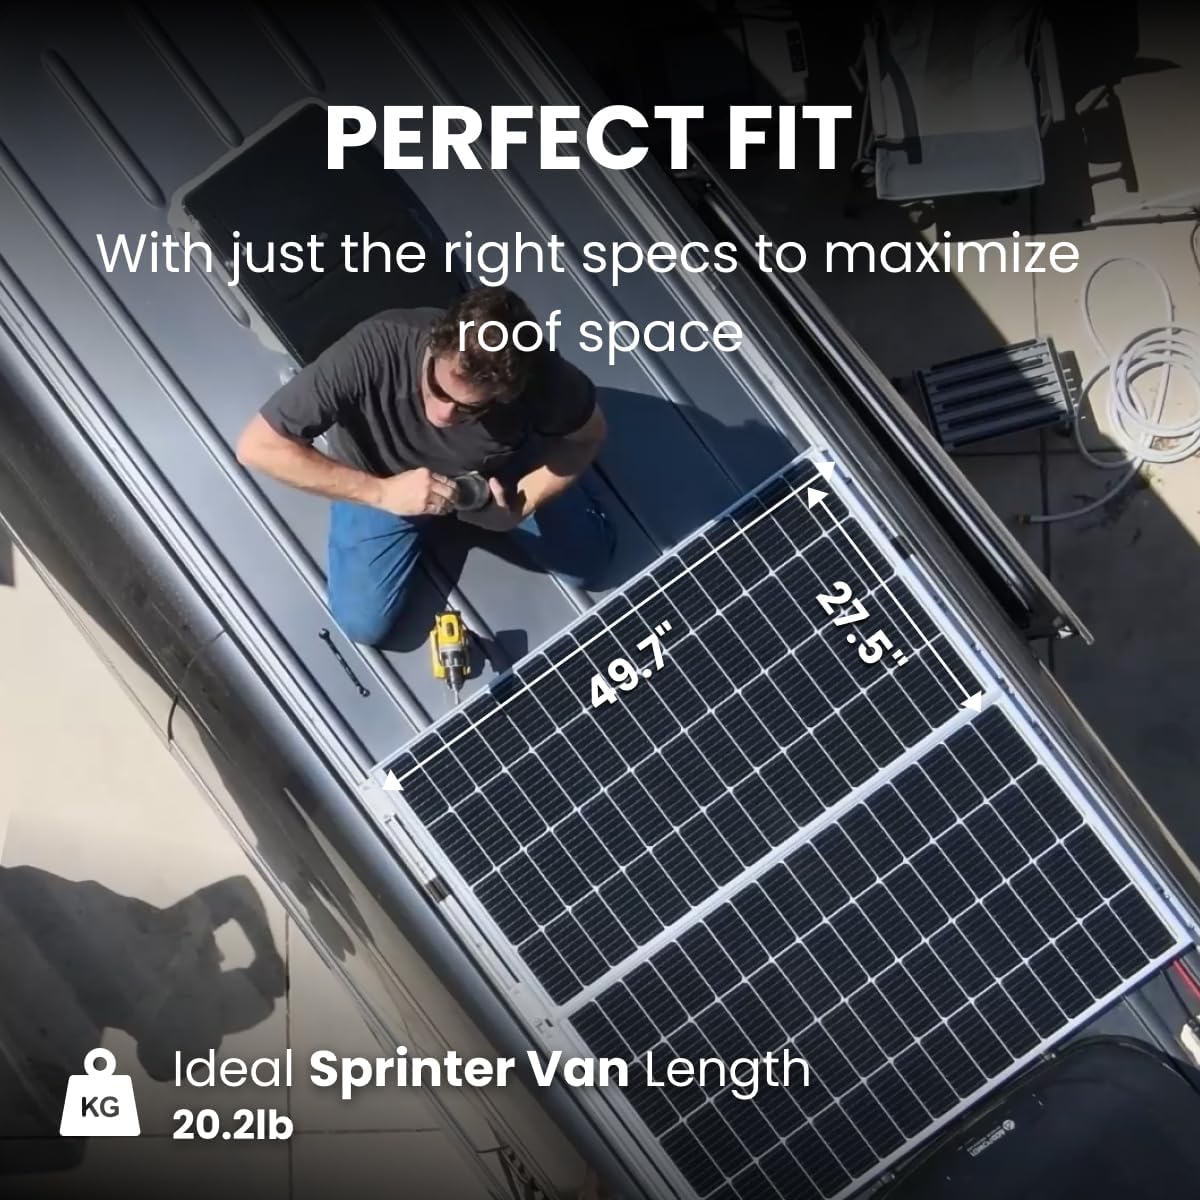
- Physical fit and mounting holes: Several reviews focus on dimensions, pre-drilled holes, and whether it fits specific roofs (like vans/Sprinter setups) without overhang.
- Wiring/connectors reality: Some buyers mention having to add the connector type they wanted (many RVers prefer MC4-style connectors).
- Durability and weather resistance: Long-ish ownership comments show panels surviving rain/wind and outdoor exposure—though proper mounting and sealing still matter.
- Diodes and electrical protection: Reviews mention bypass diodes and blocking diodes—and a few complaints show why that detail matters in real installs.
Real-World Owner Snapshot
| What owners report most | What it means for you |
|---|---|
| Strong output in good sun (sometimes near rated) | Your expectations should be “good sun + good angle = good results” |
| Shade can hammer output fast | Plan panel placement carefully; even small shadows can drop production |
| Mounting hardware may not be included | Budget for brackets/Z-brackets/roof mounts or adhesive/VHB strategies |
| Wiring/connectors vary by size/version | Confirm you’re ready to add MC4 (or your preferred connector) |
| Customer support gets frequent praise | Useful if you need a part, diode, or clarification after purchase |
| Occasional QA/shipping issues (damage, odd mismatch) | Inspect on arrival and test output early within your return window |
Check current price and recent owner reviews on Amazon (opens in a new tab)
What Real Owners Like (Pros)
1) “It actually puts out power like it should”
A recurring theme is satisfaction with real-world output. Owners report hitting strong numbers in full sun, and one user running two panels in series described seeing over 500W feeding a portable power station setup—exact results will vary, but the point is clear: many buyers felt the panels weren’t “marketing watts,” they were usable watts.
Why you care: In an RV, that difference shows up as faster battery recovery after a cloudy day, more headroom for a 12V fridge, or less generator time.
2) Long-term use cases that sound like RV life
One buyer used a 200W panel mounted on a truck camper shell for 2.5+ years, keeping a power station charged and running a 12V cooler. That’s the kind of “real usage” report RVers trust: heat, vibration, travel, and actual daily loads.
Why you care: RV installs punish gear. When people report multi-season use, it’s a meaningful vote of confidence.
3) Customer support that actually shows up
Multiple reviews go beyond “panel good” and rave about the company correcting a listing detail, shipping replacement parts, and communicating well. One buyer even described receiving replacement diodes quickly and getting the panel back in service after a mistake in wiring.
Why you care: Solar installs are modular. When you expand a system or troubleshoot, support can matter as much as the hardware.
4) Fit and dimensions that help with roof planning
A few owners specifically mention the panel fitting cleanly on a van roof without awkward overhang, and one buyer praised that a certain wattage option matched dimensions and mounting holes closely enough to integrate into an existing array.
Why you care: Drilling new holes in an RV roof is nobody’s idea of fun. Matching dimensions can save you time, sealant, and stress.
Pros / Cons Box (fast skim)
| Pros (what you’ll probably like) | Cons (what you should plan for) |
|---|---|
| Strong output reports in good sun | Output can drop sharply with minor shading |
| Many owners happy with build quality | Some shipments arrive damaged or “oddly mismatched” |
| Support praised (including replacement parts) | Mounting hardware/connectors not always included |
| Sizes that fit common RV/van roofs | Some buyers report wiring/diode quirks |
What Real Owners Complain About (Cons)
1) Shade sensitivity can be frustrating
Multiple comments describe small shadows causing disproportionate drops. One owner said even a tiny bit of shade could knock output down dramatically.
What this means in practice: Roof placement matters more than you think—AC shrouds, antennas, roof racks, and even a vent cap shadow can cost you.
2) “Where’s my mounting hardware?”
Across multiple smaller-panel reviews, a frequent complaint is that no mounting bracket is included (and some say mounting is a pain without special adapters). Even when pre-drilled holes exist, you still need a plan: Z-brackets, tilt mounts, adhesive methods, or a rack.
Bottom line: Don’t assume “panel arrives = install today.” Build your hardware list first.
3) Connector / wiring expectations don’t always match reality
A few buyers mention needing to install their own connector type (often MC4). Some report short wires. Another warns that polarity labeling can be wrong (which is rare but important).
Your move: Test polarity with a multimeter before finalizing connections—especially if you’re adapting cables.
4) Diode and “trickle charger” confusion (important)
There are mixed experiences around blocking diodes and how “trickle charger” style panels are marketed/understood. Some reviewers complain they expected a more battery-ready solution and discovered it’s “just the panel” unless you add a controller/diode/appropriate connectors.
Plain-English rule: A solar panel is not automatically a safe battery charger by itself. In almost all RV use cases, you want a charge controller between panel and battery.
5) Occasional lemons and harsh 1-star experiences
A small set of reviews claim outright failure, poor performance, or parts falling apart. A few say their panel never reached rated power or arrived broken.
How to interpret it: This happens in almost every mass-market solar listing—your best defense is inspection + testing immediately after delivery.
Who It’s Best For (and who should skip)
Best for you if…
- You want a solid RV solar panel and you’re willing to do a proper controller-based install.
- You care about strong real-world output and you camp in generally sunny areas (or you can angle/tilt the panel).
- You’re expanding an existing system and want a panel that can work well in series or parallel once you match the electrical characteristics.
- You value responsive support if you run into a part issue.
Skip this (or be cautious) if…
- Your roof has lots of obstructions and you can’t avoid partial shading.
- You want a “complete kit” experience with brackets, long leads, and plug-and-play connectors included.
- You don’t want to do any testing or DIY—because several reviews suggest variations in connectors/diodes/packaging, and you’ll be happier if you verify everything early.
Size & Setup Reality Check (200W class vs smaller trickle panels)
ACOPOWER listings often include multiple wattage options. Owner feedback shows these behave like different products in real use:
Comparison Table (what owners commonly experience)
| Panel “type” in the reviews | Typical use case | What owners say | What you should plan |
|---|---|---|---|
| 175W–250W rigid panels | Roof solar, portable power station charging, serious RV battery support | Strong output in good sun; good fit matters | Controller sizing, roof layout, series/parallel plan |
| ~35W panels | Light battery maintenance, small loads, tight mounting spots | Can perform well, but may need connector/diode attention | Controller recommended; confirm diode details if series wiring |
| 5W–10W mini panels | Trickle/maintenance charging, small devices | Mixed results; some love them, some say they barely charge | Don’t expect miracles; controller/compatibility can be a hurdle |
Mini Real-World Stories (from owners)
- The “wow, this is real power” moment: One owner wired two larger panels in series and reported seeing over 500W into a portable power setup. That’s the kind of output that makes solar feel like a real alternative to generator time.
- The 2.5-year durability + fix story: Another buyer ran a 200W panel for years, then had a diode issue after a likely wiring mistake. They contacted support, got replacement diodes shipped quickly, soldered them in, and returned to normal performance.
- The “fits my van roof perfectly” win: A van owner specifically praised the way a certain panel size fit horizontally without overhang—something that’s surprisingly important when you’re trying to keep your rig looking clean and avoid wind noise.
Installation & Usage Tips (based on what owners ran into)
If you want the smoothest install, don’t start with tools—start with a checklist. For a full walkthrough, use this guide: DIY RV Solar Installation Guide (Step-by-Step)
Step-by-step: a safer “first power-on” process
- Inspect the panel immediately
Check the glass, frame corners, and junction box for cracks or dents. If anything looks off, test before you mount. - Confirm your connector plan
Many RV solar setups standardize on MC4 connectors. If your panel arrives without your preferred termination, prep adapters/connectors before roof day. - Test polarity with a multimeter
Don’t trust wire labels blindly. Confirm positive/negative at the leads before connecting to anything. - Use a charge controller (PWM or MPPT)
- PWM (Pulse Width Modulation): simpler, often cheaper, fine for basic setups
- MPPT (Maximum Power Point Tracking): more efficient, especially in colder temps or when panel voltage is higher than battery voltage
- Choose series vs parallel intentionally
- Series increases voltage (often helpful for MPPT and some power stations)
- Parallel keeps voltage similar while increasing current
If you’re not sure, start with your system math: How to Size Your RV Solar System (Panels + Batteries)
- Mount to reduce stress and leaks
Avoid letting the panel “hang” off a single point. Use proper brackets, and seal any roof penetrations correctly.
Practical mounting lessons owners hint at
- If a panel doesn’t include brackets, plan for Z-brackets or a roof mounting solution before it arrives.
- If leads are short, you may want proper extension cables rather than “stretching” the install.
- If you’re mounting flat, expect lower output than angled—several owners saw meaningful gains when angled toward the sun.
Troubleshooting: quick fixes that match real complaints
If your output seems disappointing, start here (in order):
- Shade audit: watch your roof for moving shadows (AC shroud shadow is the classic trap).
- Connection check: confirm connectors fully seated and polarity correct.
- Controller settings: verify battery type (AGM vs LiFePO4 lithium iron phosphate) and charging profile.
- Panel placement angle: flat mounting is convenient, but it’s not peak output.
- Test panel voltage/current in full sun: do a controlled test around midday if possible.
For deeper troubleshooting habits (including preventative checks), use: RV Solar Maintenance & Troubleshooting Guide
FAQ (Common Questions RV Buyers Ask)
Q1: Will an ACOPOWER solar panel work on a typical RV “12V” system?
Yes—most RV solar setups are built around a 12V nominal battery bank, and the panel feeds a charge controller that charges that bank. The key is matching your controller to your panel wattage/voltage and your battery chemistry.
Q2: Do I need an MPPT controller or is PWM fine?
PWM can work for simple setups, but MPPT is often the better choice if you’re wiring panels in series or you want better performance in variable conditions. If you’re investing in larger panels, MPPT usually makes the system feel “worth it.”
Q3: Why does output drop so much when a small part of the panel is shaded?
That’s common with many rigid panels: partial shading can limit current through the string of cells. Owners specifically call out that even small shade can cause big drops, so placement matters a lot on RV roofs.
Q4: Can I connect the panel directly to my battery?
In most real RV use cases, you should not. Use a charge controller. Several reviews highlight confusion and risk when panels are treated like direct battery chargers.
Q5: What if my panel arrives damaged or the output seems wrong?
Test it immediately in full sun and verify polarity/connector integrity. If something’s clearly off, you’ll be glad you caught it before you permanently mount it.
Final Verdict
The ACOPOWER solar panel line earns a lot of genuine owner praise for strong sunlight-to-power performance, solid build feel, and standout customer support when things go sideways. The trade-offs are also real: you’ll want to plan for mounting hardware, verify connectors/polarity, and take shade management seriously—because a small shadow can ruin your day’s harvest.
If you’re building an RV solar setup you can actually rely on (not just “nice to have”), ACOPOWER looks like a good fit—especially if you approach it like a system (panel + controller + wiring + placement), not a single magic part.
See the ACOPOWER Solar Panel on Amazon (opens in a new tab)