DIY RV Solar Installation Guide: Step-by-Step Setup for Beginners
☀️🔋 Solar power is one of the best upgrades you can add to your RV, and doing it yourself saves money and adds a sense of accomplishment. Installing your own RV solar system gives you freedom from generators – the panels run silently and odor-free, with very little maintenance.
💸 Plus, you’ll recoup the investment over time through free energy while off-grid. In this guide we’ll walk you through each step of a DIY RV solar install, so you can feel confident harnessing sunshine on the road. We also include ⚠️ safety tips, 🔧 recommended gear, 🔌 wiring examples, 🛟 troubleshooting help and even affiliate product examples (like mounting kits, MC4 tools, charge controllers, and more) to make your project smoother.
📚 Before you begin, you may want to check out our related posts: RV Solar 101 (solar basics), Sizing Your RV Solar System (calculating panel and battery needs) .
Why Install Your Own RV Solar?
☀️ Going solar on your RV means cleaner, quieter power wherever you camp. Unlike a noisy gasoline generator, rooftop panels produce electricity silently and produce no fumes. You’ll enjoy freedom from shore power or hookups, longer battery life, and the satisfaction of being self-sufficient. DIY installation is also much cheaper than hiring a professional: you can source solar panel kits and components (from brands like Renogy, Eco-Worthy, and more) on sites like Amazon and install them yourself. This hands-on approach lets you customize the system to your needs and ensures you really understand how it works. (💡 Tip: Do a bit of planning and double-check all component specs before you buy. For example, our [Sizing Your RV Solar System] guide can help you figure out how many watts of panels and how much battery capacity you need.)
Safety Tips and Tools Needed
⚠️ Installing solar involves working on a roof and wiring 12V+ systems, so safety is crucial. Always prioritize fall protection (use a sturdy ladder and have a spotter if possible) and wear safety glasses and insulated gloves. Avoid working in wet or extremely windy conditions. 🧣 Cover your solar panels with an opaque cloth whenever you’re connecting or disconnecting wires to prevent the panels from generating power (live panels can shock you). 🔌 Never try to disconnect any electrical part while it’s under load, as sparks and arc flashes can occur. Also turn off and isolate your RV’s main battery switch when hooking up power wiring to avoid accidental shorts.
🧰 You’ll need the right tools for a smooth installation. Here’s a typical toolkit for DIY RV solar:
| Tool | Purpose |
|---|---|
| 🛠️ Electric drill and bits | For drilling pilot holes in the roof or mounting surface. |
| 🧴 Caulk gun and sealant | To seal any holes and frame attachments (many RVers prefer Dicor or Sikaflex RV sealant). |
| ✂️ Wire strippers/cutters and crimpers | To strip and crimp solar cable and connectors. A quality MC4 crimp tool (for solar panel connectors) is essential if you’re adding panel leads. |
| 🔪 Pocket knife or utility knife | For small cuts, tape, and packaging. |
| 🪛 Screwdrivers | For panel hardware and tightening terminal screws (flathead/Phillips). |
| 📏 Measuring tools | A tape measure, level, and marker/pen to lay out panel placements. A square or chalk-line can help keep panels aligned. |
| 🧰 Hacksaw or saw | To cut any mounting rails or conduit to length. |
| 🪜 Extension ladder | A sturdy metal extension ladder sized to reach your roof. Make sure it extends at least 3 feet above the roofline and is angled correctly. Tie off the top if possible for extra security. |
| 🔎 Digital multimeter | Vital for testing voltages, checking continuity, and verifying connections. |
| 🔧 Torque wrench | To tighten battery/inverter terminals to spec. Over-tightening can strip, under-tightening can add resistance. |
| 🎒 Ladder safety gear | A tool belt or bucket pulley so you can keep both hands free when climbing. |
🛰️ If your RV is already “solar-prepped,” it may have some of these pre-installed. Many new RVs come with a factory cable entry plate (wired port on the side or roof), an in-built solar charge controller, or even empty conduit in the ceiling. If so, your job is easier. But if not, you’ll need to run wires through the roof or walls and install those parts yourself. Plan ahead and gather all tools and supplies before you climb up on the roof.
Choosing a Location for Solar Panels
🧭 Picking the best spot on your RV roof is critical for panel output. Mount panels where they’ll get the most direct sun, typically on the flattest, southern-facing part of the roof (in the northern hemisphere). Panels should be far from shade sources – keep them clear of roof vents, air conditioners, antennas or nearby trees. 🌳 Many RVers notice their rear often gets shade (if you back into a campsite), so panels might perform best mounted closer to the front or center. 🇺🇸 In the USA, face panels true south with a tilt around 30–45° for optimal year-round energy. 📐 (Note: you usually have fixed mounts on an RV roof, so the “tilt” is just the roof angle or optional brackets, but keep this in mind if you ever manually tilt panels when stationary.)
🧱 Also consider your roof’s material and structure. Some RV roofs are white fiberglass, others are rubber or aluminum. Know your roof type so you choose compatible sealants and hardware (some adhesives stick better to aluminum than rubber, for example). ✅ Check that the area is large enough for your planned panel array and doesn’t have structural obstructions under the roof (like internal beams or ceiling fixtures). 🧼 Finally, clean the roof surface, remove debris, and measure carefully. ✏️ Mark the panel outlines with a pencil or chalk so you can see exactly how much room you have. ⏱️ Taking time on this planning step will prevent surprises when you start drilling or sticking panels.
Step-by-Step Guide
🧩 Follow these steps in order to install your RV solar setup. Take your time with each one and double-check instructions, product manuals or wiring diagrams for your specific gear. As RVSolarConnections advises, thorough planning and following the “formula” ensures success. Let’s dive in:
1. Planning Your Layout and Gear
🧮 Begin with figuring out your power needs and how much solar you want. Make a list of all the 12V appliances you’ll run (lights, fridge, fans, etc.), and estimate their daily watt-hour usage. Then decide how many panels and what battery capacity can handle that load – our [Sizing Your RV Solar System] guide can help. For instance, a couple of 100–200W panels charging a 100Ah+ battery bank is common for a moderate setup.
🗺️ Next, sketch your roof layout and plan where each panel, cable entry point, charge controller, inverter and battery box will go. Consider cable routes (short as possible) between the panels, charge controller and batteries. If your RV has solar-prep, note the built-in controller, breakers or wiring locations. If it isn’t pre-wired, plan where you will route the wiring through the ceiling or walls (often via the fan vent or by drilling a hole with a cable gland). Decide on the charge controller model (PWM vs MPPT and amp rating) and inverter size (if any) and confirm they fit in your planned space.
📦 Gather all your components and measure them. Make sure your components are compatible (e.g. panel voltage within your controller’s range, battery voltage matches controller and inverter). Read each manual thoroughly – RVSolarConnections emphasizes that reading product manuals is crucial before you start. Make a checklist of materials:
- Solar panels
- Mounting hardware
- Wiring (correct gauge for current)
- MC4 connectors or branch connectors
- Cable entry gland
- Fuses/breakers
- Sealant
- Battery bus (or breakers)
- Tools
❓ If you have questions, refer to related guides like RV Solar 101 or manufacturer help. Doing this careful prep work will pay off later. ✅
2. Mounting Solar Panels
🛠️ With your plan in hand, it’s time to attach the solar panels. Place each panel in its marked location on the RV roof and double-check alignment. Mark the bracket holes or outline (and then double-check no underlying obstacle inside the roof). Be sure to put sealant (like Dicor or Sikaflex) under any mounting bracket or corner before securing it – even if using adhesive mounts – to prevent leaks.
🔩 There are several mounting options:
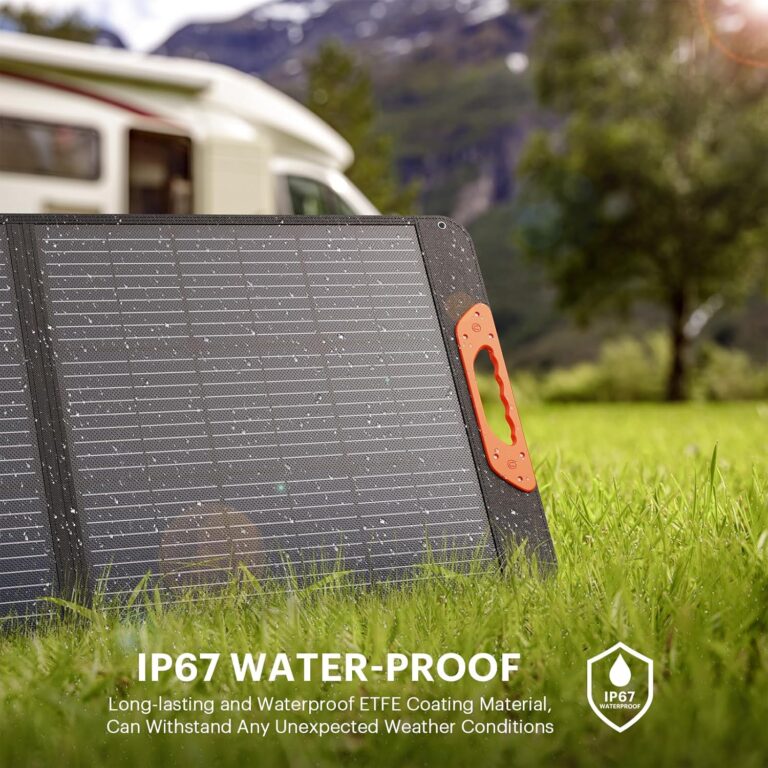
- Rigid panels on brackets: This is the most common method. Standard Z-brackets or corner clips hold the panel frame down to the roof with screws or bolts. For example, Z-brackets are inexpensive L-shaped supports that bolt through the panel frame into the roof. They require drilling holes (and using sealant). Corner brackets are another no-drill option that clamp the panel corners (some kits use adhesive pads). Tilting brackets (like the adjustable triangle shown above) screw to the roof and let you lean the panel up on a hinged leg. These adjustable mounts can cost a bit more (~$30–50 each) but let you optimize the angle for the sun. Good products include HULKNPEW or Solarland bracket kits for flat mounts, and adjustable tilt mounts like the RICH SOLAR 28″ Adjustable Tilt Kit.
- Flexible or adhesive panels: Some use flexible thin-film panels (mounted with adhesive) or stick rigid panels directly with industrial tape. If you go this route, skip the brackets and instead use high-quality butyl tape or 3M double-sided tape under the panel edges. Remember that flexible panels run hotter than framed ones, so it’s wise to leave a small gap (about 4–6 inches) under them for airflow.
📋 For bracketed installs, follow these steps:
| Step | Description |
|---|---|
| 🔧 Drill pilot holes | Through the panel frame and roof where marked, then apply sealant around each hole (sealant compatible with your roof material). |
| 🔩 Attach brackets | (or corner clips) with stainless hardware. If using tilting mounts, bolt their base to the roof and attach the panel afterward. Use rubber washers or grommets to seal screw penetrations. |
| 🧰 Torque the fasteners | To snug (no leaks, but don’t over-tighten into glass panels!). Check that panels are level and secure. |
| 🧲 If using adhesives (no holes) | Apply tape or sealant to the bracket or panel surface and press firmly, holding or weighting it until set. Some use corner pad kits (like SLB Brand adhesive corner mounts) to stick panels down. |
✅ The HULKNPEW Solar Panel Mounting Brackets (4-pack) can secure up to 100W panels on a flat roof.” After all panels are mounted, seal around any bracket edges with lap sealant. Products like Dicor Lap Sealant or Marine Goop are widely used on RV roofs. 🧼
3. Routing and Securing Wiring
🧭 Now route the solar cables from the panels to the charge controller. First, open the panel junction box (carefully; the panel may already be partially live in light) and note the positive/negative MC4 leads. Often panels come with short MC4 pigtails which you can extend with MC4 extension cables. Run these cables neatly toward your cable entry point or charge controller.
🛡️ Cable entry: Use a waterproof cable gland or entry plate for the roof penetration. Drilling a hole just large enough for the MC4 connectors (usually 3/4″ or so) and installing a waterproof grommet or dual cable entry gland (like the Go Power GP-CEP plate) will keep out moisture. Alternatively, run the cable through an existing vent or manufacturer-provided solar port, if available. Seal around any penetrations with silicone.
🧹 Wire organization: Keep your wires flat to the roof or clipped along structural members inside. Always leave a bit of slack or a gentle loop – in a moving vehicle, a small bump can tug on wires, so if they’re tight they could pull loose later. Do not bend cables sharply. Wherever possible, protect the wires from chafing: use rubber grommets or conduit where cables pass through metal or edges. Secure all cables with zip ties or clamps so they can’t flail around.
🔌 Connections: Double-check the polarity of each solar cable. If you are wiring panels in series or parallel, use MC4 branch connectors rated for solar (available on Amazon). For DIY connector work, use an MC4 crimping tool – never twist or tape wires together. After crimping, test each MC4 connection for a solid fit. Use UV-resistant electrical tape or heat-shrink on any exposed conductors.
🌎 Grounding: If your panels have metal frames, it’s good practice to bond them to the RV chassis ground using a grounding lug and wire (often as thick as your panel positive wire). This isn’t always required for basic systems, but it adds safety by tying metal parts to ground.
✅ In summary, run your panel cables carefully through the roof into the cabin or compartment where the controller will be. Route them away from heat (like the fridge vent) and mechanical hazards. Neat wiring now saves troubleshooting headaches later. Make sure you use the proper wire gauge (for example, 10AWG or 8AWG for typical panel-to-controller runs) as undersized cable can overheat. We’ll talk about fusing and grounding next, but you can see in our example wiring diagram section how the cables tie together.
4. Installing the Charge Controller
🧩 Mount the solar charge controller in a dry, easily accessible location – usually inside a cabinet near the batteries. The controller should be close enough to the battery bank to keep cable lengths short (less voltage drop) but also near the panels if possible. In many RVs it ends up on a wall in a basement compartment or storage bay. Make sure it’s screwed firmly to a flat surface and that you follow the orientation (some controllers have heat fins that need air clearance).
🧠 When wiring the controller:
| Step | Description |
|---|---|
| Panel side first | Connect the solar panel positive and negative cables to the PV+ and PV– terminals on the controller. Most controllers require you to connect panels before the battery. (Cover the panels first to prevent live output.) |
| Battery side | Then connect the controller’s battery terminals to the battery bank. Use heavy gauge cable (often the same gauge as panels or thicker, like 10–6 AWG depending on current) and put a fuse or breaker on the positive leg right at the battery. This fuse protects the battery from short circuits. Many RV installers use an ANL or MEGA fuse holder near the battery (size it to your panel/controller max current). |
| Select battery type | Set the controller for your battery chemistry (flooded, AGM, gel, or lithium). A mismatch here can prevent proper charging. Many modern MPPT controllers have a digital menu or dip-switches for battery type. |
| Configure settings | If needed, set system voltage (12V or 24V depending on your battery bank). Double-check ground and neutral wiring if the controller has AC (in hybrid inverters) – usually not needed for a simple DC controller. |
🔌 As an example of products, popular controllers include the Victron SmartSolar MPPT (with Bluetooth monitoring) and the Renogy Rover 20A or 30A MPPT units. For smaller budgets, the Renogy Wanderer PWM (12/24V) is cheap and reliable. In any case, read the manual to wire it correctly. Once wired, power up the system by connecting the battery side and you should see the controller wake up (LEDs or display showing battery voltage). ✅
5. Connecting to the Battery Bank
🔋 With the controller connected, ensure your batteries are ready. If you’re using multiple batteries, wire them as planned (e.g. two 6V batteries in series for a 12V bank, or four 12V batteries in series for 48V, etc.). Mount them on a stable platform, secured against movement.
🔌 Hook up your battery bank positive and negative to the charge controller as mentioned. Important: install a main fuse or breaker on the positive battery cable within 7 inches of the battery terminal (ANL, MEGA, or a DC circuit breaker). This protects the whole system in case of a short. Connect the negative terminal to the RV chassis ground (your vehicle ground) with a heavy wire. RVSolarConnections notes that for mobile systems, the DC negative should be grounded to the chassis using at least as large a conductor as the largest wire in the system. Bolt the ground lead to bare metal on the frame (sanded clean for good contact). You only need one main ground wire going to chassis.
🧰 If using an inverter (see next step) or other DC loads, you might install a DC fuse block or distribution panel fed off the battery positive (through a heavy fuse) and ground the panel to the negative bus. Attach all battery cables tightly (observing torque specs) and ensure nothing can short against the frame (cover with heat-shrink or tape any exposed lugs if needed).
6. Installing an Inverter (If Used)
⚡ If you want AC power (120VAC or 230VAC) in your RV, install an inverter after the battery bank. Choose a pure-sine inverter of suitable wattage (e.g., 1000–3000W).
🛠️ Mount the inverter as close to the batteries as practical, on a vertical surface for cooling, and in a ventilated area (inverters can run hot under load). Keep cable runs short to minimize voltage drop.
🔌 Wiring steps (follow your product manual and electrical codes):
| Step | Description |
|---|---|
| Positive DC feed | Wire the inverter’s positive input to the battery positive through its built-in fuse (if present). If the manual recommends it, add an external fuse sized for the inverter’s current draw. |
| Negative / Ground | Connect the inverter negative to the battery negative / chassis ground with heavy cable. |
| Extra protection | Many installers add a second fuse or DC breaker on the inverter’s positive cable near the battery. |
| AC output | Wire the inverter’s AC output to your RV’s AC distribution panel or to a dedicated outlet, following applicable electrical code (similar to hooking up a portable generator). |
🧰 Examples: Renogy, AIMS, and GO Power make common RV inverters. A typical setup might use a Renogy 2000W Pure Sine Inverter or an AIMS 3000W 12V Inverter. Always follow the manual exactly when wiring the AC side—improper wiring can be dangerous.
✅ Once wired, leave the inverter switch OFF until you’ve double-checked everything else.
7. Grounding, Fuses, and Final Checks
⚠️ Before firing up the system, do a thorough safety check:
🌤️ Now remove the panel covers and let the sun hit the array. Observe the controller: it should read a charging current (in amps). If nothing happens, troubleshoot: check the PV cable fuse, panel orientation, and that the controller mode (MPPT/PWM) is on. Use a multimeter to measure voltage at the panel terminals and controller input – a good panel in bright sun should read close to its rated Voc (as found on its spec sheet). Perform these tests under sunny conditions per Renogy’s advice.
🚫 One more big safety tip: never connect or disconnect any PV or battery wires while the system is live. Always switch off breakers or cover panels first. As Renogy warns, do not unplug connectors under load or you risk dangerous arcing. For example, if you need to adjust wiring on the roof, cover the panels with a blanket to stop the voltage, then unplug.
✅ If everything checks out (panels charging, no unusual heat or smells), congratulations – your RV now has solar! Make notes of all settings (battery type, charge rates) and consider labeling cables or terminals on your panels and controller for future reference.
Wiring Diagram Example
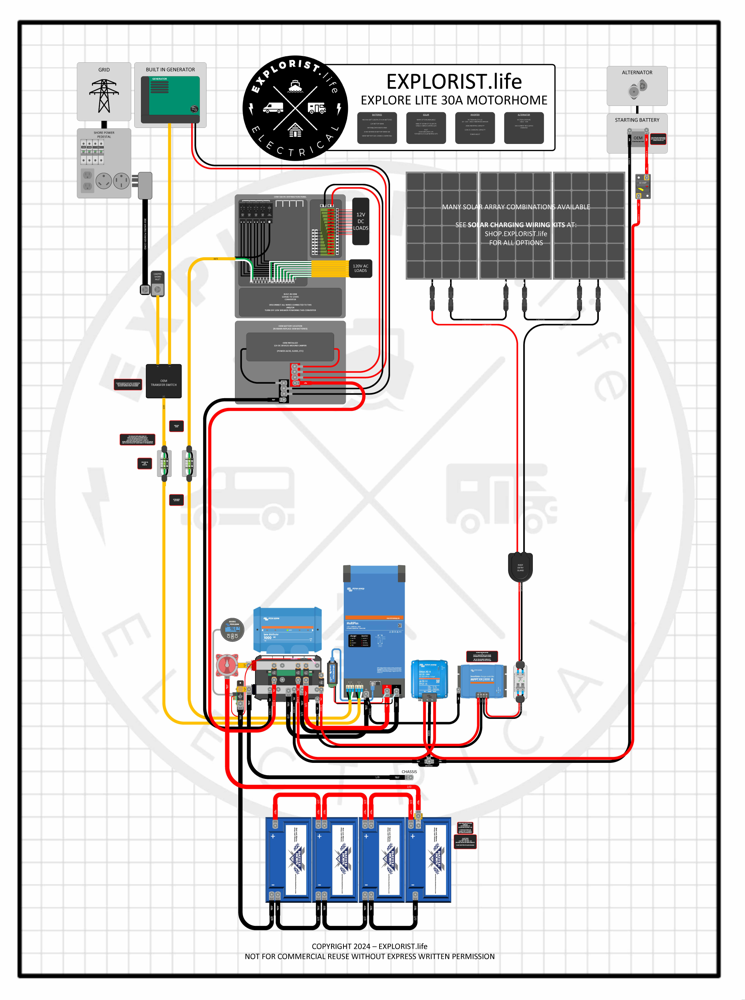
🗺️ Figure: Example RV solar wiring schematic (panels → controller → batteries → inverter) to illustrate component layout.
The diagram above (courtesy of Explorist.life) shows a typical RV solar wiring layout. Here’s what it represents in text form: two solar panels (upper right) feed through positive (red) and negative (black) cables to a solar charge controller (center). The controller then connects to a battery bank (bottom) to charge it. The battery bank (here shown as four 12V batteries in series) feeds a 12V/24V bus. A DC fuse block or breaker (left) on the positive leg protects against short-circuits. On the right side, a 120VAC inverter/charger takes 12V from the batteries and outputs AC power (and can also charge the batteries from shore power). The inverter is also tied to an AC distribution (top left, “grid” or “shore” input). All negative lines tie to the chassis ground.
While your system may be simpler (fewer panels, or no inverter), the key is: panels → (fuse) → controller → battery → (fuse) → loads/inverter. You should have an inline fuse on each positive run (panel positive and battery positive) sized for the max current. Every component’s manual usually shows a wiring diagram; follow it closely. If you follow the path above and connect matching colors/polarities, your system will mirror this standard design. 🔌
Troubleshooting Tips for Common Issues
🧰 Even a well-planned install can run into hiccups. Here are some quick checks and tips:
| Issue | Solution |
|---|---|
| 🔆 Panels not charging: | First, ensure the panels are actually receiving full sun (remove covers). Use a multimeter on a sunny midday: measure the panel open-circuit voltage (Voc) and short-circuit current. If Voc is much lower than the panel’s spec, you may have shading, a bad connection, or a defective panel. Common culprits: partial shade, dirty panels, or reversed polarity. Also confirm the panel leads are fully clicked into their MC4 connectors. |
| 🔋 Battery not rising in voltage: | Check that the charge controller is set to the correct battery type and that the battery switch is on. Make sure the battery cables and fuses are properly connected. A dead or sulfated battery may not accept charge. If using a lithium battery, ensure the controller is in Li mode. |
| 📟 Controller error codes: | Refer to the manual. Often errors are due to too-high input voltage, ground faults, or low/high temperature. Cover panels (stop input) if you need to unplug or reset the controller. |
| 🔌 Inverter issues: | If the inverter has a protection state, check for over-current (too big a load) or over-temperature. Ensure its transfer switch or breaker is set correctly (if wiring AC). |
| 🧷 Wiring and connections: | Loose crimps are the #1 issue in RV systems. Go back and tug-test any crimped or bolted connection. Check that no wires chafed through insulation. Inspect any cooling fans and vents (on the charge controller or inverter) for proper airflow. |
| 🧯 Fuse blowing: | If a fuse blows immediately, re-check wire colors; maybe you accidentally swapped +/– or grounded the wrong wire. Use the correct fuse size (too small will blow under normal current). As the RV Solar guide warns, an improper fuse or wire can cause fires, so measure the current draw and choose a fuse just above that rating. |
| 🕒 General tip: | Perform troubleshooting tests under the right conditions (sunny, noon). Also cover panels or turn off loads before disconnecting anything to avoid arcs. |
🧭 If you’re stuck, trace the system in segments: isolate the panels, then the controller, then the battery. Use your multimeter and don’t hesitate to consult manufacturer support or online forums. Many RVers share problems (and fixes) for solar installs in communities like RVSolarConnections or Solar Panel forums.
Real-World RV Solar Components
🧰 To help you pick components, here are some real-world products often used in RV solar builds (available on Amazon or RV parts shops):
| Item | Description |
|---|---|
| 🔆 Solar Panel Kits | Renogy 100W or 200W monocrystalline kit (with panels, PWM controller, cables). For higher output, consider a 2×100W or 2×200W kit for larger campers. |
| 🧱 Mounting Kits | The HULKNPEW Solar Panel Mounting Brackets (4-pack) for flat mounts; the Solarland Adjustable Tilt Bracket for inclined panels; adhesive SLB Corner Clips for drill-free installs. Don’t forget a roof sealant like Dicor Self-Leveling Lap Sealant for waterproofing. |
| 🧰 MC4 Connector Tools | The BougeRV 8-in-1 MC4 Crimping Tool Kit makes assembling and disassembling MC4 connectors easy. It includes a crimper, cutter, and wrench for locking MC4s. The Solar Serpent 5-in-1 is another popular MC4 tool. |
| ⚙️ Charge Controllers | Renogy Rover 20A or 30A MPPT controllers are budget-friendly MPPT units. Victron BlueSolar MPPT (e.g., 75/10 or 100/20) offers Bluetooth monitoring. For simple setups, Renogy Wanderer 30A PWM controllers work with 12/24V battery systems. |
| 🛡️ Wire Entry Glands | Waterproof cable entry glands (single or dual) for RV roofs. For example, a Renogy Waterproof Solar Cable Entry Gland lets you seal two panel cables through the wall. Go Power! GP-CEP Cable Entry Plate is also popular. |
| 🧯 Fuses & Fuse Blocks | Blue Sea Systems makes marine-grade DC fuse blocks (e.g., 12-circuit fuse block) and ANL fuse holders. A commonly used battery fuse is the Blue Sea 185 Series ANL fuse holder (for up to 300A fuses). For PV strings, DC-rated blade fuses or NH fuse holders may be used depending on current. |
| 🔋 Batteries | While not our main focus here, choosing the right battery is critical. Lead-acid (AGM/Gel) vs lithium (LiFePO4) will affect your controller choice. See our RV Battery Comparison article for more. |
Final Thoughts: Stay Safe and Enjoy Your Solar Power
🎉 Congratulations on making it to the end of the installation – your RV is now solar-powered! By following each step carefully, you’ve set up a system that will run your lights, fridge, and devices even off-grid. Always remember safety first: if any part of this process felt beyond your skill level, consult a professional. Double-check everything and move slowly.
🏕️ With your DIY solar system in place, you can enjoy boondocking with confidence. Share your experience and ask questions on RV solar forums – the community is full of helpful travelers. And while you’re at it, check out our other guides (like [RV Solar 101] and [Sizing Your RV Solar System]) to further optimize your setup.
☀️ Now get out there and let the sunshine power your adventures. You’ve earned the solar independence – stay safe and enjoy the journey!