weBoost Drive Reach RV Cell Signal Booster Review: Worth It for Boondocking and Remote Work?
Affiliate Disclaimer: This article contains affiliate links. If you click through and make a purchase, I may earn a small commission at no extra cost to you. This helps support my deep-dive research.
If you’ve ever pulled into a gorgeous campground… and immediately started doing the “RV signal dance” (phone up, phone down, stand by the window, stand outside, swear quietly), you already know the problem isn’t “no bars.”
The real problem is no usable connection.
You need maps to load. Weather radar to refresh. Two-factor codes to arrive. Calls to stay connected. And for a lot of RVers now, you need enough stability to work—without parking your laptop on the roof like a confused solar panel.
So I went deep on owner feedback for the weBoost Drive Reach RV to answer one question:
Is it actually worth it in real RV life—after the install pain, carrier quirks, and expectations collide with reality?
Quick Summary
- Best-case outcome: You already have a weak-but-real signal outside, and the booster helps turn it into a usable inside connection (calls/text + more consistent data).
- Most common “win” pattern: Owners who boondock or camp on the edge of coverage and are willing to install the antenna correctly.
- Most common “loss” pattern: Owners expecting a miracle in true dead zones, or users whose carrier bands aren’t effectively helped (a small but loud theme among some T-Mobile users).
- Installation reality: This is not a “five minutes and done” gadget for many rigs. Cable routing + antenna placement is the whole game.
If you want a broader connectivity strategy (cell booster + router + Wi-Fi + satellite), start here:
Quick Verdict (TL;DR)
My bottom line: The Drive Reach RV is often a legit upgrade when there’s something to boost and the antenna is installed well. Across the owner feedback I went through, about half of reviewers were happy (4–5 stars), while a meaningful minority were very unhappy (1–2 stars). That split usually comes down to expectations, carrier/band realities, and install quality.
Confidence Score: 7.4 / 10
(High confidence it can help in fringe-signal camping; lower confidence it will satisfy buyers expecting “dead zone to full bars.”)
If you want to check current pricing: See the weBoost Drive Reach RV on Amazon
Technical Deep Dive: How a Cell Booster Actually Helps (In Plain English)
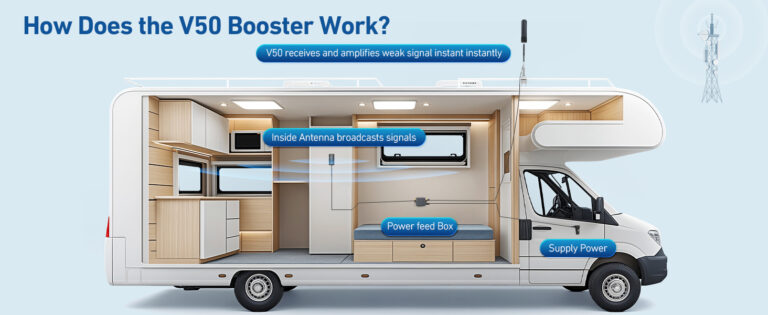
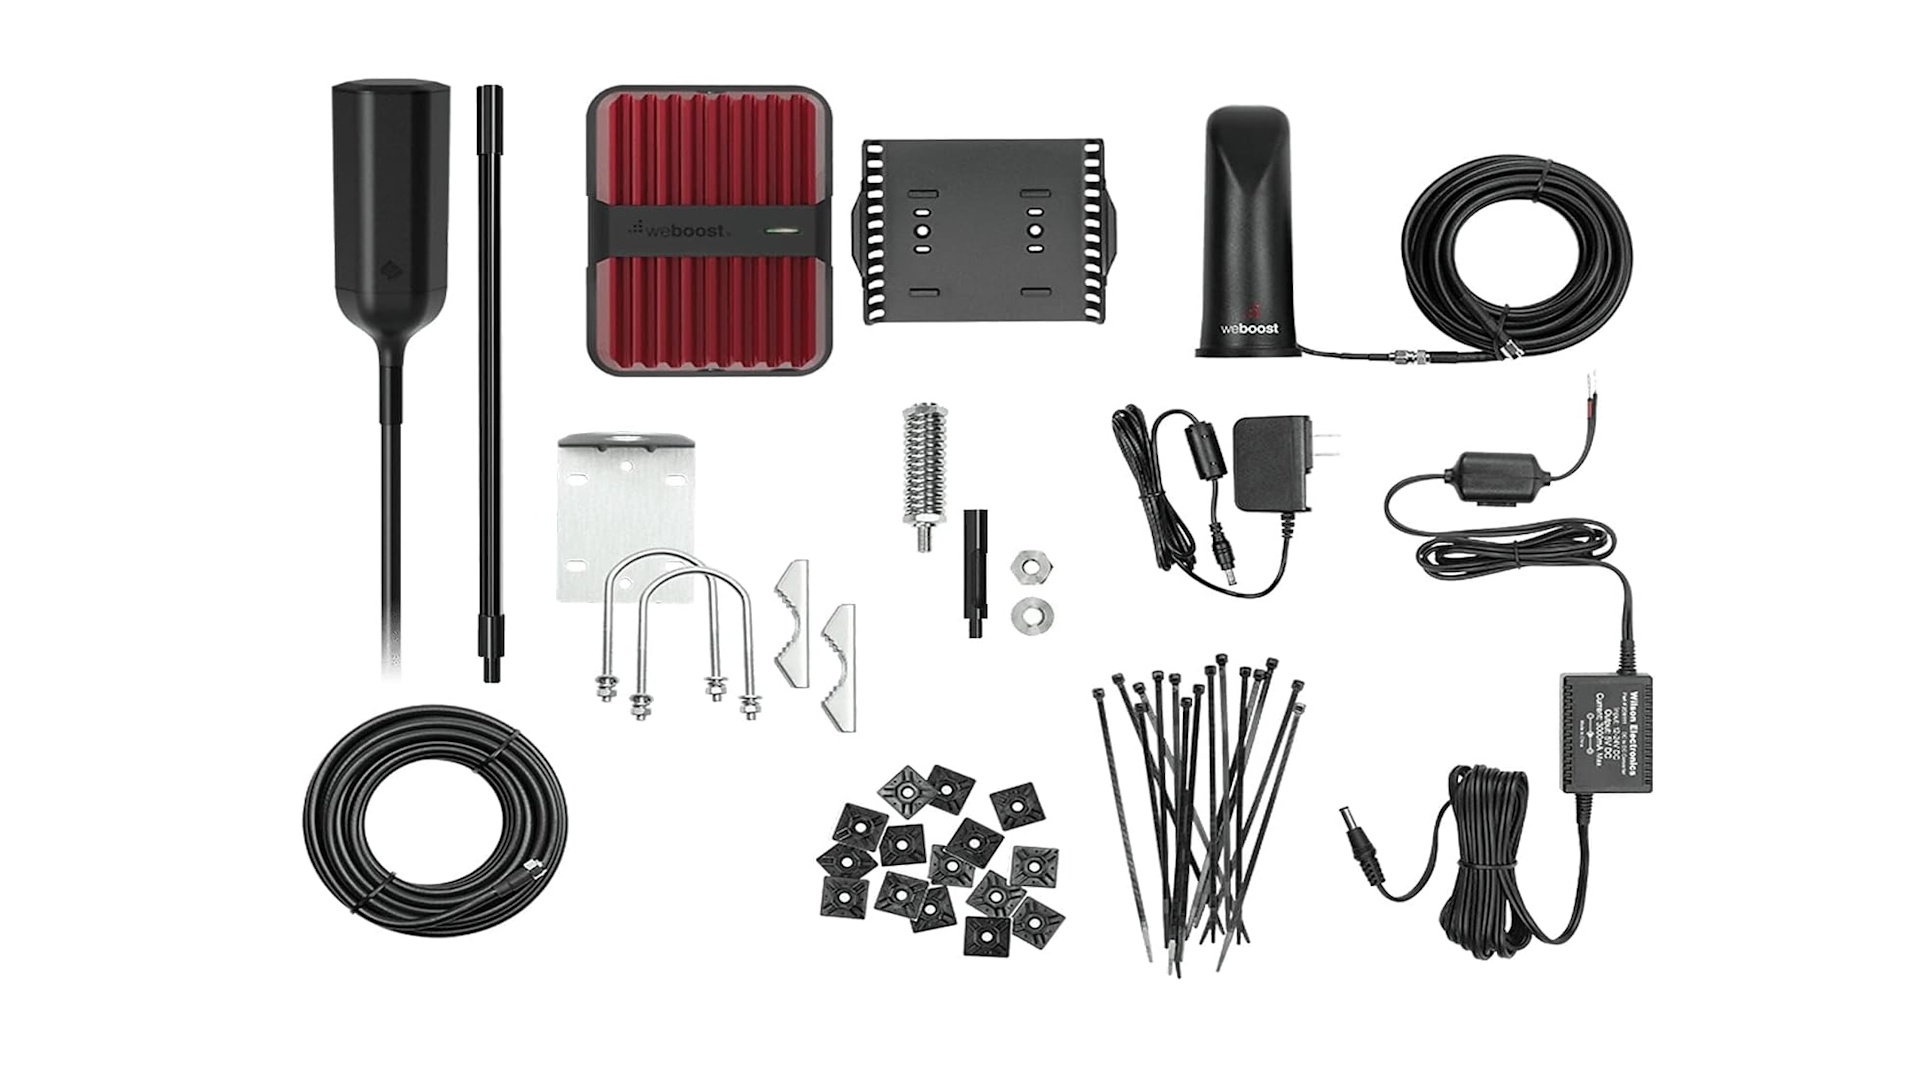
A vehicle booster like the Drive Reach RV is basically a three-part system:
- Outside antenna grabs the best signal available outside your rig
- Amplifier strengthens that signal
- Inside antenna rebroadcasts it inside so your phone/hotspot can “hear” it better
Two important realities:
- Boosters don’t create service. They improve what exists. If the outside antenna can’t find anything usable, you don’t get magic.
- Antenna placement matters more than the brand name. In the reviews I went through, installation and antenna positioning came up constantly—because it’s the difference between “wow” and “why did I buy this.”
What Makes the Drive Reach RV “RV-Specific” in Real Use
From real-world owner feedback, it looks like the Drive Reach RV tends to appeal to RVers who want:
- A more permanent-ish setup (mounted antenna, routed cables, consistent results)
- Better inside usability in metal-heavy rigs (where the RV itself is basically a signal blocker)
- A workable connection for calls/text and basic data tasks at campgrounds where you’re near the edge of coverage
This is the heart of this weBoost Drive Reach RV review: it’s less about “how powerful” the box is and more about whether your use case is boostable.
Key Features (Benefit-Driven & Comparative)
Here’s the most honest way to think about the “features”—based on what owners actually experience.
| Feature | What You’re Hoping For | What It Actually Means (Owner Reality) | Compared to Alternatives |
|---|---|---|---|
| Outside RV antenna + mounting | “Grab a stronger signal than my phone can” | Works best when mounted high/clear and (for directional styles) aimed well. Placement is everything. | Better than relying on your phone indoors. Similar concept to other vehicle boosters, but RV mounting/routing is the differentiator. |
| Amplifier (the booster unit) | “Turn 1 bar into usable service” | Many owners report meaningful improvement in fringe areas—some see 1–2 bar gains, others see stability gains more than bar gains. | A hotspot alone won’t improve signal quality. A router can help distribution, but it can’t amplify weak cellular RF by itself. |
| Inside antenna coverage | “Use my phone anywhere in the RV” | A noticeable group of owners report you may need to be fairly close to the inside antenna for best results. | Stronger “whole-rig” coverage usually requires more complex installs, better separation, or different interior antenna approaches. |
| Power setup (12V/AC depending on rig) | “Set it and forget it” | Most owners treat it as a “running when needed” device. A few mention power/adapter quirks and prefer a cleaner 12V solution. | A battery-friendly setup matters more if you boondock for long stretches. |
| Multi-device practicality | “Help phones + hotspot + tablets” | Some owners specifically report better usability for multiple devices (hotspots, iPads, work sessions), but results vary by campsite and carrier. | For work-heavy setups, pairing with an RV router can make the inside network feel more stable once the cellular link improves. |
Real User Experience Analysis (Deep Pattern Analysis)
This is where the story gets real.
Pattern #1: The “Weak-But-Real Signal” Crowd Often Wins
In the reviews I went through, the happiest owners tend to describe situations like:
- “I usually have 1–2 bars outside, but inside the rig it’s junk.”
- “We’re in mountains/trees and need calls and basic data to work.”
- “Bars don’t look wildly different, but the connection becomes usable.”
That last one matters. A recurring theme is that bar count isn’t the whole story. Several owners describe improved stability—fewer dropouts, less buffering, more reliable sending/receiving—especially when they’re not in a true dead zone.
Pattern #2: Install Quality Decides Your Fate
Roughly 4–5 out of 10 owners mention installation details—routing, drilling, mounts, cable runs, ladder mounts, roof placement, etc. And within that group, there’s a clear split:
- Some owners describe it as manageable or straightforward (especially if their rig already has an easy cable path).
- Others describe it as frustrating—mostly due to drilling reluctance, cable routing, or dialing in the best antenna position.
One pattern that comes up repeatedly is creative routing: using an existing path (like unused satellite cable routes) instead of cutting new holes—because nobody buys an RV to immediately start drilling it.
Pattern #3: “You Might Need to Be Close to the Inside Antenna”
About 1 in 10 owners explicitly describe interior range limitations—basically, the booster is strongest near the inside antenna and falls off as you move away.
That’s not “good” or “bad” by itself. It’s just physics and layout. But it’s a huge expectation-setter:
- If you want “whole RV blanket coverage,” plan placement carefully.
- If you mainly need reliable connectivity at a workstation/dinette/bed area, you can design around that.
Pattern #4: Carrier/Band Gotchas (Especially T-Mobile Complaints)
A small but important thread: some T-Mobile users report no improvement and specifically mention band compatibility concerns (including band 66, and another complaint mentioning band 71).
This isn’t every T-Mobile user. But it’s serious enough that, if you’re primarily T-Mobile, you should treat band support as a “verify before you buy” item—because a booster that helps Verizon/AT&T well but misses your key bands will feel like a total loss.
If you want to compare current owner sentiment quickly: Read the latest Amazon reviews here
Ready to check price? See the weBoost Drive Reach RV on Amazon
The Good, The Bad & The Ugly (Pros/Cons)
The Good (What Owners Consistently Like)
Based on aggregated owner experiences, the strongest positives cluster around:
- Real improvement in fringe coverage: Many owners report that it turns “barely usable” into “good enough to function,” especially for calls/text and basic data.
- More reliable camping connectivity: A frequent buyer surprise is that the “win” can be stability, not just bars.
- Work-and-stream use cases do show up: Some owners describe successful remote work sessions, hotspot use, and reduced buffering compared to pre-booster life.
- Build/packaging feels premium (for many): Several owners comment positively on the overall kit feel and completeness (though not all agree—see below).
The Bad (Common Complaints You Should Expect)
In the reviews I went through, the most repeated negatives are:
- “Did nothing for me” experiences: A sizable minority report no meaningful improvement. This often aligns with poor outside signal, difficult sites, or carrier mismatch.
- Interior antenna range limitations: Some owners describe needing to be close to the inside antenna for best results.
- Install frustration: Drilling, routing, and mounting can be a headache depending on your rig.
- Heat concerns: A smaller but notable set of owners mention the unit running hot and recommend giving it airflow and avoiding contact.
The Ugly (The Dealbreakers for Some Buyers)
These are the issues that turn into 1-star rage:
- Band/carrier mismatch: Especially the specific T-Mobile band complaints. If this is your situation, you won’t feel “slightly disappointed.” You’ll feel robbed.
- Support experiences vary: Some owners praise helpful guidance; others report long holds or poor outcomes when troubleshooting.
- Expectation gap: Buyers expecting “dead zone to full service” are the most likely to hate it.
Owner Stories (The Human Side)
I’m not going to paste quotes, but a few recurring “real RV life” stories show up again and again:
Story 1: The Mountain Campground Remote Worker
One common scenario is a couple camping in the mountains or wooded areas where phones show weak service. Before the booster, email wouldn’t reliably load and video calls were a gamble. After the install (and some antenna tweaking), they report the difference was enough to actually get work done—less buffering, fewer stalls, and a connection that didn’t feel like it was made of paper.
If you want to skim what current owners are saying: Amazon reviews for the Drive Reach RV
Story 2: The “It’s Not More Bars—It’s Less Pain”
A recurring theme is owners saying something like: bars didn’t skyrocket, but the experience got less annoying. Pages load. Calls don’t drop as much. Hotspot stays connected longer. This is the kind of improvement that’s hard to sell in marketing… but matters a lot when you live with it.
Story 3: The T-Mobile Buyer Who Got Burned
There’s also a very specific unhappy story: an owner installs everything correctly, tests multiple locations, gets no boost, then learns (after time with support) that their key band isn’t effectively helped. For those buyers, it’s not “meh.” It’s a full fail.
Expert Tips & Installation Hacks (From Owner Patterns)
Here are the practical tips that show up repeatedly in real-world feedback:
- Mount the outside antenna as high and clear as you realistically can
Height and obstructions matter. Several owners describe better results after raising or repositioning the antenna. - Treat antenna aiming like a real step—not an optional detail
If your outside antenna is directional, “close enough” aiming can be the difference between no change and a meaningful boost. - Use existing cable paths if your RV has them
Owners commonly describe routing through existing channels (like unused satellite cable routes) to avoid unnecessary drilling. - Plan the inside antenna around where you actually use your devices
Since some owners report best performance near the inside antenna, place it where you work/watch/scroll—dinette, desk area, or bedroom—not randomly “center of the RV.” - Give the amplifier airflow
A few owners specifically mention heat. Don’t bury the unit under bedding, inside a sealed cabinet, or pressed against insulation.
If you’re building a “whole RV internet” setup, pairing the improved cellular link with a real router can make your inside network feel much more consistent:
Who Is This For (And Who Should Skip)
Buy the Drive Reach RV if you’re:
- Camping where you sometimes get a weak signal (not total dead zones)
- Willing to do a real install (routing + mounting + placement)
- Trying to make calls/text and basic data more reliable inside the rig
- Working remotely and need fewer dropouts and less buffering
If that sounds like you: See the weBoost Drive Reach RV on Amazon
Skip it (or rethink) if you’re:
- Regularly in places with true zero coverage
- On a carrier setup where band support is questionable for your travel areas (some T-Mobile users report major issues)
- Expecting “whole rig, full-strength signal everywhere” without careful antenna placement
- Not willing to mount an exterior antenna or deal with cable routing
If your “skip” reason is dead zones, you may be in satellite territory:
Installation Overview (What the Process Usually Looks Like)
Step-by-step (typical owner path)
- Pick the outside antenna mounting spot (ladder/roof/rear cap—varies by rig)
- Route the antenna cable inside (existing chases help a lot)
- Mount the booster unit where it gets airflow and is reachable
- Place the inside antenna near your primary device-use area
- Power it up and test before finalizing mounts
- Fine-tune antenna position/aim if results are underwhelming
If electrical protection is part of your RV “don’t fry my gear” plan, add this to your reading list:
Deep-Dive FAQ
1) Does it work if I have zero bars?
In real-world use, boosters generally need something to work with. If you’re truly in a dead zone, many owners report little to no improvement. That’s the most common expectation trap.
2) Will it make my internet fast enough for Zoom?
Some owners report successful work sessions and better streaming stability, especially when they already had weak service outside. But if your starting signal is extremely poor, results can be disappointing.
3) Do I need to sit right next to the inside antenna?
Not always, but about 1 in 10 owners explicitly describe better results when close to the inside antenna. Placement matters—design it around where you actually use devices.
4) Is it better for calls/text or data?
Owners commonly report improvements for calls/text reliability, and many also report better data usability. A recurring theme is that stability can improve even when bar count doesn’t look dramatically different.
5) Any carrier compatibility concerns?
Most owners use it with major carriers, but a small set of T-Mobile users report problems tied to band support. If you’re primarily T-Mobile, verify your typical travel-area bands before committing.
Final Verdict
This weBoost Drive Reach RV review boils down to one truth: it’s not a miracle box—it’s a tool.
When you have a weak-but-real signal outside and you install the antenna thoughtfully, many owners report the difference is absolutely worth it: fewer dropouts, more usable data, and a connection that stops ruining your campsite vibe.
But if you’re in true dead zones, or your carrier/bands don’t line up (a specific pain point for some T-Mobile buyers), it can feel like an expensive lesson.
If your camping style matches the “fringe coverage” use case, check current pricing here:
See the weBoost Drive Reach RV on Amazon