RV Shower Weak Pressure? Causes, Fast Fixes & Best Upgrades
Last updated: February 2026
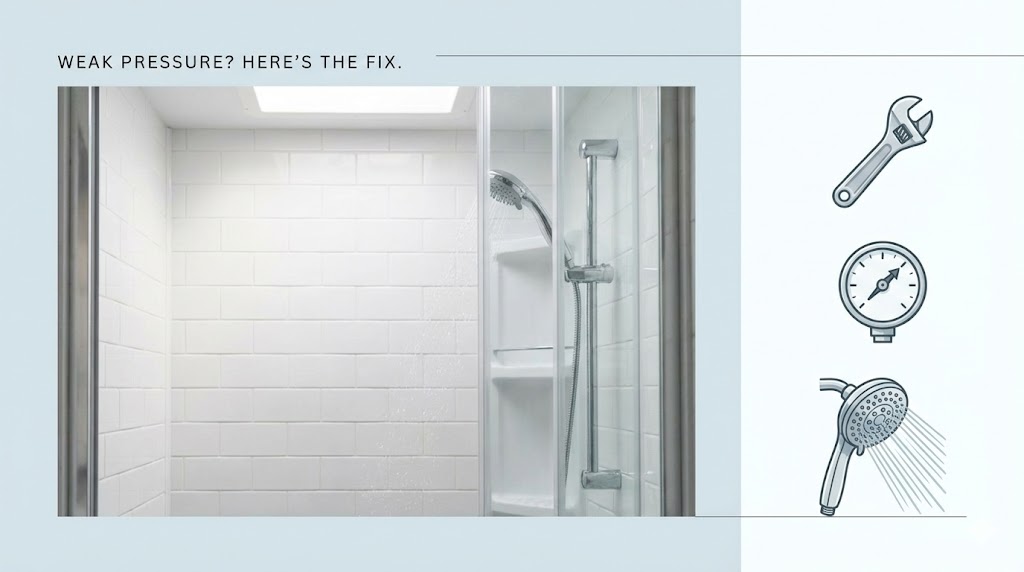
If your RV shower feels more like a sad drizzle than an actual rinse, you’re not alone — and you’re about to fix it. This guide walks you through every cause of weak RV shower pressure, shows you how to diagnose the real bottleneck, and ranks the upgrades that actually move the needle.
Quick Answer (Do This First)
Stop guessing and start diagnosing. Most weak-pressure problems trace back to one of a few predictable bottlenecks. Run through this triage before you buy a single part.
60-Second Triage Checklist (Source-First)
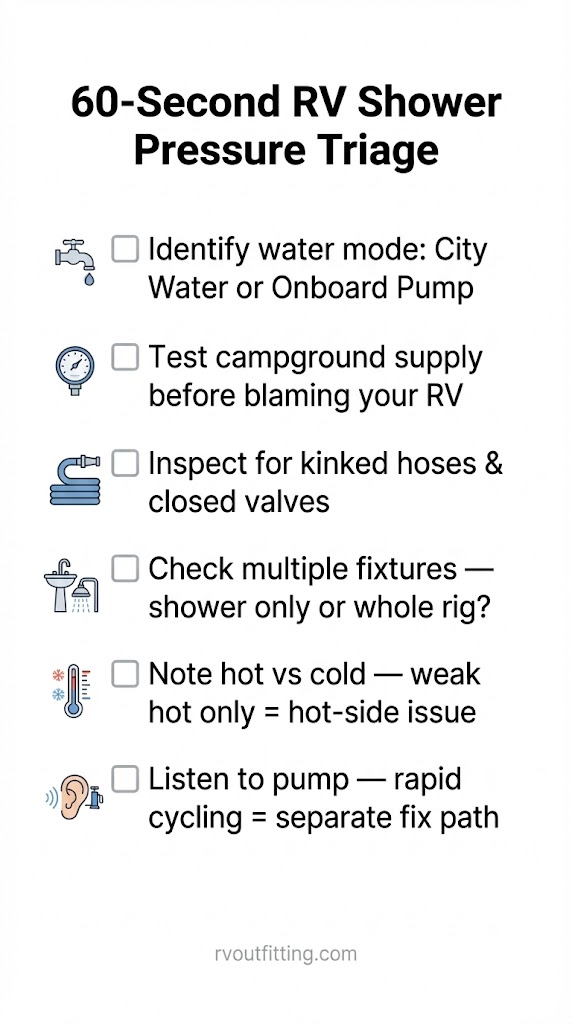
Run this checklist before you touch anything else:
- Identify your water mode. Are you on city water (campground hookup) or running the onboard tank and pump? The fix paths are completely different.
- Test the campground supply. Before blaming your RV, check whether other campers are experiencing low pressure or if the spigot itself is weak.
- Inspect visually. Walk the hose line from source to showerhead. Look for kinked hoses, partially closed shutoff valves, and obvious drips or leaks.
- Check multiple fixtures. Is only the shower weak, or is the kitchen faucet low too? Single-fixture problems point to a local restriction. Whole-rig problems point upstream.
- Note hot vs. cold. If cold pressure is fine but hot is weak, the issue is on the hot-water delivery side — not your supply or pump.
- Listen to the pump (if applicable). Rapid on-off cycling (“pulsing”) is a distinct symptom with its own fix path.
Decision Rule
Use this to pick your path:
- If pressure is weak only on city water → suspect the pressure regulator, low campground PSI, or a supply-side restriction. Jump to the City Water Low Pressure Playbook section.
- If pressure is weak only on the pump → suspect pump performance, clogged filters, short-cycling, or an internal plumbing restriction. Jump to the Pump Mode Issues section.
- If pressure is weak on both → the bottleneck is likely inside the RV itself (showerhead, filter, diverter valve, or plumbing). Work through the Common Causes section below.
RV Water Pressure Basics (So the Fix Makes Sense)
You don’t need a plumbing degree, but a few definitions make every fix recommendation click instantly.
Key Definitions (Short, Direct)
- PSI (pounds per square inch): How hard the water pushes. Higher PSI = more force at the showerhead.
- GPM (gallons per minute): How much water actually flows. You can have decent PSI but still get low flow if something restricts volume.
- Flow restrictor: A small disc or washer inside the showerhead designed to limit GPM. Saves water but can choke pressure.
- Accumulator tank: A small pressurized tank installed near the pump that absorbs pressure spikes and smooths out delivery. Eliminates pulsing.
- Diverter valve: The lever or knob that switches water between the tub spout and the showerhead. When faulty, it bleeds pressure.
- Short-cycling: When the pump rapidly kicks on and off instead of running smoothly. Feels like pulsing water.
- PEX: Flexible cross-linked polyethylene tubing used in newer RV plumbing. Generally better flow than older rigid pipe or vinyl.
- City water vs. onboard tank: City water comes from the campground hookup (external pressure). Onboard means your freshwater tank and 12V pump provide the pressure.
Safe Pressure + Why It Matters (Safety Notes)
Safe RV water pressure range: 40–60 PSI.
RV plumbing, fittings, and hoses are not built to handle the same force as a residential house. Sustained pressure above 60 PSI risks cracked fittings, blown hose connections, and water damage behind walls you won’t see until it’s too late.
For the showerhead specifically, a flow rate in the 1.8–2.5 GPM range generally delivers a satisfying rinse without draining your freshwater tank in minutes.
If you’re connecting to city water at a campground, always use a pressure regulator between the spigot and your RV to keep incoming PSI in the safe zone. A quality pressure regulator is one of the cheapest forms of RV insurance you can buy.
Troubleshooting Matrix (Symptom → Likely Cause → First Fix)
This is the section that saves you the most time. Match your symptom, check the likely cause, and start with the first fix before escalating.
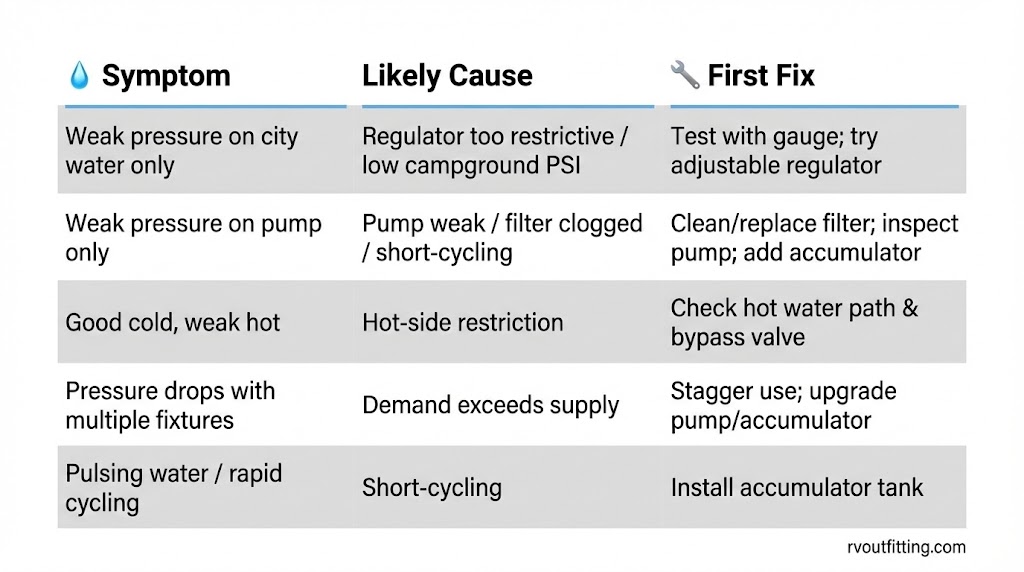
Troubleshooting Table
| Symptom | Likely Cause | First Fix |
|---|---|---|
| Weak pressure on city water only | Regulator too restrictive, campground low PSI, supply-side restriction | Test source PSI with a gauge; try an adjustable regulator; consider a booster pump if source is consistently low |
| Weak pressure on pump only | Pump losing performance, clogged filter, short-cycling | Clean or replace inline filter; inspect pump; add an accumulator tank |
| Good cold pressure, weak hot | Hot-side delivery restriction (see recall sidebar below) | Check hot water path for kinks or restrictions; inspect water heater bypass valve position |
| Pressure drops when multiple fixtures run | Demand exceeds supply capacity | Stagger fixture use; upgrade pump or add accumulator for higher flow capacity |
| Pulsing water / rapid pump cycling | Short-cycling (no accumulator or failing pump) | Install an accumulator tank; check pump pressure switch and connections |
Why Is Your RV Shower Pressure Weak? (Common Causes)
Once you’ve narrowed the symptom, here’s the ranked list of root causes — ordered from most common and easiest to check to least obvious.
Campground Water Supply Issues (External-First)
Before you start unscrewing anything inside your RV, consider that the problem might not be yours at all. Campground water pressure varies wildly. During high-demand weekends and peak summer season, dozens of rigs pulling from the same supply line can drop available PSI well below what your RV needs.
The fastest way to confirm: screw a water pressure gauge onto the campground spigot before it connects to your hose. If the gauge reads below 40 PSI, the campground is the bottleneck, and no amount of showerhead swapping will fix that.
Clogged Showerhead / Mineral Buildup
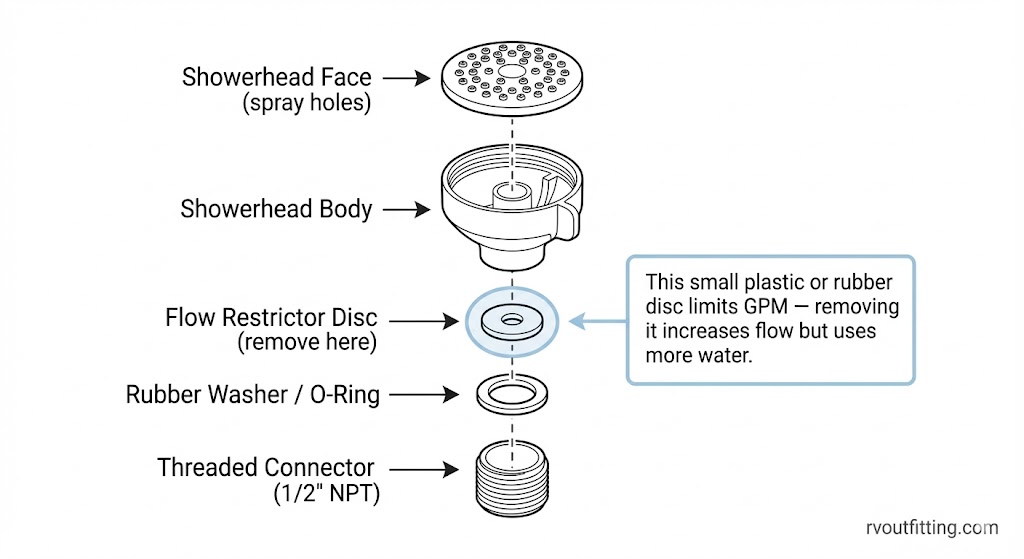
Hard water and mineral deposits gradually choke flow through the tiny spray holes. This is especially common if you camp in areas with high mineral content.
Vinegar cleaning method (quick version):
- Unscrew the showerhead.
- Soak it in white vinegar for several hours or overnight.
- Use an old toothbrush to scrub the spray holes.
- Rinse, reinstall, and test.
Also check whether your showerhead has a built-in flow restrictor — a small plastic or rubber disc just inside the inlet. It’s there to save water, but it can cut perceived pressure significantly. Removing it improves flow, though you’ll use more water per shower.
Clogged Water Filters
An inline water filter is easy to forget about — and that’s exactly why it causes problems. As it traps sediment and contaminants, it gradually restricts flow. If you haven’t changed yours in a while, this could be the silent culprit.
Recommended replacement interval: every 3–6 months, or sooner if you’re camping in areas with sediment-heavy water. If you want to keep your freshwater system clean and safe, regular filter swaps are non-negotiable.
Kinked/Collapsed Hoses + Partially Closed Valves
It sounds obvious, but a kinked drinking-water hose between the spigot and your RV inlet, or a shutoff valve that’s only partially open, will throttle flow before it ever reaches the showerhead. Check under the rig and at every connection point. Hoses that run over wheel wells, around corners, or under slide-outs are the usual suspects.
Restrictive Pressure Regulator
A pressure regulator protects your plumbing, but an overly restrictive one mimics “low pressure” perfectly. If your regulator is old, corroded, or a fixed-setting model set too low, it could be choking flow that the campground is delivering just fine.
Regulator lifespan is generally around 5–10 years. If yours is getting up in age, consider replacing it with an adjustable model so you can dial in the sweet spot. For help choosing one, see our guide to RV water pressure regulators.
Faulty/Weak RV Water Pump
If you’re on onboard water and the shower has always been weak — or has gotten progressively worse — the pump itself may be losing performance. RV water pumps typically flow in the 3.0–5.5 GPM range and draw 4–15 amps at 12V, depending on the model.
Pump lifespan runs roughly 10–15 years, but hard water, sediment, and heavy use shorten that. If your pump is struggling, check out our roundup of reliable RV water pumps to compare replacements.
Leaks in Plumbing (Including Micro-Leaks)
Even a small leak between the pump and the showerhead bleeds off pressure. Micro-leaks under cabinets, behind walls, or at fitting joints can be hard to spot. Listen for dripping when the pump is pressurized but no fixtures are open. Check under sinks and around the water heater for any dampness or staining.
Faulty Diverter Valve (Often Missed)
The diverter valve directs water from the tub faucet up to the showerhead. When it fails — which usually happens gradually — water partially escapes through the tub spout even when the diverter is engaged. The result feels a lot like a clogged showerhead, but cleaning the head won’t fix it.
How to tell the difference: If water visibly trickles from the tub spout while the shower is running, the diverter is the problem, not the showerhead.
Quick Fixes You Can Do Fast (Minimal Tools)
Before you order parts or call a tech, try these low-risk fixes. Each takes minutes, costs nothing (or close to it), and eliminates common causes.
Clean the Showerhead (Vinegar Soak)
What you need: White vinegar, a bowl or zip-lock bag, an old toothbrush, and about 15 minutes of active time (plus soak time).
Unscrew the showerhead, submerge it in vinegar, and let it soak. Scrub the spray holes after soaking, rinse, and reinstall. Done-when signal: The spray pattern is noticeably more even and forceful.
Remove Flow Restrictor (Only If You Accept Tradeoffs)
The flow restrictor is usually a small disc or washer right inside the showerhead inlet. You can pop it out with a flathead screwdriver or needle-nose pliers.
Tradeoffs to consider:
- You’ll use more water per shower (matters when boondocking on a limited tank).
- Some campgrounds have water-conservation guidelines.
- The pressure improvement is often noticeable and immediate.
Hose/Valve Checks
Walk your water line from source to showerhead. Straighten any kinked hose runs. Open every shutoff valve fully. If you use quick-connect fittings, disconnect and re-seat them to make sure the internal valve is opening completely.
Switch Water Modes for Diagnosis
This is the single most useful diagnostic move:
- On city water and pressure is weak? Disconnect from the campground, fill your freshwater tank, and switch to the onboard pump. If pressure improves, the campground supply or your regulator is the bottleneck.
- On the pump and pressure is weak? Hook up to city water (with a regulator). If pressure improves, the pump or tank-side plumbing needs attention.
If you’re new to switching between these modes, our guide on filling and using your RV freshwater tank walks through the process.
City Water Low Pressure Playbook (When the Campground Is the Bottleneck)
Sometimes your RV is fine — the campground just doesn’t deliver enough PSI. Here’s how to confirm and adapt.
Test Source Pressure with a Gauge
Screw a water pressure gauge directly onto the campground spigot (before your hose and regulator). Record the PSI reading.
- Below 40 PSI: The campground is the bottleneck. A booster pump is your main option.
- 40–60 PSI: Good range. If pressure still feels weak at the showerhead, the restriction is inside your RV (regulator, filter, showerhead, or plumbing).
- Above 60 PSI: You need a regulator to protect your plumbing, but low shower pressure isn’t from a weak source.
Regulator Strategy (Don’t Accidentally Choke Your Flow)
A fixed-setting regulator set too low will limit your shower pressure even when the campground delivers plenty.
- Consider an adjustable regulator if: You camp at a variety of parks with different supply pressures. An adjustable model lets you dial in the right PSI for each stop.
- Stick with a fixed regulator if: You mainly stay at parks with consistent supply and want set-and-forget protection.
- Key mistake to avoid: Running without a regulator because “pressure is low anyway.” One spike is all it takes to crack a fitting.
For a breakdown of how regulators work and which ones hold up, see our low water pressure troubleshooting guide.
Booster Pump Considerations (City Water)
A booster pump sits between the campground supply and your RV inlet and increases incoming PSI. It’s the right tool when the source is genuinely low and you can’t change parks.
What a booster pump solves: Consistently low campground pressure (under 40 PSI).
What it can’t fix: Internal restrictions like clogged filters, restrictive showerheads, or faulty diverter valves.
Safety reminder: Always pair a booster pump with a pressure gauge and regulator. Boosting past 60 PSI risks plumbing damage.
Pump Mode Issues (When Onboard Pump Showers Still Feel Weak)
If you’re running your freshwater tank and onboard pump and the shower still disappoints, here’s the dedicated diagnostic path.
Short-Cycling and “Pulsing” Fixes
Short-cycling — when the pump kicks on and off rapidly — creates pulsing water at the showerhead that feels like inconsistent, weak pressure. An accumulator tank is the most common and effective fix. It stores a small reserve of pressurized water, which smooths delivery and reduces how often the pump cycles. The result is quieter operation and steadier flow.
Pump Pressure Switch Adjustment (Only If Your Pump Manual Allows It)
Some RV water pumps have an adjustable pressure switch. Guides sometimes reference small clockwise adjustments (around a quarter turn) to increase cut-off pressure. However, this varies by pump model.
Critical rule: Only adjust the pressure switch if your specific pump’s documentation explicitly describes the procedure. Blind adjustments can damage the pump or push pressure above safe limits.
When Replacement Is the Right Answer
If the pump is old, struggles to maintain pressure, makes grinding or straining sounds, or you’ve already cleaned filters and added an accumulator without improvement — the pump itself is likely worn.
Signs pointing to pump wear vs. a restriction elsewhere include the pump running continuously without building pressure, and visible leaks or corrosion at the pump housing. If you need to replace your RV water pump, the process is straightforward with basic tools.
Best Upgrades for Stronger RV Shower Pressure (Short-Term → Advanced)
Not every weak-pressure problem needs an expensive fix. Work through these tiers in order — start at Tier 1 and only escalate if the diagnosis demands it.
Tier 1: High-Pressure Showerhead Upgrade (Highest ROI)
Swapping the factory showerhead for one designed to maximize perceived pressure is the single highest-return upgrade for most RVers. Options to compare include Oxygenics BodySpa, Ecocamel Jetstorm and Jetstorm Plus, Ecocamel Orbit Soft Water, Camco, Dura Faucet, Empire Faucets, and Qwelife. Each uses a different approach (oxygen infusion, turbine technology, or spray-pattern optimization) to make low PSI feel stronger.
See the comparison table below for a side-by-side breakdown.
Tier 2: Adjustable Pressure Regulator
If you’re on city water and your current regulator is fixed or aging, upgrading to an adjustable model lets you fine-tune incoming PSI to the 40–60 sweet spot for each campground you visit.
Tier 3: Accumulator Tank
An accumulator tank targets short-cycling and pulsing specifically. If your pump is in good shape but the water delivery feels inconsistent, this is the right mid-tier investment. It also reduces pump wear over time by cutting cycle frequency.
Tier 4: Booster Pump (City Water) / Pump Replacement (Onboard)
Booster pump (city water path): The Flojet 03526-144A (4.5 GPM) is one widely referenced example for RV booster duty.
Pump replacement (onboard path): If diagnosis points to pump wear, here are examples to compare:
- Shurflo 4008-101-E65 — 3.0 GPM
- Remco Aquajet Variable Speed — 5.3 GPM
- SEAFLO 33 Series — 3.3 GPM, 45 PSI
Variable-speed models like the Remco Aquajet reduce noise and short-cycling by ramping output to match demand rather than running at full power with on-off cycling.
Tier 5: Diverter Valve Replacement
If water trickles from the tub spout while the shower is running, the diverter is the bottleneck. Replacing it is a commonly missed fix that can make an immediate difference — and it’s usually a straightforward swap.
Tier 6 (Advanced): PEX Plumbing Upgrades
For older rigs with restrictive plumbing materials, upgrading internal lines to PEX is a renovation-level project that can improve flow throughout the rig. This only makes sense if you’ve already addressed every upstream cause and you’re planning a larger remodel anyway.
Best RV Showerheads for Weak Pressure (Comparison Table)
Comparison Table Spec (What Columns Must Include)
The table below compares the most frequently recommended showerheads for RVs with low water pressure. All use a standard 1/2″ NPT connection for easy RV installation.
Matchups to Include (From Dossier)
| Brand / Model | Spray Approach | Install Fit | Best For | Notes |
|---|---|---|---|---|
| Oxygenics BodySpa | Oxygen-infusion concept; mixes air into spray to amplify perceived pressure | 1/2″ NPT | Boondockers who want stronger feel with less water | Multiple spray modes; widely recommended in RV communities |
| Ecocamel Jetstorm | Turbine-driven aeration | 1/2″ NPT | Maximum pressure feel on very low PSI | Aggressive spray; may feel intense for some users |
| Ecocamel Jetstorm Plus | Turbine aeration with additional spray settings | 1/2″ NPT | Users who want the Jetstorm punch with more versatility | Upgraded version with mode options |
| Ecocamel Orbit Soft Water | Aeration tuned for softer delivery | 1/2″ NPT | Families or those who prefer a gentler spray | Smoother feel vs. the Jetstorm line |
| Camco | Standard multi-mode showerhead | 1/2″ NPT | Budget-friendly replacement for factory heads | Solid improvement over most factory units at a lower price |
| Factory Showerhead | Varies by manufacturer | 1/2″ NPT | — | Often the weakest link; first thing to upgrade |
Cost Map: Free Hacks → Mid-Tier Parts → “$300+” Fixes
Cost Table Structure (Avoid Outdated Pricing)
Prices shift frequently, so the table below uses general tiers rather than exact dollar amounts — except where a specific price snapshot is noted.
| Tier | Fixes Included | Typical Spend |
|---|---|---|
| Free | Clean showerhead (vinegar soak), remove flow restrictor, straighten hoses, open valves fully, switch water modes for diagnosis | $0 |
| Mid-Tier Parts | Replacement inline filter, adjustable pressure regulator, upgraded showerhead, accumulator tank | Low to moderate — varies by brand and retailer |
| $300+ System Upgrades | Booster pump, full pump replacement, diverter valve, PEX re-plumb | Moderate to significant — only after diagnosis confirms the need |
Bundled Kit Trend (2025–2026)
A growing number of manufacturers now sell pump-and-accumulator bundles designed to work together out of the box. Examples include the Kohree pump + accumulator kit (one snapshot price: $127.99) and the RVGUARD pump + accumulator system. Bundles can save money and simplify installation compared to sourcing components separately.
Fixes by RV Age/Plumbing Type (Older vs Newer Rigs)
Not all RVs are plumbed the same way, and the age of your rig changes what you should suspect first.
Older Rigs (Galvanized/Vinyl Issues)
Older RVs may use galvanized steel fittings or rigid vinyl tubing that corrodes, narrows, or becomes brittle over time. Internal scale buildup inside these lines gradually reduces flow diameter — and no showerhead upgrade will compensate for a line that’s partially blocked.
What to check first: Inspect exposed fittings for corrosion or mineral buildup. If accessible, disconnect a line and look inside for narrowed openings. Persistent whole-rig low flow in an older RV often points to the plumbing itself.
Newer Rigs (PEX Systems)
Newer RVs with PEX plumbing generally have better flow characteristics. Typical restriction points in newer rigs tend to be at fittings, valves, and connections rather than the tubing itself. PEX systems are also more upgrade-friendly — adding an accumulator or swapping a pump is simpler when the plumbing is flexible and corrosion-free.
Safe Regulator Bypass Test (Temporary) + Warnings
This is a diagnostic step — not a permanent solution. Use it only to determine whether your pressure regulator is the choke point.
When to Use This Test (And When Not To)
Temporarily removing the regulator from the line and connecting directly to the campground supply tells you whether the regulator was restricting flow. If pressure immediately improves, the regulator is the bottleneck.
Use this test when: You’ve tested source PSI with a gauge and it’s adequate (40–60 PSI), but pressure at the showerhead is still weak.
Skip this test when: You don’t have a pressure gauge, or the campground supply is known to be high-pressure (above 60 PSI). Running unregulated in that scenario risks immediate damage.
Safety Notes (Non-Negotiable)
These are not suggestions — they’re requirements:
- Never exceed 60 PSI flowing into your RV, even temporarily. That’s the damage threshold for most RV plumbing.
- Always use a gauge during the bypass test so you know exactly what pressure you’re sending into the rig.
- Keep the test short. Run it just long enough to confirm whether the regulator is the restriction, then reconnect.
- Never “set and forget” an unregulated connection. One pressure surge while you’re away from the rig can cause serious water damage.
For a broader look at keeping your RV’s electrical and water systems safe, pair good plumbing practices with proper electrical protection.
Seasonal Maintenance to Keep Pressure Strong
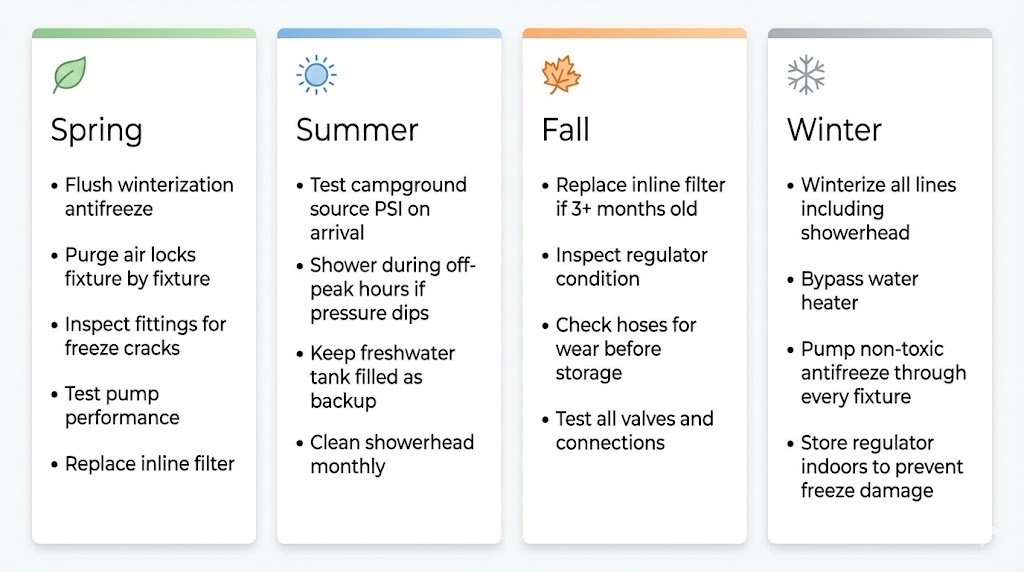
Weak shower pressure is often a maintenance problem disguised as an equipment problem. A simple seasonal routine prevents most issues before they start.
Maintenance Schedule (Monthly/Seasonal/Annual)
Monthly: Run the pump briefly and check for leaks or unusual cycling behavior.
Every 3–6 months: Replace inline water filters. Clean the showerhead (vinegar soak).
Seasonally: Inspect hoses, fittings, and valves. Test your pressure regulator with a gauge.
Annually: Check pump performance. Inspect under-sink and behind-wall connections for dampness.
Post-Winterization / Spring De-Winterization Checks
Spring is prime time for weak-pressure surprises. After winterizing, you may encounter air locks in the lines, debris flushed loose during the de-winterization process, and fittings that shifted or cracked during freezing temps.
Run each fixture individually when you first pressurize in spring, starting with the one closest to the pump or inlet. This helps purge air locks systematically. If you’re setting up your freshwater system for the season, take the extra few minutes to check every connection.
Summer Campground Variance Tips
Peak camping season means more rigs sharing the same campground water supply, which often drives available PSI down — especially in the mornings and evenings when everyone showers.
Adapt by testing source pressure early in your stay, showering during off-peak hours if possible, and keeping a filled freshwater tank as a backup so you can switch to the pump if campground pressure dips too low.
Edge Cases Competitors Skip (But Owners Ask)
These scenarios come up constantly in RV forums but rarely get clear answers in standard guides.
“Fine on Pump, Weak on City Water” (And the Reverse)
Fine on pump, weak on city water: The restriction is between the campground spigot and your RV inlet. Most common causes include a restrictive or failing pressure regulator, a clogged inline filter on the city-water side, or simply low campground source PSI. Test with a gauge and swap the regulator first.
Fine on city water, weak on pump: The pump isn’t delivering enough pressure or flow. Check the pump strainer screen, clean or replace the pre-pump filter, and listen for signs of wear. If the pump is aging, replacement may be the most cost-effective fix.
Multi-Fixture Pressure Drop (Families/Larger Rigs)
When the shower weakens noticeably every time someone turns on the kitchen faucet, your system’s flow capacity is the limiting factor. Practical mitigations include staggering fixture use (don’t run the shower while filling a pot), upgrading to a higher-GPM pump, and adding an accumulator tank to buffer demand spikes. Larger rigs with multiple bathrooms may need to size up to a 5+ GPM pump to keep everyone comfortable.
Altitude and Temperature Effects
Higher altitudes reduce pump efficiency because the pump works against different atmospheric conditions. Cold temperatures can stiffen hoses, slow regulator response, and affect water heater recovery. If you’re experiencing weak pressure at altitude or in cold weather and everything checks out mechanically, these environmental factors may be contributing. They’re worth noting as a troubleshooting consideration rather than a primary diagnosis.
Safety & Freshness Sidebar (Recalls + “Don’t Repeat Unsourced Stats”)
Trust matters. Here’s what changed recently and what common claims to be skeptical of.
ThermaHeat Tank Pad Recalls (Jan–Feb 2026) — Awareness Note
Several RV manufacturers issued recalls related to ThermaHeat water heater tank pads in early 2026:
- Winnebago: 3,019 units (2024–2026 models)
- Grand Design: 150 units (2026 models)
- Newmar: 16 units (2026 model)
Why this matters for shower pressure: A malfunctioning water heater component can affect hot water delivery in ways that feel like “weak shower pressure” — especially if hot pressure drops while cold stays strong. If you own an affected model, check for recall notices before chasing a showerhead or pump fix.
Avoid Repeating the “68% of Owners” Stat Without a Primary Source
You may see a widely circulated claim that “68% of RV owners experience low water pressure.” No primary source for this statistic has been confirmed. Treat it as unverified and avoid repeating it as fact.
Mini FAQ (PAA-Style, Short Answers)
Why is my RV shower water pressure so low?
The most common causes are a clogged showerhead, restrictive flow restrictor, dirty inline filter, low campground water supply, a weak or aging water pump, or a faulty diverter valve. Use the triage checklist above to isolate which one applies to your rig.
How do I increase water pressure in my RV shower?
Start with free fixes: clean the showerhead, remove the flow restrictor, and check for kinked hoses or partially closed valves. If those don’t help, upgrade the showerhead, replace the inline filter, and check your regulator. For persistent issues, an accumulator tank or pump upgrade may be needed.
What PSI should RV water pressure be?
The safe range for RV plumbing is 40–60 PSI. Sustained pressure above 60 PSI risks damaging fittings, hoses, and connections.
Can I remove the flow restrictor from my RV shower head?
Yes. It’s usually a small disc inside the showerhead inlet. Removing it will improve flow, but you’ll use more water per shower — an important consideration when boondocking on a limited freshwater tank.
What is the best RV shower head for low water pressure?
Showerheads designed to amplify low-pressure flow include the Oxygenics BodySpa, Ecocamel Jetstorm, and Ecocamel Orbit Soft Water. Each uses a different aeration or turbine approach to make low PSI feel stronger. See the comparison table above for a side-by-side breakdown.
Do I need a water pressure regulator for my RV?
Yes. A pressure regulator protects your plumbing from campground supply surges that can exceed 60 PSI. An adjustable model gives you the flexibility to dial in pressure for different campgrounds.
How do I adjust my RV water pump pressure?
Some pumps have an adjustable pressure switch. Only adjust it if your specific pump’s manual describes the procedure. Small adjustments (often around a quarter turn) can change the cut-off pressure, but blind adjustments risk pump damage or unsafe pressure levels.
Why does my RV have good cold water pressure but weak hot water?
The restriction is on the hot-water delivery side. Check for a partially open water heater bypass valve, kinks in hot-water lines, or a hot-water side restriction. Also check whether your RV is affected by the ThermaHeat tank pad recalls noted above.
Will a booster pump damage my RV plumbing?
It can if you let pressure exceed 60 PSI. Always use a booster pump with a pressure gauge and a regulator downstream to keep pressure within the safe range.
How often should I replace my RV water filter?
Every 3–6 months, or sooner if you camp in areas with heavy sediment. A clogged filter is one of the most overlooked causes of weak water pressure.
What causes RV water pump to cycle on and off?
Short-cycling is usually caused by a lack of an accumulator tank, a small leak in the system, or a failing pressure switch. An accumulator tank smooths pressure delivery and reduces cycle frequency.
How do I clean a clogged RV showerhead?
Unscrew the showerhead, soak it in white vinegar for several hours, scrub the spray holes with a toothbrush, rinse, and reinstall. Repeat every few months as part of routine maintenance.
Is 60 PSI too high for an RV?
It’s at the upper limit. Most RV manufacturers recommend staying at or below 60 PSI. Sustained pressure above that threshold risks cracking fittings and damaging internal plumbing.
What size water pump do I need for my RV?
RV water pumps typically range from 3.0 to 5.5 GPM. A 3.0 GPM pump is adequate for smaller rigs with light demand. Larger rigs, families, or anyone wanting strong shower pressure should consider a pump in the 4.0–5.5 GPM range.
How do I winterize my RV shower to avoid pressure problems?
Drain all water lines, bypass the water heater, and pump non-toxic RV antifreeze through every fixture (including the showerhead). In spring, flush thoroughly and check every fitting before pressurizing. Proper winterization prevents cracked fittings and debris that cause pressure problems when you de-winterize.
Summary Action Plan (Immediate → Short-Term → Long-Term)
Immediate (No-Buy)
- Clean the showerhead with a vinegar soak
- Check for kinked hoses and partially closed valves
- Switch between city water and pump mode to isolate the source
- Test campground supply pressure with a gauge (if you have one)
Short-Term (Low-Cost Parts)
- Replace the inline water filter
- Upgrade to an adjustable pressure regulator (or replace an aging one)
- Swap the factory showerhead for a high-pressure model (Oxygenics, Ecocamel, etc.)
Long-Term (System Upgrades)
- Install an accumulator tank to eliminate short-cycling and smooth delivery
- Replace the water pump if it’s worn, noisy, or can’t maintain pressure
- Add a booster pump for consistently low campground supply
- Replace the diverter valve if it’s leaking through to the tub spout
- Upgrade plumbing to PEX (renovation-level — only if diagnosis supports it)
Each step on this ladder should follow your diagnosis, not a hunch. Work the triage checklist first, confirm the bottleneck, then invest in the right fix tier. If you’re just getting started with RV camping, tackling pressure issues early sets you up for much more comfortable trips ahead.