RV Toilet Types Explained: How to Choose the Best System for Your RV
Last updated: February 2026
Choosing the right RV toilet type matters more than most new RV owners expect — it shapes your daily comfort, your maintenance routine, your disposal workflow, and where you can realistically camp. This guide compares every major RV toilet class, including newer dry flush, sealing, and smart systems, then walks you through a practical decision framework so you pick the right one for your rig, travel style, and sanity.
What Are the Main Types of RV Toilets?
If you just need the short version before diving in, here it is: there are far more RV toilet options than “the one that came with the rig.” Each type handles waste differently, and the best choice depends on how you camp, how much maintenance you want, and what disposal options you have access to.
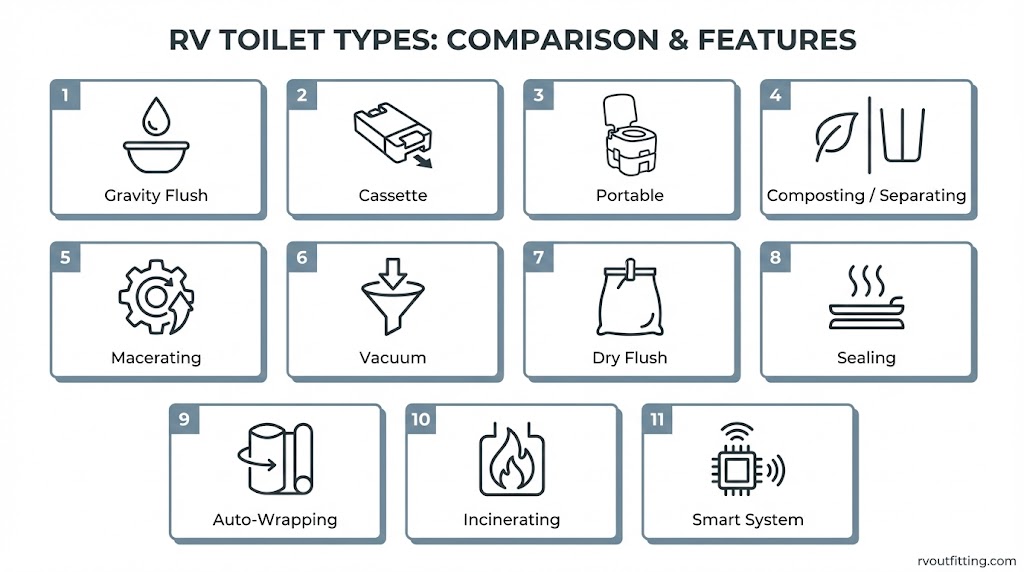
The main RV toilet categories
- Gravity flush — The standard factory-installed RV toilet. Best for full-hookup campground users who want familiar, simple operation.
- Cassette — Built-in toilet with a removable waste cassette you carry to a dump point. Best for small campers, vans, and European-style rigs.
- Portable — Fully self-contained, freestanding unit. Best for truck campers, tent campers, and backup use.
- Macerating — Grinds waste before transfer to the tank. Best for higher-end builds wanting a residential feel.
- Vacuum flush — Uses vacuum-assisted waste transport. Best for premium motorhomes and marine-crossover systems.
- Composting / separating — Separates liquids and solids, uses drying media. Best for frequent boondockers and off-grid travelers.
- Dry flush — Wraps and seals waste using a cartridge system. Best for van life and boondockers avoiding dump stations.
- Sealing — Uses heat-sealed barrier film to create sealed waste packets. Best for users prioritizing hygiene and sealed disposal.
- Auto-wrapping — Automatically wraps waste in disposable packets. Best for niche applications where distribution and support exist.
- Incinerating — Burns waste to ash using a liner-based process. Best for specialized off-grid setups with compatible power or fuel.
- Smart sanitation systems — Integrates the toilet, tank monitoring, and additive management as a connected system. Best for early adopters wanting ecosystem-level sanitation management.
Quick decision rule
- If you mostly stay at full-hookup campgrounds → start with gravity flush or cassette.
- If you boondock often → compare composting/separating, dry flush, and sealing systems.
- If you want a residential feel or high-end system → consider macerating or vacuum flush.
- If you want to skip the black tank workflow entirely → look at non-black-tank classes (composting, dry flush, sealing, incinerating).
- Final choice depends on your disposal access, power availability, budget for consumables, and how much maintenance you’re willing to handle.
RV Toilet Comparison
Before reading every type in detail, scan this comparison table to narrow your focus fast. This is your at-a-glance decision matrix.
| Toilet Type | Waste Handling | Water Use | Power Needed | Install Complexity | Odor Control Difficulty | Consumables | Best For | Common Drawbacks | Key Maintenance | Cost Model |
|---|---|---|---|---|---|---|---|---|---|---|
| Gravity Flush | Collect & dump (black tank) | Medium–High | None | Easy | Medium | Tank chemicals, RV toilet paper | Full-hookup users, standard rigs | Black tank management, odor if mismanaged | Seal inspection, tank treatment | Low upfront, low ongoing |
| Cassette | Collect & dump (removable cassette) | Low–Medium | None | Moderate | Medium | Tank additives | Small campers, vans, limited dump access | Frequent emptying, cassette handling | Cassette seals, additive routine | Moderate upfront, low–moderate ongoing |
| Portable | Collect & dump (self-contained) | Low | None | Easy (freestanding) | Medium | Tank additives | Truck campers, backup use | Low capacity, frequent emptying/carrying | Seal cleaning, dump routine | Low upfront, low ongoing |
| Composting / Separating | Process on-site (drying media) | None–Very low | Optional (fan) | Moderate | Medium–High | Coir/peat/sawdust media | Boondockers, off-grid | Learning curve, user discipline | Separation habits, media changes, fan upkeep | Moderate upfront, low ongoing |
| Macerating | Collect & dump (macerated to tank) | Medium | Required | Advanced | Low–Medium | RV toilet paper | Higher-end builds, flexible layouts | Noise, complexity, motor/impeller issues | Motor/impeller maintenance | High upfront, moderate ongoing |
| Vacuum Flush | Collect & dump (vacuum-assisted) | Low–Medium | Required | Advanced | Low–Medium | RV toilet paper | Premium motorhomes | System complexity, vacuum leak risk | Pump/vacuum seal checks | High upfront, moderate ongoing |
| Dry Flush | Bag & dispose (cartridge) | None | Required | Easy–Moderate | Low | Cartridges | Boondocking, van life | Cartridge cost, consumable availability | Cartridge management | Moderate upfront, higher ongoing |
| Sealing | Bag & dispose (heat-sealed film) | None | Required | Moderate | Low | Barrier film cartridges | Hygiene-focused users | Consumable cost, regional availability | Film/cartridge replacement | Moderate–High upfront, higher ongoing |
| Auto-Wrapping | Bag & dispose (auto-wrapped) | None | Required | Moderate | Low | Wrapping consumables | Niche users | Limited distribution/support | Consumable management | Varies |
| Incinerating | Process on-site (ash output) | None | Required (electric or fuel) | Advanced | Low | Liners | Specialized off-grid setups | High cost, power/fuel planning | Liner workflow, ash removal | High upfront, moderate ongoing |
| Smart Systems | Collect & dump + system monitoring | Medium | Required | Advanced | Low–Medium | System-specific additives | Early adopters, tech-forward RVers | Early-adopter limitations | System-managed (monitoring/alerts) | High upfront, varies ongoing |
Important comparison notes
Pricing caution: Consumable prices and product availability change frequently. Always verify current pricing directly from manufacturers or authorized retailers before making a purchase decision.
Regional availability: Some newer systems — particularly sealing and auto-wrapping toilets — have limited distribution in certain regions. Check availability in your area before committing.
Disposal rules: Legal disposal requirements for composting solids, sealed waste bags, and incineration ash vary by state, province, country, and even specific campgrounds. Never assume one rule applies everywhere.
How RV Toilets Work
Understanding how each toilet type handles waste is the fastest way to understand why some work better for certain camping styles. You don’t need an engineering degree — just a basic grasp of where the waste goes and what you have to do with it.
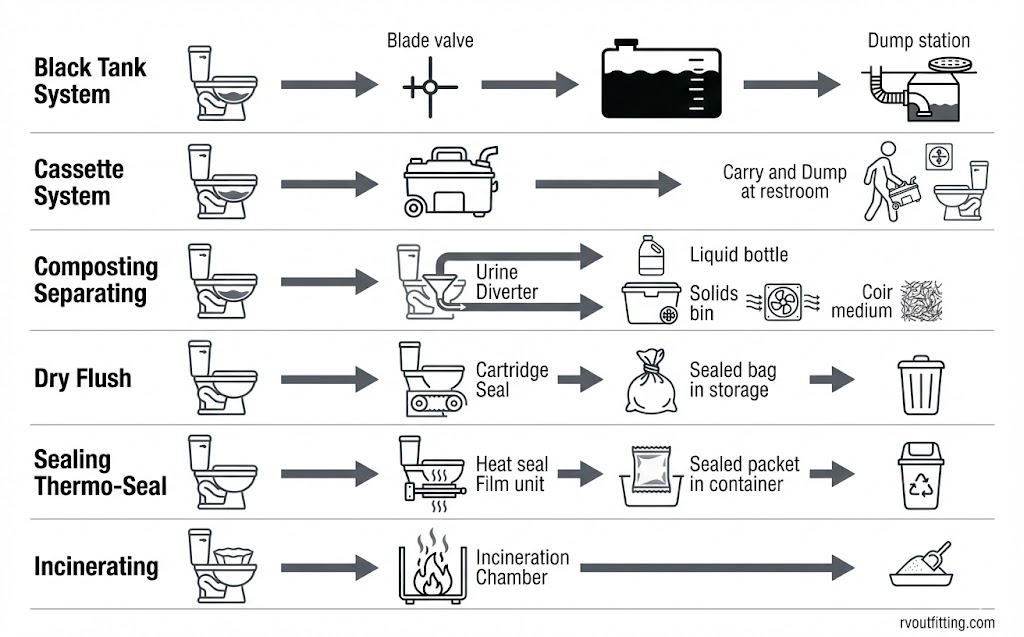
The standard RV sanitation path (black tank systems)
Most factory-installed RV toilets follow the same basic plumbing path: waste goes from the bowl, through a valve, and down into the black tank (the dedicated sewage holding tank in your RV). When the tank is full, you connect a sewer hose at a dump station or campground hookup and drain it.
The black tank is separate from the grey tank, which collects water from sinks and the shower. Keeping them separate matters because they dump differently, and mixing them up causes problems.
Gravity flush toilets use a blade valve or ball valve at the bottom of the bowl. When you press the foot pedal or pull the lever, the valve opens, water rinses the bowl, and gravity does the rest. The valve closes, creating a water seal that keeps tank odors from coming back up.
Water and tank management are the heart of keeping black tank systems working well. Insufficient water, skipped tank treatments, or poor flushing habits lead to buildup, odor, and the infamous “poop pyramid” — a mound of dried waste that forms under the toilet opening when the tank isn’t managed properly.
The non-black-tank alternatives (overview)
Not all RV toilets use a black tank. Several categories skip that system entirely, and each handles waste in a fundamentally different way:
Composting / separating systems divert urine and solids into separate containers. The solids chamber uses a drying medium (coconut coir, peat moss, or sawdust) and often a small vent fan to manage moisture and odor. Over time, the solid waste dries and reduces in volume. The liquid container gets emptied more frequently.
Bag-and-dispose systems (dry flush, sealing, auto-wrapping) wrap or seal individual waste deposits into contained packets. You remove the sealed bags and dispose of them, similar to how you’d handle a diaper — no dump station or sewer hookup required.
Incinerating systems use a liner placed in the bowl. After use, the toilet runs an incineration cycle that reduces waste to a small amount of sterile ash. The ash container gets emptied periodically.
Smart sanitation systems combine a toilet with integrated tank monitoring and additive management. The toilet is part of a connected ecosystem rather than a standalone unit.
Controls and ergonomics
RV toilets use one of three main control types: a foot pedal (most common on gravity flush models), a hand lever, or an electric push-button (common on macerating, vacuum, and premium systems).
Bowl material is either porcelain (heavier but feels more residential) or plastic (lighter and more common in standard models). Bowl shape varies between round and elongated, and height ranges from low-profile to residential height. These factors matter more than most buyers expect — especially if anyone in the household has mobility concerns or if bathroom space is tight.
RV Toilet Types Explained (Type-by-Type Deep Dive)
Each type below follows the same structure: how it works, pros, cons, best use case, popular brands, and common issues. This standardized format makes it easy to compare.
Gravity Flush Toilets
How it works
Gravity flush is the most common RV toilet type and the one that comes factory-installed in the majority of travel trailers and motorhomes. You press a foot pedal or pull a lever, water flows into the bowl, the blade or ball valve opens, and gravity pulls waste into the black tank below. Releasing the pedal closes the valve and refills the bowl with a small amount of water to maintain the odor seal.
Pros
- Familiar operation — works similar to a residential toilet
- Widely available parts and replacements
- Strong fit for factory RV plumbing layouts
- Generally the most affordable upfront option
Cons
- Requires black tank management (dumping, treatment, maintenance)
- Water consumption adds up, especially for off-grid freshwater management
- Odor issues if tank is mismanaged or seals deteriorate
Best for: Full-hookup campground users, standard travel trailers and motorhomes, and anyone comfortable with the traditional black tank workflow.
Popular brands and models: Dometic 300/310/320 series, Thetford Aqua-Magic lines, SEAFLO.
Common issues: Seal and valve leaks over time, persistent odor from inadequate tank treatment, and the dreaded “poop pyramid” that forms when insufficient water is used during flushing. Regular seal inspection and proper tank charging habits prevent most of these problems.
Cassette Toilets
How it works
A cassette toilet is a permanently mounted unit with a removable waste tank (the “cassette”) that slides out through an exterior service door. You use the toilet normally, then when the cassette is full, you pull it out, carry it to a dump point or restroom, empty it, rinse, and slide it back in. Most cassette toilets use a small amount of water for flushing and require tank additives.
Pros
- No dependency on a traditional black tank system
- More flexible dumping — you can empty at dump stations, public restrooms, or designated cassette dump points
- Common in compact European-style RV layouts and popular in vans
Cons
- Cassettes are relatively small, so you empty them more frequently than a black tank
- You physically carry the waste cassette, which can be heavy when full
- Requires additive workflow to manage odor
Best for: Small campers, van conversions, travelers who camp in areas with limited dump station access, and rigs built on European platforms.
Popular brands and models: Thetford C-series, Dometic cassette lines.
Common issues: Cassette seal wear, odor breakthrough when additives run low, and the handling routine itself (carrying a full cassette isn’t glamorous). Keeping seals clean and replacing them on schedule prevents most leaks.
Portable Toilets
How it works
A portable toilet is a completely self-contained, freestanding unit with its own small freshwater tank and waste holding tank. There’s no installation — you place it where you need it, use it, and when the waste tank is full, you detach it and empty it at a dump station or restroom.
Pros
- Zero installation — just set it down
- Works as a primary toilet in simple setups or as a backup in any rig
- Affordable entry point
Cons
- Small capacity means frequent emptying
- You carry and dump the waste tank by hand
- Not as stable or comfortable as a permanently mounted option
Best for: Truck campers, tent camping setups, emergency backup toilet, and beginners building out simple rigs.
Popular brands and models: Thetford Porta Potti, Dometic 972/975, Camco, SereneLife.
Composting vs Separating Toilets (Important Distinction)
How it works
These toilets use a urine diverter to separate liquids from solids. The solids chamber is filled with a bulking medium — typically coconut coir, peat moss, or sawdust — which absorbs moisture. Many models include a small vent fan that draws air through the solids chamber and out a vent pipe, helping dry the material and direct odor outside.
The liquid container fills faster and needs emptying more often (diluted urine can generally be disposed of more easily than solid waste, but disposal rules vary by location). The solids container empties less frequently.
Terminology clarification
This is important: many toilets marketed as “composting” in the RV world are technically separating or drying toilets, not true composting systems. Full composting requires sustained heat and microbial activity over time, which most compact RV units don’t achieve. For buyer expectations, understand that most of these units dry and contain waste rather than fully composting it. The end product usually needs further processing or proper disposal.
Pros
- Eliminates or greatly reduces black tank dependency
- Strong appeal for boondocking and extended off-grid stays
- Low to no water use
Cons
- Requires user discipline — proper separation technique matters
- Learning curve, especially for families or households with multiple users
- Vent fan dependency (some models need a small amount of power and a vent path)
- Managing the medium and emptying routine is hands-on
Best for: Frequent boondockers, off-grid travelers, and anyone committed to leaving the black tank behind.
Popular brands and models: Nature’s Head, Air Head, OGO, Cuddy, Trelino, Trobolo, Boxio, Separett, Sun-Mar GTG.
Common issues: Odor problems usually trace back to poor liquid/solid separation (liquid in the solids bin creates smell). Fan failure leads to moisture buildup. Getting the medium-to-moisture ratio right takes some practice.
Macerating Toilets
How it works
A macerating toilet uses a built-in motor with an impeller (a small grinding blade) to pulverize waste and toilet paper before pumping the slurry into the black tank. This means the waste can travel through smaller-diameter plumbing and the tank receives pre-processed material.
Pros
- Premium, residential feel with a full-size porcelain bowl on some models
- Flexible plumbing layouts — the macerated waste can be pumped at angles and distances that gravity alone can’t manage
- Reduces clogs in the waste line
Cons
- Requires electrical power for the motor
- More complex mechanically — more components that can fail
- Noise during the macerating cycle (qualitative; noise levels vary by model)
Best for: Higher-end RV builds, custom conversions where plumbing flexibility matters, and users who prioritize a comfortable, residential bathroom experience.
Popular brands and models: Dometic MasterFlush, Saniflo, Liberty Pumps, Jabsco.
Common issues: Impeller or motor failures, clogs from non-compatible materials entering the macerator, and power-related faults. Using only RV-safe toilet paper and keeping foreign objects out of the bowl prevents most mechanical problems.
Vacuum Flush Toilets
How it works
Vacuum flush toilets use a vacuum generator or pump to create suction that moves waste from the bowl into the holding tank. The vacuum-assisted transport means these systems can use less water per flush than a standard gravity system.
Pros
- Premium heritage from marine and high-end RV applications
- Low water consumption per flush
- Can support certain plumbing layouts that benefit from vacuum-assisted transport
Cons
- System complexity — vacuum pump, generator, and associated plumbing
- Diagnosing vacuum leaks and pump cycling issues requires more troubleshooting knowledge
Best for: Premium motorhomes and specialized installations where vacuum systems are factory-engineered.
Popular brands and models: Dometic VacuFlush, SeaLand.
Common issues: Vacuum loss (which causes weak or failed flushes), pump cycling problems, and seal deterioration in the vacuum system. These are not beginner-friendly systems to troubleshoot.
Dry Flush Toilets
How it works
A dry flush toilet uses a proprietary cartridge loaded with liner material. After each use, you press a button, and the system wraps and seals the waste into a contained packet using the liner. The sealed packet drops into a storage area below, and a fresh section of liner is advanced for the next use. When the cartridge is depleted, you remove it and dispose of the sealed waste packets. No water, no chemicals, no plumbing.
Pros
- Completely eliminates the black tank
- Clean, simple bag-and-dispose workflow
- No water needed
- Minimal odor when functioning properly
Cons
- Ongoing cartridge cost — this is the big trade-off
- You’re dependent on cartridge availability (if you run out on the road, you’re stuck)
- Requires electrical power for the sealing mechanism
Best for: Boondockers, van lifers, and anyone who strongly wants to avoid dump stations and black tank hassles.
Popular brands and models: Laveo DryFlush, Modiwell lines.
Common issues: Cartridge jams or cycle errors, and the ongoing consumable management. Running out of cartridges far from a supplier is a real planning consideration.
Consumables note: Cartridge pricing and availability change. Always verify current pricing and stock from the manufacturer or authorized retailers before committing.
Sealing Toilets (Thermo-Seal / Barrier Film)
How it works
Sealing toilets use heat-sealed barrier film to create individually sealed waste packets after each use. The sealing mechanism activates after flushing, wrapping the waste in a tightly sealed film that locks in odor and moisture. Sealed packets are stored in a container and disposed of as household-type waste (where local regulations allow).
Pros
- Excellent odor containment
- Clean, hygienic handling of sealed waste
- No black tank required
Cons
- Ongoing consumable cost for barrier film cartridges
- Regional availability can be limited, especially in North America
- Power required for the sealing cycle
Best for: Users who prioritize hygienic, sealed disposal and clean handling above all else.
Popular brands and models: Clesana C1 / X1 family.
Common issues: Seal cycle errors and film/cartridge replacement workflow. Getting replacement consumables can be a challenge depending on your region.
Availability caveat: North American availability for some sealing toilet brands is still developing. Verify current distribution in your market before purchasing.
Auto-Wrapping Toilets
How it works
Auto-wrapping toilets automatically wrap each waste deposit in a disposable packet. The mechanics are similar in concept to dry flush and sealing systems — waste is contained and sealed for disposal — but the wrapping mechanism and consumables differ by brand.
Pros
- Convenient, hands-off waste handling
Cons
- Limited distribution outside certain markets
- Consumables dependency and potential supply chain gaps
Best for: Niche applications where the specific brand has reliable distribution and support in your region.
Popular brands and models: Wrappon models.
Incinerating Toilets
How it works
An incinerating toilet uses a liner placed in the bowl before each use. After use, the liner and waste go through a high-temperature incineration cycle inside the unit. What’s left at the end is a small amount of sterile ash, which you empty periodically from an ash collection tray.
Pros
- Complete on-site waste processing — no black tank, no dump station, no waste to carry
- Sterile ash output is easy to dispose of
Cons
- High upfront cost
- Significant power or fuel requirements (electric or gas, depending on the model)
- Incineration cycles take time — you can’t use the toilet during a cycle
Best for: Specialized off-grid or remote installations where dump station access doesn’t exist and the rig has the power or fuel infrastructure to support it.
Popular brands and models: Cinderella Travel/Freedom/Comfort, Incinolet, EcoJohn.
Common issues: Liner workflow management, cycle interruptions if power is lost mid-cycle, and energy planning (these units draw significant power or fuel during each burn cycle).
Smart Sanitation Systems (New Category)
How it works
Smart sanitation systems represent a shift from thinking about the toilet as a standalone fixture to treating the entire waste management pathway — toilet, tank, monitoring, and treatment — as an integrated system. Sensors monitor tank levels and conditions, and in some cases the system manages additive dosing automatically.
Why this matters
This changes the buying decision from “which toilet do I bolt down?” to “which sanitation ecosystem fits my rig?” As these systems mature, they could simplify the maintenance and monitoring tasks that trip up many RV owners.
Example: Thetford iNDUS is one system-level example worth watching in this category.
Freshness caveat: Smart sanitation systems are an emerging category. Features, compatibility, and availability are evolving. Verify current offerings before purchasing, as what’s available in early 2026 may look different by late 2026.
Which RV Toilet Is Best for You?
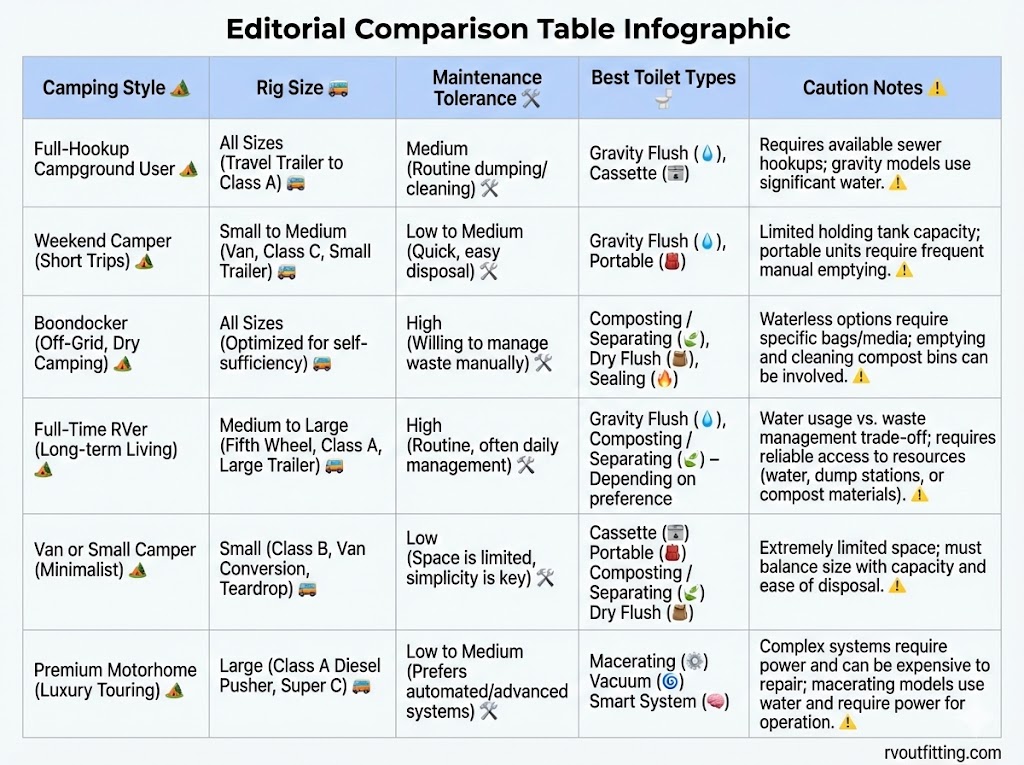
Now that you know what each type is and how it works, the real question: which one fits your life? The answer isn’t about specs. It’s about how you camp, what rig you have, who’s using the toilet, and how much maintenance you’re willing to do.

Choose by camping style
Full-hookup campground users: Gravity flush or cassette toilets work well. You have consistent dump access, and these systems are proven, affordable, and simple. There’s little reason to pay a premium for a non-black-tank system if you’re always hooked up.
Weekend campers: Gravity flush handles short trips easily. A portable toilet is a great low-cost backup if your rig doesn’t have a built-in bathroom.
Boondockers and off-grid travelers: This is where composting/separating, dry flush, and sealing toilets shine. Limited water, no sewer hookups, and extended stays away from dump stations make non-black-tank options much more appealing.
Full-time RVers: Your tolerance for maintenance and consumable management matters most. Some full-timers love their composting setups; others find the gravity flush + dump station routine simpler at scale. Think about long-term cost and effort, not just the first month.
Seasonal vs frequent travel: If you camp a handful of times a year, keep it simple. Gravity flush or portable. If you travel constantly, the ongoing cost and workflow of your chosen system becomes a bigger factor.
Choose by rig type and space
Motorhome vs travel trailer: Most motorhomes and travel trailers accommodate gravity flush, macerating, or vacuum systems without major changes. Cassette systems are less common in larger North American rigs but standard in many European designs.
Van or small camper: Space is the constraint. Cassette, portable, composting/separating, or dry flush systems are often the only options that fit. Measure carefully — bowl clearance, door swing, and access for emptying all matter.
Tank and venting limitations: If your rig has a black tank and standard venting, gravity flush is the path of least resistance. Converting to composting or dry flush may require venting modifications and changes to your tank workflow.
Retrofit feasibility: Swapping to a different toilet type (not just a different model of the same type) involves real planning. Simple same-footprint replacements are easy. Changing the waste handling class (e.g., gravity to composting) may require vent installation, power wiring, and rethinking your disposal routine.
Choose by household needs
Solo or couple: Almost any system works. Composting and dry flush systems are well-suited for low-use households where consumable depletion is slower.
Families: Higher usage frequency means faster emptying cycles for cassette, portable, composting, and cartridge-based systems. Gravity flush with a standard black tank offers the most capacity per dump cycle. Also consider user discipline — separating toilets require proper technique that young children may not consistently follow.
Accessibility and comfort: Toilet bowl height, shape (round vs elongated), and the type of control mechanism (foot pedal vs push-button) all affect usability. If anyone in the household has mobility limitations, a residential-height bowl with push-button controls is significantly easier to use.
Noise sensitivity: Macerating and vacuum systems generate operational noise during the flush cycle. If quiet operation matters to your household, factor this in. (Exact noise comparisons between brands aren’t confirmed, so listen to demo videos or visit a dealer before buying.)
Choose by maintenance tolerance
“Set and forget” preference: Gravity flush with good tank management habits is the lowest-effort routine. Smart systems aim to reduce this further with automated monitoring.
Willing to handle consumables: Dry flush, sealing, and auto-wrapping systems all depend on consumable supply. If you’re organized and plan ahead, the workflow is clean and simple. If you tend to forget supplies, you could end up stuck.
Comfortable troubleshooting mechanical/electrical systems: Macerating and vacuum systems offer premium performance but require more troubleshooting knowledge when something goes wrong. If you’re not comfortable diagnosing motor, pump, or vacuum issues, these add complexity to your life.
Cost, Consumables, and Ownership Model (CAPEX vs OPEX)
One of the biggest mistakes in choosing an RV toilet is comparing purchase price alone. The real cost of ownership includes what you spend after the toilet is installed — and for some types, that ongoing cost is the dominant expense.

Cost model terminology
CAPEX (Capital Expenditure) is your upfront cost: the price of the toilet unit plus installation parts, tools, and any labor involved.
OPEX (Operating Expenditure) is your ongoing cost: consumables (cartridges, liners, additives, drying media), replacement parts, maintenance items, and any power or fuel costs that come with running the system.
Cost per use is a useful concept that divides your total ongoing consumable cost by the number of uses you get. It helps you compare systems like dry flush (where each cartridge provides a set number of uses) against gravity flush (where tank chemicals are the main recurring expense).
What to track for each toilet type
When comparing options, build a simple cost picture for each one:
- Unit price — What does the toilet itself cost?
- Install parts/tools/labor — What additional parts or professional help do you need?
- Consumables — Cartridges, liners, barrier film, tank additives, drying medium — what does the toilet eat on an ongoing basis?
- Maintenance items — Seal kits, valve replacements, fan motors, impellers — what wears out?
- Power/fuel impacts — Does the toilet draw meaningful electricity or fuel? (Especially relevant for incinerating and macerating systems.)
Installation, Replacement, and Conversion Feasibility
Whether you’re replacing the same type of toilet or converting to an entirely different system, knowing what’s involved before you buy prevents expensive surprises. This section covers guide-level feasibility — not a full install manual for every model.
Basic replacement workflow (same-type swap)
Replacing your RV toilet with the same type (e.g., swapping one gravity flush for another) is a manageable DIY project for most RV owners:
- Measure the footprint and flange alignment. Your new toilet needs to match the bolt pattern and floor opening of the old one.
- Check bowl clearance, height, and door swing. Especially in tight RV bathrooms, a taller or wider bowl can interfere with the door or walls.
- Confirm water supply and power requirements. A gravity flush swap usually needs no electrical changes. Switching to a macerating or vacuum model does.
- Remove the old toilet and replace seals/hardware. Always use new flange seals — reusing old seals is a common leak source.
- Install the new unit, reconnect water, and test for leaks and flush function.
Safety note: Always follow the manufacturer’s installation instructions for your exact model. Disconnect the water supply before removing the old unit, and test thoroughly before regular use.
Conversion path examples (guide-level, not a full install manual)
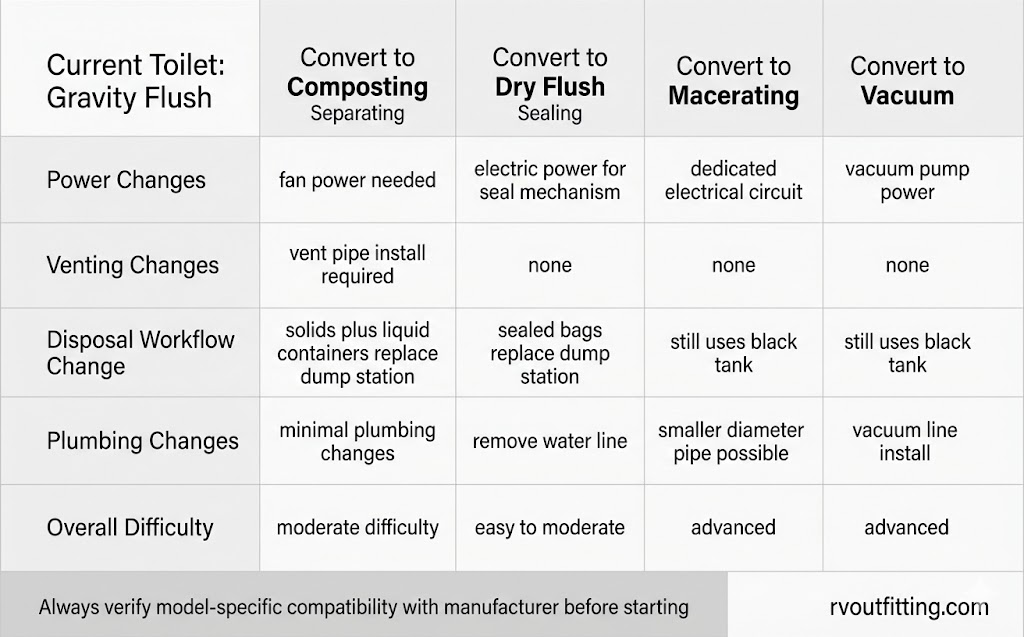
Gravity → composting/separating: Converting from gravity flush to a composting or separating toilet means your black tank usage changes significantly (it may no longer be needed for toilet waste). You’ll need to plan for vent and fan installation (most separating units require an exhaust vent to the outside), and your disposal workflow shifts from dump station visits to managing solid and liquid containers.
Gravity → dry flush/sealing: These conversions are often simpler from a plumbing perspective (no water line needed for the toilet), but you’ll need electrical power for the sealing mechanism and a plan for ongoing consumable storage and procurement.
Gravity → macerating/vacuum: This is the most complex conversion path. Macerating and vacuum systems require electrical wiring, potentially different plumbing diameters, and sometimes modifications to the waste tank system. Professional installation is worth considering for these conversions.
Not confirmed: model-specific retrofit steps and compatibility details for specific rigs. Always consult the manufacturer and, ideally, an RV technician familiar with your rig.
Tools and supplies checklist
Basic toolkit for most RV toilet replacements:
- Adjustable wrench
- Rubber gloves
- Bucket and towels (for residual water)
- New flange seal / gasket (match to your model)
- Plumber’s tape
- Optional: ABS pipe, pipe cutter, and connectors (if plumbing changes are needed)
- Manufacturer-specific hardware kit (if required by the new unit)
Maintenance and Troubleshooting by Toilet Type
Preventive maintenance is boring but effective. Most RV toilet failures come from skipped basics, not catastrophic part failures. This section covers the habits that keep things working and the first-response fixes when something goes wrong.
Maintenance habits that apply to most systems
Regardless of toilet type, a few universal habits prevent the majority of problems:
- Use the right supplies for your system. RV-safe toilet paper for black tank systems, the correct drying medium for composting, the right cartridge for dry flush — using the wrong consumable causes more issues than any mechanical failure.
- Keep seals and moving parts clean. Rubber seals dry out, valves accumulate buildup, and o-rings deteriorate. Periodic cleaning and lubrication (per manufacturer instructions) extends the life of every seal in the system.
- Follow your disposal workflow consistently. Skipping a tank treatment, letting a cassette overfill, or neglecting to empty a composting liquid container on schedule leads to odor, overflow, or damage.
- Inspect before you replace. When something smells off or a flush feels weak, check seals, connections, and user habits before assuming you need a new part.
Troubleshooting matrix (symptom → likely cause → first fix)
| Symptom | Likely Cause | First Fix |
|---|---|---|
| Bad odor (black tank systems) | Insufficient water in tank, dried-out bowl seal, inadequate tank treatment | Add water, check seal for drying/cracks, treat tank with recommended chemical |
| Bad odor (composting/separating) | Liquid in solids bin, fan not running, vent blocked | Check separation technique, verify fan operation, clear vent path |
| Weak flush / incomplete clearing | Low water pressure, partially clogged valve, mineral buildup | Check water system pressure, clean valve, descale if needed |
| Seal leak / water loss in bowl | Worn blade/ball valve seal | Replace seal per manufacturer instructions |
| Toilet not flushing (electric types) | Power connection issue, fuse blown, control board fault | Check power supply, inspect fuse, reset system |
| Vacuum system cycling issues | Vacuum leak, pump wear, seal failure in vacuum line | Check all vacuum connections for leaks, inspect pump |
| Macerator jam / noise issue | Foreign object in impeller, worn impeller, motor strain | Remove obstruction (power off first), inspect impeller |
| Composting fan failure / moisture imbalance | Fan motor burnout, wiring issue, excess liquid in solids | Replace fan, check wiring, improve separation discipline |
| Dry flush or sealing cycle error | Cartridge jam, depleted cartridge, mechanical fault | Check cartridge seating, replace if depleted, follow reset procedure |
| When to stop DIY and call service | Persistent electrical faults, vacuum system failures, macerator motor replacement, anything involving gas lines (incinerating models) | Contact the manufacturer or a qualified RV technician |
Black tank-specific problems to cover
The “poop pyramid”: This is exactly what it sounds like — a mound of dried waste that builds up directly below the toilet opening, eventually reaching the bowl. It happens when too little water is used during flushing or when the tank isn’t properly “charged” (pre-filled with water and treatment) before a trip. Prevention is simple: always add water to the tank before use, use plenty of water with each flush, and use a tank treatment product designed to break down solids.
Tank charging and chemical treatment: Before each trip (or when starting with an empty tank), add several gallons of water and a dose of tank treatment chemical to the black tank. This creates a liquid base that helps waste break down and prevents buildup. Popular treatment types include enzyme-based, chemical-based, and drop-in pod formats. (Use what’s recommended for your system; opinions vary on brand preference.)
Toilet paper compatibility: RV-safe (rapid-dissolve) toilet paper breaks down faster in a black tank than standard residential paper. The classic test: put a few sheets in a jar of water, shake, and see how quickly it disintegrates. If it doesn’t break down reasonably fast, it’s more likely to contribute to clogs and buildup.
Emergency fixes on the road
When something goes wrong mid-trip, your first priority is a safe temporary response — not a permanent repair.
First safe actions by toilet class:
- Gravity flush seal leak: Place a towel at the base, minimize use, and plan for a seal replacement at your next stop.
- Composting fan failure: Open a vent or window for airflow, reduce use frequency, and carry a spare 12V fan.
- Dry flush cartridge error: Follow the manufacturer’s reset procedure. If the cartridge is jammed, don’t force it — switch to a backup option.
- Macerator jam: Power off the toilet immediately. Do not attempt to clear the jam with the power connected.
- Vacuum system failure: If the vacuum pump stops, the toilet won’t flush. Switch to a backup portable toilet until you can diagnose the pump.
What to carry as a small sanitation repair kit:
- Spare flange seal / gasket for your toilet model
- Replacement 12V fan (for composting/separating systems)
- Extra cartridge (for dry flush systems)
- Basic hand tools (wrench, screwdriver, pliers)
- Rubber gloves, plastic bags, and cleaning spray
- A compact backup portable toilet (good insurance regardless of your primary system)
Clear limit: Model-specific emergency procedures are not confirmed in this guide. Always refer to your toilet’s owner manual for the manufacturer’s recommended troubleshooting steps.
Common Mistakes (What Not to Do)
Most RV toilet headaches trace back to avoidable errors made during buying, installation, or daily use. Here’s the prevention checklist.
Buying mistakes
Don’t do these:
- Choosing by upfront price only. A cheap toilet with expensive consumables costs more over a year than a pricier unit with low recurring costs. Always factor in OPEX.
- Ignoring disposal access where you camp. A dry flush system is great — unless you camp in areas where you can’t easily dispose of sealed waste bags. Match the toilet’s disposal workflow to your actual camping destinations.
- Ignoring power requirements for electric systems. Macerating, vacuum, dry flush, sealing, and incinerating toilets all need power. If your rig’s electrical system can’t support the load, you have a problem.
- Assuming all “composting” toilets work the same. The difference between a true composting system and a separating/drying system is significant for your expectations around maintenance, output, and disposal.
Installation mistakes
Don’t do these:
- Not checking fit, clearance, and height before ordering. Measure your bathroom space, door swing, and floor bolt pattern. An extra inch of bowl height can mean the door doesn’t close.
- Reusing worn seals. Always install fresh seals during a replacement. Old seals are the number one source of post-installation leaks.
- Skipping the leak test. After installing, run water through the system and check every connection before you trust it on the road.
- Ignoring venting requirements on non-traditional systems. Composting and some other systems require exterior venting. Skipping this step creates odor problems and moisture buildup.
Usage/maintenance mistakes
Don’t do these:
- Using the wrong paper or skipping proper waste management routines. Non-RV paper in a black tank, no tank treatment before a trip, or wrong medium in a composting system — these are all fast tracks to problems.
- Poor liquid/solid separation habits (separating systems). If liquid gets into the solids bin consistently, odor and breakdown issues follow. Technique matters, and all users in the household need to be on board.
- Ignoring early odor, noise, or leak symptoms. Small leaks become big leaks. Unusual sounds from a macerator mean something is wearing. Odor that wasn’t there before means a seal or a process has changed. Act early.
- Using universal disposal assumptions. “I can dump this anywhere” is never a safe assumption. Disposal rules for composting solids, sealed bags, and incinerator ash vary by jurisdiction.
Disposal, Compliance, and Travel Rules (Jurisdiction Check)
Here’s the uncomfortable truth: there is no single, universal rule for how you can dispose of waste from every RV toilet type. Rules vary by state, province, country, campground, and sometimes even by municipality. This section gives you a safe framework for checking — not a blanket legal answer.
What disposal rules can vary by location
- Composting/separating solids — Some locations allow disposal in trash; others require specific composting or waste facilities.
- Sealed bags from dry flush and sealing systems — Manufacturer guidance may say “dispose in regular trash,” but local waste authorities may have different rules.
- Incineration ash — Generally considered inert, but disposal policies still vary.
- Campground-specific policies — Individual parks and campgrounds may have their own rules about what goes in their dumpsters or dump stations.
- State, country, and local regulations — These are the ones that carry legal weight, and they are not consistent across borders.
Safe “check before you dump/dispose” workflow
- Check your product manufacturer’s guidance — Start with the official disposal recommendations for your specific toilet model.
- Check your local or state/provincial waste authority — Look up the rules for solid waste and sanitation in the jurisdiction where you’re camping.
- Check campground or park rules — Ask the host or check posted regulations. Don’t assume.
- Document the rule if traveling cross-border — If you’re moving between states or countries, the rules may change at the border. Keep a note of what’s allowed where.
Mini FAQ
What are the different types of RV toilets?
The main types are gravity flush, cassette, portable, composting/separating, macerating, vacuum flush, dry flush, sealing, auto-wrapping, incinerating, and smart sanitation systems. Each handles waste differently, and the best choice depends on your camping style, rig, and maintenance preferences.
How does an RV toilet work?
Most standard RV toilets use a gravity flush system: water rinses the bowl, a valve opens, and waste drops into the black holding tank below. Non-black-tank options work differently — composting toilets dry waste with media, dry flush toilets seal waste in cartridges, and incinerating toilets burn waste to ash.
What is the best RV toilet for boondocking?
Composting/separating, dry flush, and sealing toilets are the strongest options for boondocking because they don’t rely on dump station access or large amounts of water. The best choice among them depends on your budget for consumables, your comfort with the maintenance routine, and your disposal options.
Can you put a regular residential toilet in an RV?
Not without significant modifications. Residential toilets use more water, require a standard sewer connection, and aren’t designed for RV plumbing, floor structures, or holding tank systems. Purpose-built RV toilets are engineered for the constraints of mobile living.
What is a composting toilet in an RV?
A composting toilet (more accurately, a separating or drying toilet in most RV applications) separates liquids and solids. The solids are mixed with a drying medium like coconut coir, and a fan helps manage moisture and odor. Most compact RV units dry waste rather than fully composting it.
Is RV toilet paper necessary?
It’s strongly recommended for any toilet connected to a black tank. RV-safe (rapid-dissolve) toilet paper breaks down faster and reduces clog and buildup risk. Composting, dry flush, and sealing systems have their own paper/consumable guidelines — check the manufacturer’s recommendations.
How much water does an RV toilet use per flush?
It varies by toilet type and model. Gravity flush toilets use the most water per flush, vacuum flush systems use less, and composting, dry flush, sealing, and incinerating toilets use little to no water. Exact figures vary by model — check your toilet’s specifications.
What is the difference between a cassette toilet and a portable toilet?
A cassette toilet is permanently mounted with a removable waste tank (cassette) that slides out through an exterior door. A portable toilet is a completely freestanding, self-contained unit you can place anywhere. Cassette toilets are more integrated; portable toilets are more flexible but typically lower capacity.
How do you stop an RV black tank from smelling?
Use enough water with each flush, treat the tank with an appropriate chemical or enzyme product before and during use, keep the bowl seal in good condition, and ensure the tank vent is clear. Most black tank odor traces back to insufficient water, dried-out seals, or skipped tank treatment.
Are all RV toilets the same size?
No. RV toilets vary in footprint, bolt pattern, bowl height, and bowl shape. Always measure your existing space and floor bolt pattern before ordering a replacement, especially if switching brands or types.
How do you replace an RV toilet?
For a same-type swap: disconnect the water supply, unbolt the old toilet, remove it, clean the flange area, install a new flange seal, position the new toilet, bolt it down, reconnect water, and test for leaks. Always follow the specific manufacturer’s instructions for your model.
What is a macerating toilet?
A macerating toilet uses a motor-driven impeller to grind waste and toilet paper into a slurry before pumping it into the holding tank. This allows more flexible plumbing layouts and provides a more residential flushing experience, but requires electrical power and adds mechanical complexity.
Dometic vs Thetford: which brand is better?
Both are well-established, widely available RV toilet brands with strong parts and service networks. Dometic and Thetford each offer gravity, cassette, macerating, and other types. The “better” brand depends on which specific model fits your rig, budget, and feature preferences. Compare specific models rather than brand names.
How often should you dump an RV black tank?
It depends on tank size and how many people are using the system. A common guideline is to dump when the tank is about two-thirds full — dumping a partially full tank provides enough liquid volume to help flush the tank clean. Frequency can range from every few days (families) to once a week or longer (solo or couple).
What is a dry flush toilet?
A dry flush toilet wraps and seals each waste deposit into a contained packet using a proprietary cartridge. No water, no chemicals, no plumbing. You dispose of the sealed packets and replace the cartridge when it’s depleted. It’s popular with boondockers and van lifers who want to avoid dump stations entirely.
Final Recommendation Path
You’ve seen the full landscape. Here’s how to turn that knowledge into a buying decision without second-guessing yourself into paralysis.
3-step shortlist method
Step 1: Pick your waste-handling class first. Decide whether you want a collect-and-dump system (black tank or cassette), a bag-and-dispose system (dry flush, sealing), an on-site processing system (composting, incinerating), or a smart system. This single decision eliminates most options immediately.
Step 2: Eliminate by space, power, and disposal constraints. Does the toilet physically fit your bathroom? Does your rig have the electrical capacity for it? Can you reliably access the disposal method it requires where you camp? If any answer is no, move on.
Step 3: Compare your final two or three models by maintenance and cost workflow. At this point, you’re choosing between viable options. The tiebreaker is usually ongoing cost (consumables and maintenance) and how the daily routine feels to use.
Before-you-buy checklist
- Fit and bowl comfort — Measure your space. Sit on the model at a dealer if possible.
- Power and venting needs — Confirm your rig can support the toilet’s electrical and ventilation requirements.
- Consumable availability — Can you reliably get cartridges, liners, media, or additives where you travel? Check before you commit.
- Disposal legality where you travel — Confirm that you can legally dispose of the toilet’s waste output in your primary camping regions.
- Warranty, support, and parts availability — Check the manufacturer’s warranty terms and verify that replacement parts are accessible in your market.
If you’re outfitting your rig for the first time, pairing the right toilet with a solid water system setup and reliable electrical protection gives you a foundation that handles daily life comfortably and safely on the road.