RV Toilet Flushing Weak? How to Diagnose and Fix a Weak or Incomplete Flush
Last updated: February 2026
A weak RV toilet flush is one of the most common — and most fixable — problems RVers face, whether you’re hooked up at a campground or boondocking off-grid.
Quick Answer / Quick Start
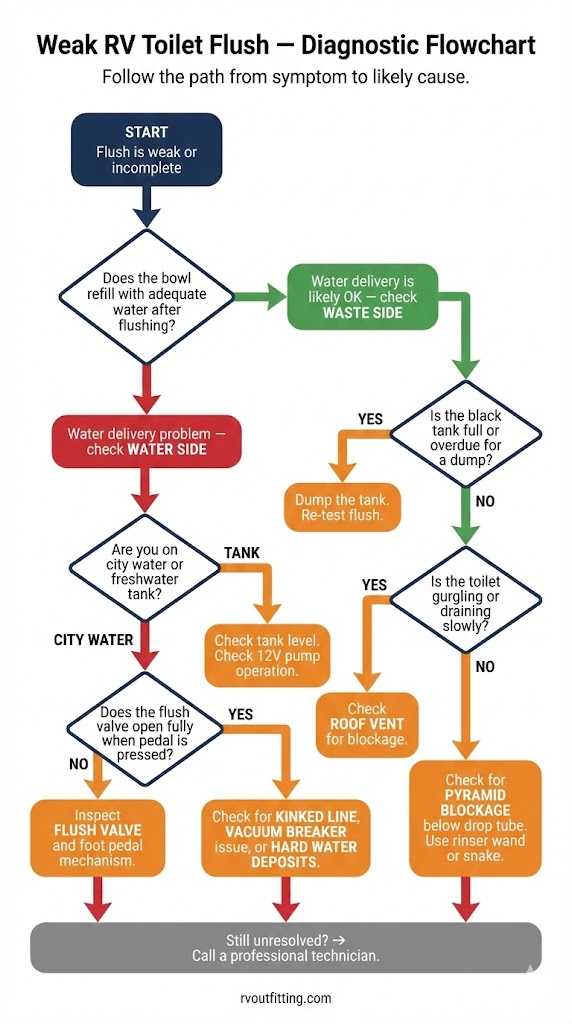
Most weak flush problems fall into one of two buckets: water-side flow issues (supply, pump, line, vacuum breaker, or valve) or waste-side resistance (clog, pyramid blockage, full tank, or blocked vent).
Before you start pulling things apart, run through this quick-start checklist:
- Check your water source. Are you on city water or running off your freshwater tank? Is the tank actually full enough to deliver pressure?
- Check the flush valve action. Press the foot pedal — does the valve open fully? Does water flow into the bowl at a normal rate?
- Check your black tank and vent. Is the tank overdue for a dump? Is the toilet gurgling or draining slowly after the flush?
- Note when it happens. Does the weak flush only show up when boondocking but work fine at hookups? That points to your water pump or freshwater supply, not the toilet itself.
- Look for bowl water loss. If the bowl won’t hold water between flushes, worn seals are likely involved.
Works at hookups but weak when boondocking? That’s almost always a water-supply or pump issue — not a clog or valve problem. Start with your freshwater tank level and pump performance before chasing anything else.
Here’s a quick symptom-to-action reference:
| Symptom | Likely Bucket | First Action |
|---|---|---|
| Weak flush overall | Water-side or waste-side | Run the reset procedure below |
| Weak only when boondocking | Water supply / pump | Check tank level + pump operation |
| Bowl won’t hold water | Seals / gaskets | Inspect flush valve seal |
| Gurgling after flush | Vent blockage | Check roof vent stack |
| Not flushing but not clogged | Flush valve / mechanism | Check valve opens fully |
Step-by-Step “Reset” Procedure (Fast Wins Before Deep Troubleshooting)
Before you chase complex causes or order parts, run through a structured reset. This baseline check catches the most common low-hanging issues and saves you from unnecessary disassembly.
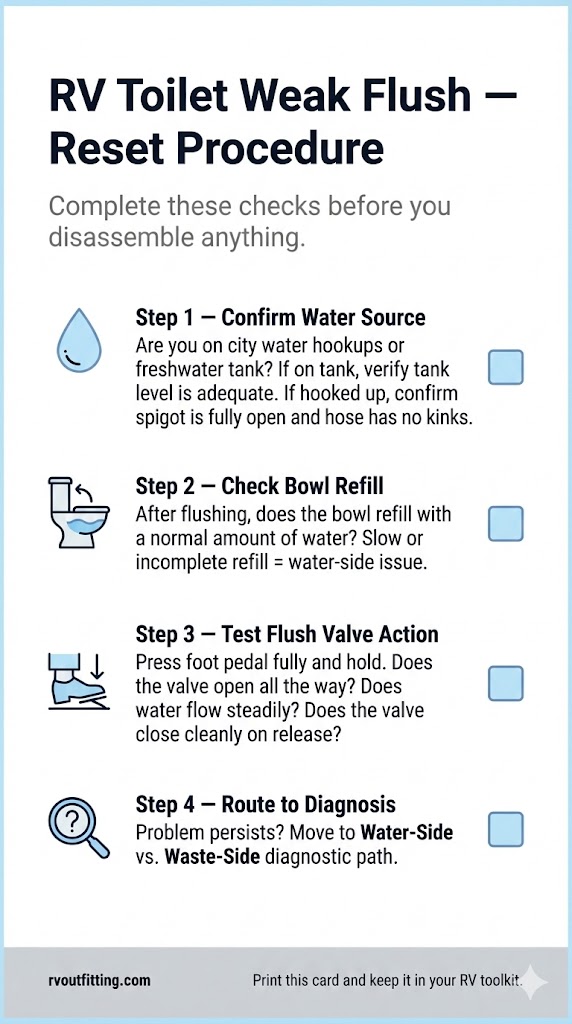
Reset Step Sequence (no disassembly first)
Step 1 — Confirm your water source context.
Are you on city water hookups or running off your freshwater tank? If you’re on your tank, confirm it has adequate water. If you’re hooked up, confirm the campground spigot is fully open and your hose has no kinks. Understanding which water source you’re using changes where you look first — a weak flush on city water points toward the toilet itself, while a weak flush on tank water could be upstream.
If you’re new to campground hookups, understanding how city water connections work can help you rule out supply-side problems fast.
Step 2 — Confirm whether the bowl refills normally.
After flushing, does the bowl refill with a reasonable amount of water? If refill is slow or incomplete, the issue is almost certainly water-side (supply, pump, valve, or line). If the bowl refills fine but the flush itself is weak, you may be dealing with waste-side resistance.
Step 3 — Confirm whether the flush action completes.
Press the foot pedal fully and hold it. Does the valve open all the way? Does the water flow steadily? Release the pedal — does the valve close cleanly? A valve that only partially opens or sticks mid-travel will produce a weak flush every time.
Step 4 — Route to deeper diagnosis if the problem persists.
If the reset checks don’t reveal an obvious fix, move on to the water-side vs. waste-side diagnostic below.
Troubleshooting Matrix (Symptom → Likely Cause → First Fix)
This matrix is designed to get you to the right answer fast. Find your symptom, check the likely cause, and start with the safest first fix.
Symptom rows to include
| Symptom | Likely Cause | First Fix |
|---|---|---|
| Weak flush overall | Water-side (low supply, pump, valve) or waste-side (clog, full tank) | Run reset procedure; split into water-side vs. waste-side checks |
| Toilet not flushing but not clogged | Flush valve not opening fully; water-side flow restriction | Inspect foot pedal mechanism and valve travel |
| Bowl not holding water | Worn flush valve seal or gasket | Inspect seal condition; lubricate or replace |
| Gurgling when flushing | Clogged or obstructed roof vent stack | Check vent for debris or blockage |
| Flush weak at hookups | Valve, vacuum breaker, or hard water deposits | Inspect valve, test vacuum breaker, check for scale |
| Flush weak only when boondocking | Low freshwater tank or underperforming water pump | Verify tank level and pump operation |
Diagnosing a Weak Flush: Water Problem or Waste Problem?
Getting this branch right saves you from chasing the wrong fix. A water-side issue means not enough water is reaching the bowl. A waste-side issue means something downstream is blocking or slowing the flush.
Water-side indicators
These signs point to a problem with water delivery to the toilet:
- Empty or low freshwater tank. The most obvious cause when boondocking. No water in, no flush power out.
- Water pump not running or underperforming. If you don’t hear the pump kick on, or if water dribbles instead of flowing, the pump is suspect.
- Kinks or obstructions in the water line. A bent supply hose behind the toilet or a pinched line in the wall can choke flow without being visible.
- Broken or seized flush valve. If the valve doesn’t open fully when you press the pedal, water can’t enter the bowl at the volume needed for a strong flush.
Waste-side indicators
These signs point to a problem below or downstream of the toilet:
- Pyramid blockage in the black tank. Solid waste builds up directly below the drop tube, eventually blocking the path. The flush looks weak because waste has nowhere to go.
- Full waste tank or sensor failure. A full black tank resists flow. And if your sensors read “empty” when the tank is actually full, you might not even realize it.
- Clogged air vent. The roof vent stack lets air into the system so waste can flow freely. A blocked vent creates back-pressure that slows or weakens the flush.
Weak flush vs slow flush
These two feel similar but often have different causes.
A weak flush typically means the water entering the bowl lacks volume or pressure — the flush fires but doesn’t have enough force. This usually points toward water-side issues like a valve not opening fully, low supply, or pump problems.
A slow flush typically means water enters fine, but waste drains sluggishly or incompletely. This usually points toward waste-side resistance: a clog, a full tank, or a vent blockage creating back-pressure.
Working rule: Weak → check water and valve first. Slow → check tank, clogs, and vent first.
How RV Toilets Work (Gravity vs Macerating vs Electric vs Composting/Separation)
Understanding which type of toilet you have changes how you troubleshoot a weak flush. What counts as “weak” and where to look first depends on the system.
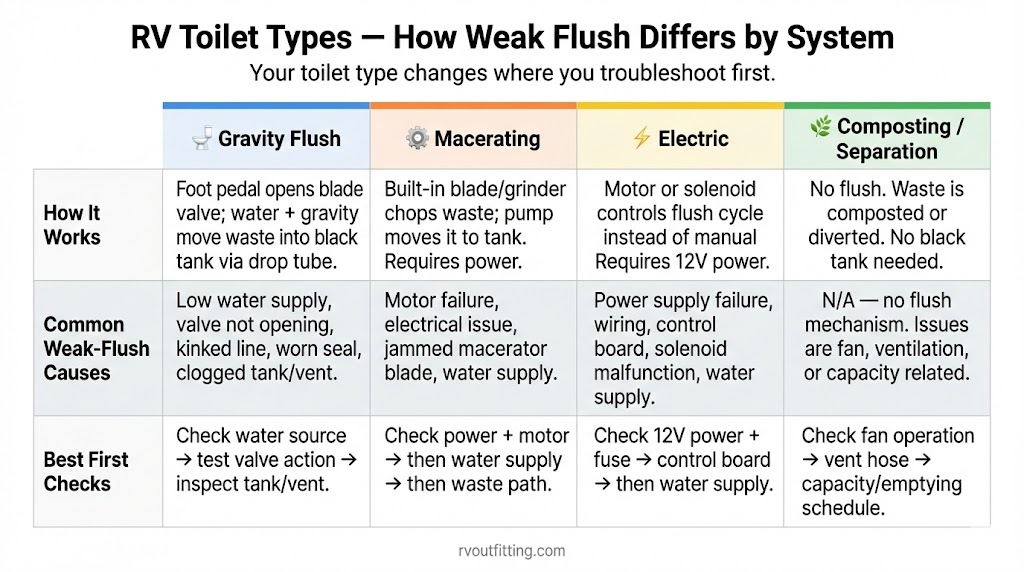
Gravity flush toilets
Gravity flush toilets are the most common type in RVs. You press the foot pedal, which opens a blade valve (or slide valve) at the bottom of the bowl. Water flows in from the supply line, and gravity pulls waste through the valve opening and down the drop tube into the black tank.
A weak flush on a gravity toilet almost always comes back to either not enough water reaching the bowl or the valve not opening fully. The rough-in distance — the measurement from the wall to the center of the drain — matters when replacing a gravity toilet, but it doesn’t typically affect flush strength.
Macerating toilets
Macerating toilets use a built-in blade or grinder to chop waste before pumping it to the tank. Because they use a pump, weak flush troubleshooting is different — you need to consider electrical connections, the macerator motor, and pump function in addition to water supply.
If you have a macerating toilet with a weak flush, check the electrical system and motor operation before chasing water-side causes.
Electric toilets
Electric flush toilets use an electric motor or solenoid to control the flush cycle instead of (or in addition to) a foot pedal. Troubleshooting a weak flush on an electric model includes a dedicated electrical branch: check the power supply, wiring connections, control board, and motor function.
Electric toilet-specific troubleshooting is a specialized topic. If basic water and waste checks don’t resolve the issue, professional help is often the most efficient path.
Composting & separation toilets as alternatives
If recurring weak flush problems are driving you toward an upgrade, composting and separation toilets eliminate the flush-and-tank system entirely. Examples include Nature’s Head, Air Head, OGO Origin, and Trelino.
These are worth considering as a long-term solution if you’re tired of fighting gravity flush issues, especially for full-time boondockers. Detailed pros and cons of each model are beyond the scope of this guide. Not confirmed in the provided outline/dossier.
Water Flow Issues That Cause a Weak Flush
Water delivery problems are the most common root cause of a weak RV toilet flush. Work through these checks systematically.
Empty water tank / low water supply
This one sounds obvious, but it catches more people than you’d expect — especially when boondocking. If your freshwater tank is low, there simply isn’t enough supply pressure to deliver a strong flush.
Before troubleshooting anything else off-grid, confirm your tank level. If you’re managing water carefully while boondocking off your freshwater tank, a weak flush might just mean it’s time to refill.
12V water pump not working (or underperforming)
Your RV’s 12V water pump is what delivers pressure when you’re not connected to city water. If the pump isn’t cycling on when you press the flush pedal, or if it runs but delivers a weak stream, the pump is a prime suspect.
Listen for the pump when you activate the flush. No sound at all could mean a blown fuse, bad connection, or failed pump. A pump that runs but delivers low flow could be worn or losing prime.
If you suspect pump failure, this is a good place to call in professional help rather than attempting electrical diagnosis yourself. For more on RV water pump performance, see our guide to the best RV water pumps for reliable pressure.
Kinks or obstructions in the water line
A kinked supply line is an easy-to-miss cause. Check behind the toilet where the water line connects — these lines can get bent during installation, after bumpy travel, or when items shift in storage.
Follow the supply line as far as you can access it. A crescent wrench can help you disconnect fittings for a closer inspection if needed.
Vacuum breaker diagnostics
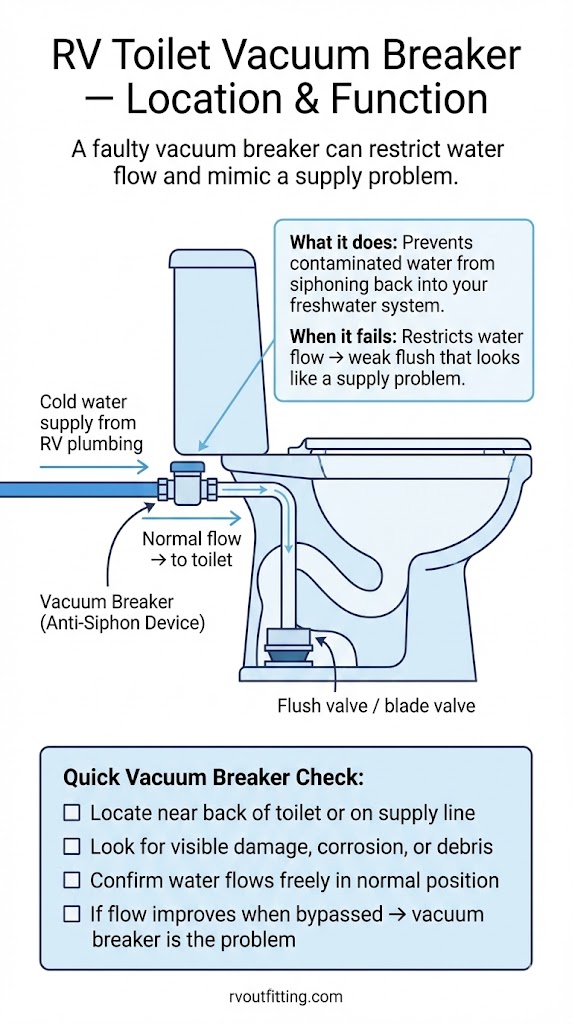
The vacuum breaker is a small anti-siphon device typically located on or near the toilet’s water supply connection. Its job is to prevent contaminated water from being siphoned back into your freshwater system.
When a vacuum breaker malfunctions, it can restrict water flow to the toilet, mimicking a supply problem. Here’s a basic check:
- Locate the vacuum breaker (usually near the back of the toilet or on the supply line).
- Look for visible damage, corrosion, or debris.
- Confirm that water flows freely when the device is in normal operating position.
- If flow improves when the vacuum breaker is bypassed or removed for testing, it’s likely the culprit.
Hard water deposits restricting flow
Over time, hard water can leave mineral deposits inside the supply line, valve body, and rim jets of your RV toilet. These deposits gradually restrict flow and reduce flush strength — the decline is slow enough that you may not notice until it’s significant.
CLR (Calcium, Lime, and Rust remover) is one product sometimes mentioned for addressing mineral buildup, but use caution: always confirm compatibility with your toilet’s materials before applying any chemical cleaner. Some RVers also recommend using a water softener at the campground hookup as a preventive measure to reduce hard water exposure over time.
Stuck or Faulty Flush Valve (and Flush Mechanism)
The flush valve is where water delivery meets bowl evacuation. If it’s not working properly, even good water pressure won’t produce a strong flush.
Blade/slide valve not opening fully
Most gravity flush RV toilets use a blade valve (sometimes called a slide valve) at the bottom of the bowl. When you press the foot pedal, a linkage opens this valve to let water and waste drop into the tank below.
If the valve only opens partway — due to a stiff linkage, debris in the track, or a worn foot pedal mechanism — the flush will be weak even though water supply is fine. The foot pedal mechanism itself is a common failure point; the spring or linkage can wear, bend, or disconnect over time.
Broken or seized flush valve
A stuck valve may open partway or not at all, and you’ll feel resistance or stiffness in the pedal. A broken valve may feel loose, fail to seal, or visibly show cracks or damage.
If the valve is seized and won’t move with gentle effort, or if it’s cracked or warped, replacement is typically the right call. Forcing a stuck valve risks damaging the toilet body.
Seal lubricant/conditioner use
Regular seal conditioning can help prevent valve stiffness and seal degradation. Thetford Toilet Seal Lubricant & Conditioner is a silicone-based product specifically designed for RV toilet seal conditioning and lubrication. Applying it periodically helps keep the blade valve sliding smoothly and the seal pliable.
Clogs and Blockages Behind a Weak Flush
When water delivery is fine but the flush is still weak or incomplete, the problem is likely downstream. Here’s how to address clogs safely.
Using a plunger (RV-specific)
Can you use a plunger on an RV toilet? Yes — but use an RV-specific plunger, not a standard household plunger. RV toilet seals and valve mechanisms are more delicate than residential fixtures. A plunger designed for RV use applies enough force to clear a blockage without damaging the flush valve seal or the blade valve itself.
Go easy. Aggressive plunging can unseat seals or crack the valve housing.
Toilet snake (flexible)
If a plunger doesn’t clear the blockage, a flexible toilet snake can reach deeper into the line. Use a snake specifically designed for RV plumbing — it’s more flexible and less likely to damage the drop tube or tank fittings.
A snake is your next step when a plunger can’t reach the obstruction, or when you suspect the blockage is below the valve rather than at the opening.
Rinser wand / flush wand and built-in black tank flush
These are two different tools that serve similar purposes:
- A rinser wand (or flush wand) is a handheld tool you insert through the toilet opening into the black tank to spray and break up waste buildup.
- A built-in black tank flush is a fixed system with a port on the outside of the RV that connects to a hose and sprays water inside the tank through a permanently installed nozzle.
Both help clear blockages and clean tank walls, but they work differently. A wand gives you more direct control; a built-in flush is more convenient for routine maintenance.
Home-methods people try
RVers have a range of DIY methods for clearing clogs:
- Hot water method. Pouring several gallons of hot (not boiling) water into the bowl and letting it sit can help soften and break up blockages. Avoid boiling water, which could damage seals or the toilet bowl itself.
- Baking soda and vinegar. A common home remedy — pour baking soda into the bowl, add vinegar, and let the fizzing action work on the clog. Effectiveness varies.
- Ice cube method. Fill the bowl and tank with ice cubes, add water, and drive. The agitation from driving is supposed to help break up buildup inside the tank.
- RV-safe chemical treatments. Products like Camco TST, Porta Pak, Aqua-Kem, Unique Camping & Marine, and Happy Campers are formulated to be safe for RV plumbing and tank systems.
Important: Do not use household drain cleaners in your RV toilet. See the “What NOT to Do” section below for why.
Worn Seals and Gaskets (Including Bowl Won’t Hold Water)
Seal and gasket condition directly affects both flush strength and bowl water retention.
Signs of worn seals/gaskets
Why does my RV toilet bowl not hold water? The most common reason is a worn or dried-out flush valve seal. When the seal no longer makes a tight closure, water slowly leaks past the valve and into the black tank.
This doesn’t just mean a dry bowl between uses — it also means the bowl can’t hold enough water during the flush cycle to create a strong, complete flush. Less water in the bowl at flush time equals a weaker flush.
Other signs include visible cracking or hardening of the rubber seal, water stains below the toilet, or a faint sewer smell in the bathroom.
Seal replacement
If the seal is worn, dried, cracked, or no longer pliable, replacement is the fix. Seal replacement is a straightforward repair for most gravity flush toilets, and replacement seals are widely available for common brands.
Seal maintenance schedule
Regular seal conditioning (see the Thetford Seal Lubricant section above) extends seal life and prevents the drying and cracking that lead to weak flushes and water loss.
As for a specific replacement interval — not confirmed in the provided outline/dossier. A reasonable approach is to inspect seals at the start of each camping season and replace when you see visible wear or loss of bowl water retention.
Black Tank Problems That Affect Flush Performance
Sometimes the toilet itself is fine — the problem is in the tank below it.
Pyramid blockage / poop pyramid
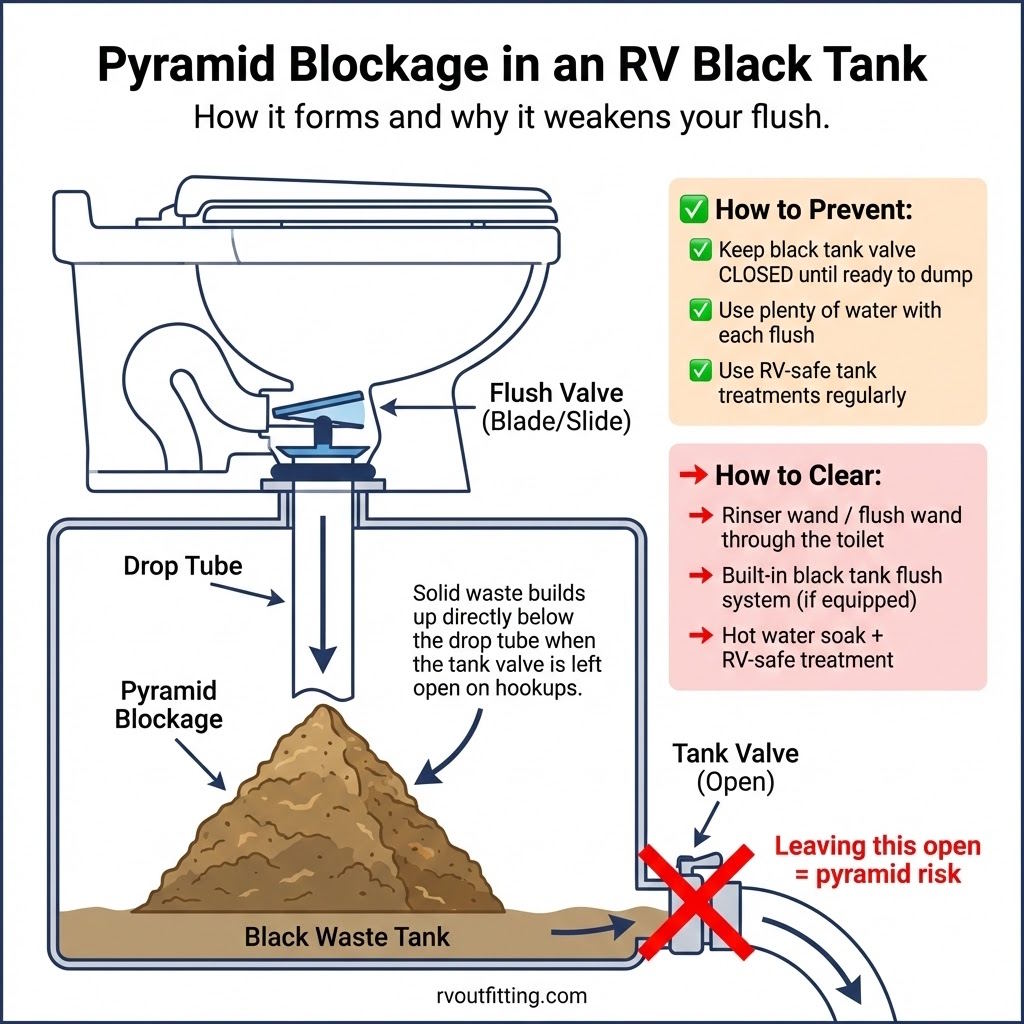
A pyramid blockage (sometimes called a “poop pyramid”) happens when solid waste accumulates directly below the drop tube, building up into a mound that eventually blocks the opening. This typically occurs when the black tank valve is left open while on hookups, allowing liquids to drain away while solids stack up.
Signs include a weak or incomplete flush, waste visible near the valve opening, or the toilet backing up.
Prevention: keep the black tank valve closed until the tank is ready to dump, and always use plenty of water with each flush.
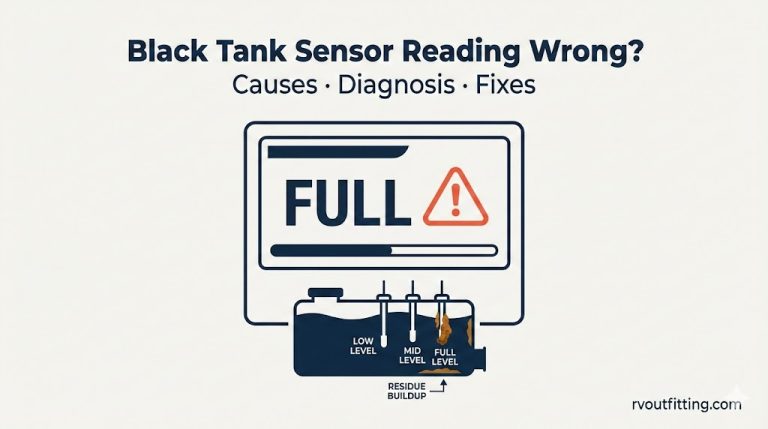
Full waste tank vs sensor failure
How do I know if my RV black tank is full? Your tank level sensors should tell you — but standard RV tank sensors are notoriously unreliable. Waste and residue coat the sensor probes, giving false readings (often reading “full” when the tank is partially empty, or “empty” when it’s actually full).
If your sensors say there’s room but the flush is weak and slow, the tank may be fuller than reported.
One trending upgrade is the SeeLevel tank monitor by Garnet Instruments, which uses external sensors mounted on the outside of the tank wall. These aren’t affected by internal buildup and tend to give more accurate readings.

Clogged air vent (vent stack issue)
Why does my RV toilet gurgle when I flush? A gurgling sound usually means the vent stack on your RV’s roof is partially or fully blocked. The vent allows air into the tank system so waste and water can flow freely. When it’s blocked — by leaves, insect nests, or debris — the system can’t equalize pressure, leading to slow draining, weak flushing, and gurgling noises.
Check the roof vent opening for visible obstructions.
Sensor upgrade trend
External tank sensors like the SeeLevel system have been gaining traction among RVers (noted as trending in mid-2025), and some manufacturers — such as Brinkley RV — have been adopting updated sensor systems in newer models. These are trend signals rather than confirmed universal changes, but they reflect growing recognition that standard sensor reliability is a pain point.
Prevention and Maintenance Tips
The best fix for a weak flush is never having one. These habits keep the system working the way it should.
RV-safe / quick-dissolve toilet paper
What’s the best toilet paper for RV toilets? Use toilet paper labeled as RV-safe or quick-dissolve. This type breaks down much faster than standard household toilet paper, reducing the risk of clogs and buildup in the black tank.
If you’re not sure whether your current toilet paper qualifies, drop a few sheets in a jar of water and shake it. RV-safe paper should begin breaking apart quickly.
Tank treatment options
Regular tank treatments help break down waste and control odor. Named examples from the RV space include:
- Happy Campers — a mineral-based tank treatment
- Camco TST
- Porta Pak
- Aqua-Kem
- Unique Camping & Marine
Choose a treatment compatible with your system and use it consistently, especially in warm weather when odor and buildup accelerate.
Prevent hard-water buildup (if applicable)
If you camp in areas with hard water, mineral deposits can accumulate inside your toilet’s supply line, valve, and rim jets over time. This is the same issue covered in the water flow section above.
A portable water softener at the campground hookup can reduce mineral content before it ever reaches your RV plumbing — a preventive step that pays off over seasons of use.
Keeping your freshwater system clean also matters. If you haven’t flushed and sanitized your freshwater tank recently, sediment and mineral buildup in the lines can contribute to flow issues at every fixture, including the toilet.
What NOT to Do (Costly Mistakes to Avoid)
Knowing what to avoid is just as important as knowing what to do. These mistakes can turn a simple weak flush into an expensive repair.
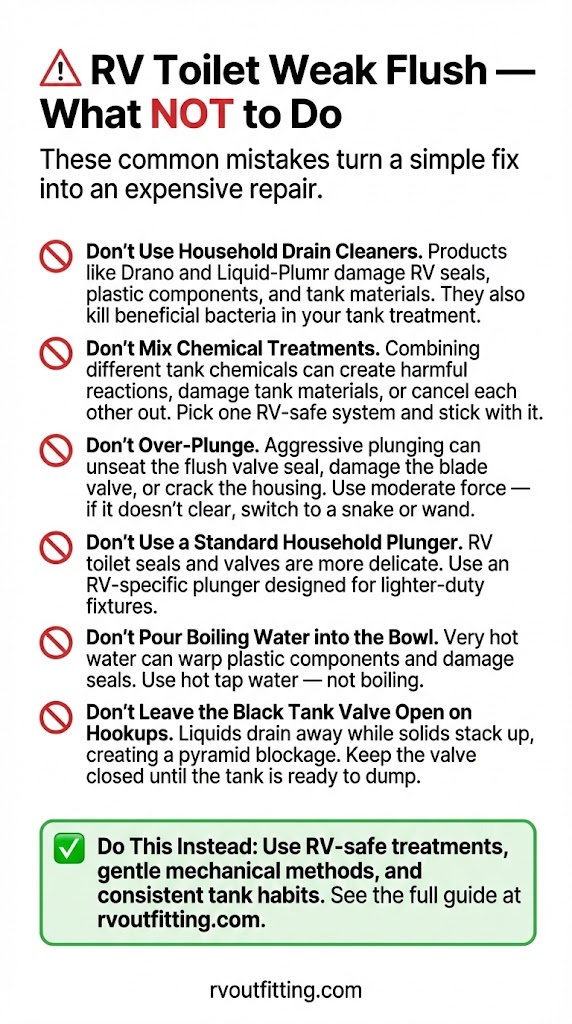
Household drain cleaner in an RV toilet
Can I use household drain cleaner in an RV toilet? No — avoid household drain cleaners like Drano or Liquid-Plumr in your RV. These products are formulated for residential plumbing and can damage RV toilet seals, plastic components, and black tank materials. They may also kill beneficial bacteria in your tank treatment, making waste breakdown less effective.
Stick to RV-safe treatments and the mechanical methods outlined above.
Mixing chemicals / using non-RV-safe treatments
Don’t mix different chemical treatments in your black tank. Combining products can create reactions that damage tank materials, produce harmful fumes, or simply cancel each other out. Pick one RV-safe treatment system and use it consistently.
Over-plunging / damaging seals or valves
Aggressive plunging can unseat the flush valve seal, damage the blade valve, or crack the valve housing. If a few moderate plunges don’t clear the blockage, switch to a flexible snake or rinser wand instead of increasing force. Protecting seals and valve components now prevents a bigger repair later.
When to Replace Your RV Toilet (Repair vs Replace vs Upgrade)
At some point, repeated fixes stop making sense. Here’s how to think about the decision.
Repair vs replace decision framework
Consider replacement over repair when:
- The flush valve and seals need replacement for the second or third time in a short period
- The toilet body is cracked, warped, or corroded
- Weak flush problems keep returning despite addressing water supply, valve, and tank issues
- Tank sensor frustrations are adding to the overall headache
- The cost of parts and labor for the next repair approaches the cost of a new unit
Specific cost thresholds for repair vs. replace decisions: not confirmed in the provided outline/dossier. Prices vary by toilet type, brand, and whether you DIY or hire a technician.
Upgrade options: macerating/electric vs composting/separation
Can switching toilet types permanently solve weak flush problems? In many cases, yes — but the right upgrade depends on how you camp.
- Macerating or electric toilets can deliver stronger, more consistent flushes and handle waste differently than gravity models. They add complexity (electrical components, motors) but eliminate some gravity-flush-specific issues.
- Composting and separation toilets eliminate the flush-and-tank system entirely. No black tank means no pyramid clogs, no sensor failures, and no flush valve seals to maintain.
Recent activity in this space includes Thetford’s S-series separation toilets (launched mid-2025) and updated guides and demos from composting brands like Air Head (January 2026 update) and OGO Origin (demos from early 2025). These signals suggest the separation/composting category is maturing with more options for RVers considering a switch.
When to Seek Professional Help
Not every weak flush is a DIY fix. Here’s when calling a technician is the smarter move.
Symptoms that justify pro help
Bring in a professional when you’re dealing with:
- Persistent vent issues you can’t resolve from the roof vent opening
- Electric toilet-specific problems involving wiring, control boards, or motor function
- Suspected water pump failure — especially if you’re not comfortable working with 12V electrical systems
- Recurring pyramid blockages that keep coming back despite good habits and tank treatments
- Any situation where you’ve worked through the diagnostic steps above and the problem persists
When you call, tell the technician what you’ve already checked and ruled out. It saves time and helps them zero in on the actual cause.
Electrical safety in your RV is always worth taking seriously. For a broader look at protecting your rig’s systems, our guide to RV electrical safety tips covers the essentials.
Mini FAQ (PAA)
Why is my RV toilet flushing weak?
Most weak flushes trace back to either a water delivery problem (low supply, weak pump, blocked line, faulty valve) or a waste-side issue (clog, full tank, blocked vent). Start with the reset procedure above to narrow it down.
How do I increase the flush power on my RV toilet?
First, make sure your water supply is adequate and your flush valve opens fully. Address any kinks in the supply line, check the vacuum breaker, and clean out hard water deposits if present. On the waste side, clear any clogs and make sure the vent stack is open.
Why is my RV toilet not flushing but not clogged?
This usually points to the flush valve or water supply. The valve may not be opening fully due to a worn pedal mechanism, or the water line may be kinked or restricted. Check valve travel and water flow before assuming it’s a clog.
Can you use a plunger on an RV toilet?
Yes, but use an RV-specific plunger and go easy. Standard household plungers and aggressive force can damage the flush valve seal and blade valve.
Will baking soda and vinegar unclog an RV toilet?
It can help with minor blockages. Pour baking soda into the bowl, add vinegar, and let the fizzing action work. For stubborn clogs, you’ll likely need a flexible snake or rinser wand.
How do I fix a stuck flush valve on my RV toilet?
Check the foot pedal linkage first — it may be bent, disconnected, or worn. If the valve itself is seized, a silicone-based seal lubricant may free it. If it’s cracked or broken, replacement is typically needed.
Why does my RV toilet bowl not hold water?
The flush valve seal is most likely worn, dried out, or cracked. When the seal can’t hold a tight closure, water slowly leaks past into the black tank.
How do you manually flush an RV toilet?
On most gravity flush toilets, pressing the foot pedal opens the valve and lets water flow. If the foot pedal mechanism fails, you can pour water directly into the bowl to create a gravity flush — the valve may need to be opened manually.
What causes a pyramid clog in an RV black tank?
Leaving the black tank valve open while on hookups. Liquids drain away continuously, but solids accumulate below the drop tube and build up into a pyramid-shaped blockage.
How often should I replace my RV toilet seal?
Not confirmed in the provided outline/dossier. Inspect at the start of each season and replace when you notice the bowl losing water, visible seal cracking, or reduced flush performance.
Can I use household drain cleaner in an RV toilet?
No. Household drain cleaners can damage seals, plastic components, and tank materials. Use only RV-safe treatments and mechanical clearing methods.
Why does my RV toilet gurgle when I flush?
Gurgling usually indicates a blocked or partially blocked vent stack on the roof. The system can’t equalize air pressure, which slows drainage and causes the sound.
What’s the best toilet paper for RV toilets?
Use toilet paper labeled RV-safe or quick-dissolve. It breaks down faster than standard paper and reduces the risk of clogs and buildup.
How do I know if my RV black tank is full?
Check your tank level sensors, but know that standard sensors are often inaccurate due to buildup on the probes. If readings seem off, external sensor upgrades like SeeLevel monitors provide more reliable data.
Is it worth upgrading to a composting toilet in an RV?
It depends on how you camp. Composting and separation toilets eliminate the black tank entirely, which removes pyramid clogs, sensor issues, and flush valve maintenance. They’re especially popular with full-time boondockers. Newer options like Thetford’s S-series separation toilets are expanding the choices available.